OAuth2.0介绍
OAuth(开放授权)是一个开放标准,允许用户授权第三方应用访问他们存储在另外的服务提供者上的信息,而不需要将用户名和密码提供给第三方应用或分享他们数据的所有内容。OAuth2.0是OAuth协议的延续版本,但不向后兼容OAuth 1.0即完全废止了OAuth1.0。很多大公司如Google,Yahoo,Microsoft等都提供了OAUTH认证服务,这些都足以说明OAUTH标准逐渐成为开放资源授权的标准。
Oauth协议目前发展到2.0版本,1.0版本过于复杂,2.0版本已得到广泛应用。
spring-cloud-starter-oauth2
spring-cloud-starter-oauth2 是对OAuth2的一种实现,并且跟我们之前学习的Spring Security相辅相成,与Spring Cloud体系的集成也非常便利,接下来,我们需要对它进行学习,最终使用它来实现我们设计的分布式认证授权解决方案。
OAuth2.0的服务提供方涵盖两个服务,即授权服务 (Authorization Server,也叫认证服务) 和资源服务 (Resource Server),使用 spring-cloud-starter-oauth2 的时候你可以选择把它们在同一个应用程序中实现,也可以选择建立使用同一个授权服务的多个资源服务。
认证授权服务 (Authorization Server) 应包含对接入端以及登入用户的合法性进行验证并颁发token等功能,对令牌的请求端点由 Spring MVC 控制器进行实现,下面是配置一个认证服务必须要实现的endpoints:
AuthorizationEndpoint 服务于认证请求。默认 URL: /oauth/authorize 。
TokenEndpoint 服务于访问令牌的请求。默认 URL: /oauth/token 。
资源服务 (Resource Server) 应包含对资源的保护功能,对非法请求进行拦截,对请求中token进行解析鉴权等,下面的过滤器用于实现 OAuth 2.0 资源服务:
OAuth2AuthenticationProcessingFilter 用来对请求给出的身份令牌解析鉴权。
环境搭建
新建auth-server服务
pom
<dependency>
            <groupId>org.springframework.cloud</groupId>
            <artifactId>spring-cloud-starter-security</artifactId>
        </dependency>
        <dependency>
            <groupId>org.springframework.cloud</groupId>
            <artifactId>spring-cloud-starter-oauth2</artifactId>

        </dependency>
sql脚本
DROP TABLE IF EXISTS `t_user` ;

CREATE TABLE `t_user` (
  `id` BIGINT (20) NOT NULL COMMENT '用户id',
  `username` VARCHAR (64) NOT NULL COMMENT '用户登录账号',
  `password` VARCHAR (64) NOT NULL COMMENT '用户登录密码',
  `fullname` VARCHAR (255) NOT NULL COMMENT '用户姓名',
  `mobile` VARCHAR (11) DEFAULT NULL COMMENT '手机号',
  PRIMARY KEY (`id`) USING BTREE
) ENGINE = INNODB DEFAULT CHARSET = utf8mb4 ROW_FORMAT = DYNAMIC COMMENT = '用户表' ;

/*Data for the table `t_user` */
INSERT INTO `t_user` (
  `id`,
  `username`,
  `password`,
  `fullname`,
  `mobile`
)
VALUES
  (
    1,
    'zhangsan',
    '$2a$10$o/FkX0ss2mr6ligiO6AP9.z8ecTiBhJpqjew.iEGq4.s.V8r1UKRa',
    '张三',
    '16680804545'
  ),
  (
    2,
    'lisi',
    '$2a$10$InoDpP3VaYFNEPBbNrE3fOiEWFYgvIVLkuG/BzKF8jiPLjItGGFN6',
    '李四',
    '16680804545'
  ) ;
代码
import org.springframework.boot.SpringApplication;
import org.springframework.boot.autoconfigure.SpringBootApplication;


@SpringBootApplication
public class AuthApplication {
    public static void main(String[] args) {
        SpringApplication.run(AuthApplication.class, args);
    }
}
实体类
@Data
@AllArgsConstructor
@NoArgsConstructor
@TableName("t_user")
public class User {
    private Long id;
    private String username;
    private String password;
    private String fullname;
    private String mobile;
}
@Getter
public class MyUserDetails extends User {

    /**
     * 这里我只用简单的 用户名 密码  权限集合
     *
     *
     * @param username
     * @param password
     * @param authorities
     */
    public MyUserDetails(String username, String password, Collection<? extends GrantedAuthority> authorities) {
        super(username, password, authorities);
    }
}
mapper,service
@Mapper
@Repository
public interface UserMapper extends BaseMapper<User> {
}
@Service
public class UserDetailsServiceImpl implements UserDetailsService {

    @Autowired
    private UserMapper userMapper;

    @Override
    public UserDetails loadUserByUsername(String username) throws UsernameNotFoundException {

        User user = userMapper.selectOne(new QueryWrapper<User>().eq("username", username));
        if (StringUtils.isEmpty(user)) {
            throw new UsernameNotFoundException("用户不存在");
        }

        //我这里弄一个简单的权限集合,真实的开发中是要查询数据库的
        List<GrantedAuthority> atuh = AuthorityUtils.commaSeparatedStringToAuthorityList("admin,p1");

        //从数据库查出的用户信息赋值给security框架中user对象
        return new MyUserDetails(
                user.getUsername(),
                user.getPassword(),
                atuh
        );
    }
}
controller
@RestController
public class LoginController {

    @RequestMapping(value = "/login-success", produces = {"text/plain;charset=utf-8"})
    public String loginSuccess() {
        String username = getUsername();
        return username + " 登录成功";
    }

    /**
     * 获取当前登录用户名
     *
     * @return
     */
    private String getUsername() {
        Authentication authentication = SecurityContextHolder.getContext().getAuthentication();
        if (!authentication.isAuthenticated()) {
            return null;
        }
        Object principal = authentication.getPrincipal();
        String username = null;
        if (principal instanceof org.springframework.security.core.userdetails.UserDetails) {
            username =
                    ((org.springframework.security.core.userdetails.UserDetails) principal).getUsername();
        } else {
            username = principal.toString();
        }
        return username;
    }

}
WebSecurityConfig
@Configuration
@EnableGlobalMethodSecurity(securedEnabled = true, prePostEnabled = true)
public class WebSecurityConfig extends WebSecurityConfigurerAdapter {

    /**
     * 密码编码器
     *
     * @return
     */
    @Bean
    public PasswordEncoder passwordEncoder() {
        return new BCryptPasswordEncoder();
    }

    /**
     * 安全拦截机制(最重要)
     *
     * @param http
     * @throws Exception
     */
    @Override
    protected void configure(HttpSecurity http) throws Exception {
        http
                .csrf().disable();
        http
                .authorizeRequests()
                .antMatchers("/r/r1").hasAnyAuthority("p1")
                .anyRequest().authenticated();
        http
                //允许表单登录
                .formLogin()
                //自定义登录成功的页面地址
                .successForwardUrl("/login-success");
    }
}
访问 http://localhost:8080/auth/login 输入正确的用户名和密码,登录成功
刚才的写的auth服务,现在有一个平台A想通过auth服务拿到张三的个人信息。
认证授权服务器配置
AuthorizationServerConfigurerAdapter
AuthorizationServerConfigurerAdapter要求配置以下几个类,这几个类是由Spring创建的独立的配置对象,它们会被Spring传入AuthorizationServerConfigurer中进行配置。
public class AuthorizationServerConfigurerAdapter implements AuthorizationServerConfigurer {
    public AuthorizationServerConfigurerAdapter() {
    }
    public void configure(AuthorizationServerSecurityConfigurer security) throws Exception {
    }
    public void configure(ClientDetailsServiceConfigurer clients) throws Exception {
    }
    public void configure(AuthorizationServerEndpointsConfigurer endpoints) throws Exception {
    }
}
上面这个AuthorizationServerConfigurerAdapter是框架写好的,我们重写它的方法‘
授权码模式
ClientDetailsServiceConfigurer 用来配置客户端详情服务(ClientDetailsService),客户端详情信息在这里进行初始化,你能够把客户端详情信息写死在这里或者是通过数据库来存储调取详情信息。ClientDetails有几个重要的属性如下列表:
clientId:(必须的)用来标识客户的Id。
secret:(需要值得信任的客户端)客户端安全码,如果有的话。
scope:用来限制客户端的访问范围,如果为空(默认)的话,那么客户端拥有全部的访问范围。
authorizedGrantTypes:此客户端可以使用的授权类型,默认为空。
authorities:此客户端可以使用的权限(基于Spring Security authorities)。
客户端详情(Client Details)能够在应用程序运行的时候进行更新,可以通过访问底层的存储服务(例如将客户端详情存储在一个关系数据库的表中,就可以使用 JdbcClientDetailsService)或者通过自己实现ClientRegistrationService接口(同时你也可以实现 ClientDetailsService 接口)来进行管理。
我们暂时使用内存方式存储客户端详情信息,配置如下:
@Configuration
@EnableAuthorizationServer
public class AuthorizationServer extends AuthorizationServerConfigurerAdapter {

    /**
     * 客户端详情
     *
     * @param clients
     * @throws Exception
     */
    @Override
    public void configure(ClientDetailsServiceConfigurer clients) throws Exception {
        clients
                // 使用in‐memory存储
                .inMemory()
                // client_id
                .withClient("c1")
                //客户端密钥
                .secret(new BCryptPasswordEncoder().encode("secret"))
                //客户端访问的资源列表
                .resourceIds("res1")
                // 该client允许的授权类型 authorization_code,password,refresh_token,implicit,client_credentials
                .authorizedGrantTypes("authorization_code", "password", "client_credentials", "implicit", "refresh_token")
                // 允许的授权范围
                .scopes("all")
                //false 允许跳转到授权页面
                .autoApprove(false)
                //加上验证回调地址
                .redirectUris("http://www.baidu.com");

    }
}
重启项目,登录 http://localhost:8080/auth/login
紧接着我们访问 http://localhost:8080/auth/oauth/authorize?client_id=c1&response_type=code&scope=all&redirect_uri=http://www.baidu.com
分析:在代码里面的 c1 我们把它当成平台A,平台A想拿到用户张三的个人信息。
首先,我们的平台A要主动去访问auth认证授权服务的授权端点。输入平台A的信息:
client_id:c1
response_type:code
scope:all
redirect_uri:http://www.baidu.com
平台A输入的信息会和 auth认证授权服务(微信认证授权服务)存储的信息做对比,如果一致,代表平台A是一个合法的平台。
这个时候 auth认证授权服务(微信认证授权服务)就会提醒张三用户,你是同意还是拒绝平台A访问你的一个信息呢?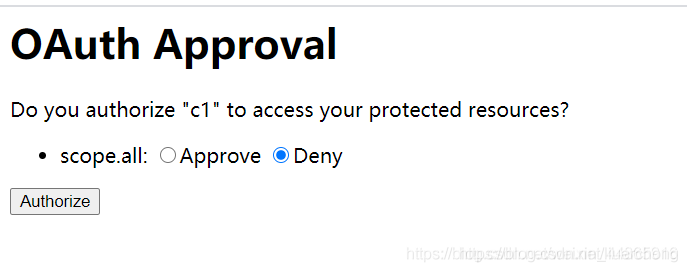
这个时候你点击Approve 再点击Authorize
注意观察浏览器的地址栏的变化
http://localhost:8080/auth/oauth/authorize?client_id=c1&response_type=code&scope=all&redirect_uri=http://www.baidu.com ——————》
https://www.baidu.com/?code=lQyBvO
看到了一个授权码,但是拿到授权码感觉没用,平台A想要的是张三用户的个人信息,所以接下来,ouath2.0的协议思路是这样的。
1、平台A获取到授权码,请求 auth认证授权服务申请令牌 此过程用户看不到,平台A请求 auth认证授权服务,请求携带授权码。
2、 auth认证授权服务验证平台A请求的授权码,如果合法则给平台A颁发令牌,令牌是平台A拿到张三用户个人信息的通行证。
AuthorizationServerEndpointsConfigurer 用来配置令牌(token)的访问端点和令牌服务(token services)。
AuthorizationServerEndpointsConfigurer 通过设定以下属性决定支持的授权类型(Grant Types):
authenticationManager:认证管理器,当你选择了资源所有者密码(password)授权类型的时候,请设置这个属性注入一个AuthenticationManager 对象。
userDetailsService:如果你设置了这个属性的话,那说明你有一个自己的 UserDetailsService
接口的实现,或者你可以把这个东西设置到全局域上面去(例如 GlobalAuthenticationManagerConfigurer
这个配置对象),当你设置了这个之后,那么 “refresh_token” 即刷新令牌授权类型模式的流程中就会包含一个检查,用来确保这个账号是否仍然有效,假如说你禁用了这个账户的话。
authorizationCodeServices:这个属性是用来设置授权码服务的(即 AuthorizationCodeServices
的实例对象),主要用于 “authorization_code” 授权码类型模式。
implicitGrantService:这个属性用于设置隐式授权模式,用来管理隐式授权模式的状态。
tokenGranter:当你设置了这个东西(即 TokenGranter 接口实现),那么授权将会交由你来完全掌控,并且会忽略掉上面的这几个属性,这个属性一般是用作拓展用途的,即标准的四种授权模式已经满足不了你的需求的时候,才会考虑使用这个。
AuthorizationServerEndpointsConfigurer 这个配置对象有一个叫做 pathMapping() 的方法用来配置端点URL链接,它有两个参数:
第一个参数:String 类型的,这个端点URL的默认链接。
第二个参数:String 类型的,你要进行替代的URL链接
以上的参数都将以 “/” 字符为开始的字符串,框架的默认URL链接如下列表,可以作为这个 pathMapping() 方法的第一个参数:
/oauth/authorize:授权端点。
/oauth/token:令牌端点。
/oauth/confirm_access:用户确认授权提交端点。
/oauth/error:授权服务错误信息端点。
/oauth/check_token:用于资源服务访问的令牌解析端点。
/oauth/token_key:提供公有密匙的端点,如果你使用JWT令牌的话。
在 AuthorizationServer 类中 添加代码
      /** ==============================================================================*/

    /**
     * 令牌存储策略
     */
    @Autowired
    private TokenStore tokenStore;

    /**
     * 客户端详情服务
     */
    @Autowired
    private ClientDetailsService clientDetailsService;


    /**
     * 令牌存储策略
     *
     * @return
     */
    @Bean
    public TokenStore tokenStore() {
        //使用内存存储(普通令牌)
        return new InMemoryTokenStore();
    }

    /**
     * 令牌管理服务
     *
     * @return
     */
    @Bean
    public AuthorizationServerTokenServices tokenService() {
        DefaultTokenServices service = new DefaultTokenServices();
        //客户端详情服务
        service.setClientDetailsService(clientDetailsService);
        //支持刷新令牌
        service.setSupportRefreshToken(true);
        //令牌存储策略
        service.setTokenStore(tokenStore);


        // 令牌默认有效期2小时
        service.setAccessTokenValiditySeconds(7200);
        // 刷新令牌默认有效期3天
        service.setRefreshTokenValiditySeconds(259200);
        return service;
    }

    /** ==============================================================================*/

    /**
     * 认证管理器
     */
    @Autowired
    private AuthenticationManager authenticationManager;
    /**
     * 授权码模式服务
     */
    @Autowired
    private AuthorizationCodeServices authorizationCodeServices;

    @Bean
    public AuthorizationCodeServices authorizationCodeServices() {
        //设置授权码模式的授权码如何存取,暂时采用内存方式
        return new InMemoryAuthorizationCodeServices();
    }

    /**
     * 令牌访问端点配置
     *
     * @param endpoints
     * @throws Exception
     */
    @Override
    public void configure(AuthorizationServerEndpointsConfigurer endpoints) throws Exception {
        endpoints
                //认证管理器
                .authenticationManager(authenticationManager)
                //授权码服务
                .authorizationCodeServices(authorizationCodeServices)
                //令牌管理服务
                .tokenServices(tokenService())
                .allowedTokenEndpointRequestMethods(HttpMethod.POST);
    }
====================================================================
AuthorizationServerSecurityConfigurer 用来配置令牌端点的安全约束。
在 AuthorizationServer 类中 添加代码
    /** ==============================================================================*/

    /**
     * 令牌端点的安全约束
     *
     * @param security
     */
    @Override
    public void configure(AuthorizationServerSecurityConfigurer security) {
        security
                //oauth/token_key是公开(提供公有密匙的端点,如果你使用JWT令牌的话)
                .tokenKeyAccess("permitAll()")
                //oauth/check_token公开(用于资源服务访问的令牌解析端点)
                .checkTokenAccess("permitAll()")
                //表单认证(申请令牌)
                .allowFormAuthenticationForClients();
    }
补充:在 WebSecurityConfig 添加认证管理器
    /**
     * 认证管理器
     *
     * @return
     * @throws Exception
     */
    @Bean
    @Override
    public AuthenticationManager authenticationManagerBean() throws Exception {
        return super.authenticationManagerBean();
    }
重启项目
登录 http://localhost:8080/auth/login
紧接着我们访问 http://localhost:8080/auth/oauth/authorize?client_id=c1&response_type=code&scope=all&redirect_uri=http://www.baidu.com
拿到code值:
https://www.baidu.com/?code=rdP7m1
因为申请令牌是post接口,所以用Postman来测试
http://localhost:8080/auth/oauth/token?client_id=c1&client_secret=secret&grant_type=authorization_code&code=rdP7m1&redirect_uri=http://www.baidu.com
参数列表如下:
client_id:客户端唯一标识。
client_secret:客户端秘钥。
grant_type:授权类型,填写authorization_code,表示授权码模式
code:授权码,就是刚刚获取的授权码,注意:授权码只使用一次就无效了,需要重新申请。
redirect_uri:申请授权码时的跳转url,一定和申请授权码时用的redirect_uri一致。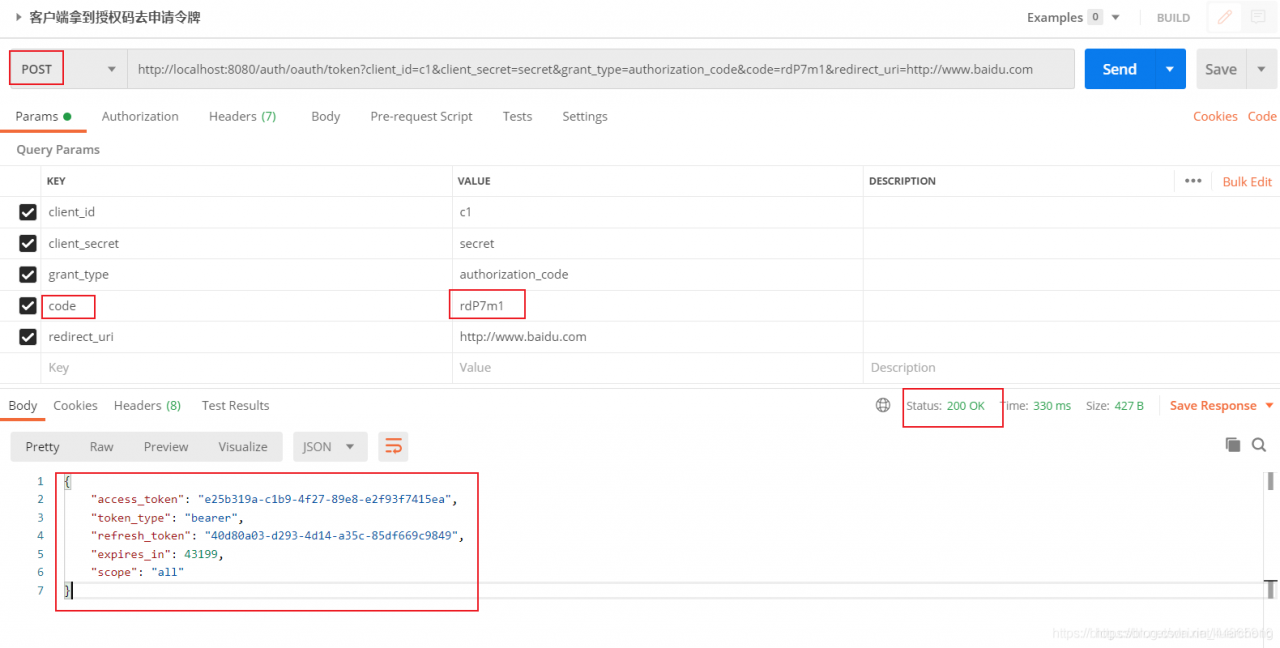
认证授权服务器返回令牌(access_token)
{
    "access_token": "e25b319a-c1b9-4f27-89e8-e2f93f7415ea",
    "token_type": "bearer",
    "refresh_token": "40d80a03-d293-4d14-a35c-85df669c9849",
    "expires_in": 43199,
    "scope": "all"
}
刚才这种模式是四种模式中最安全的一种模式,也叫授权码模式。一般用于client是Web服务器端应用或第三方的原生App调用资源服务的时候。因为在这种模式中access_token不会经过浏览器或移动端的App,而是直接从服务端去交换,这样就最大限度的减小了令牌泄漏的风险。
====================================================================
简化模式 和 客户端模式
在这里不做介绍,这两种不常见
密码模式
(1)张三将用户名、密码发送给平台A
(2)平台A拿着张三的用户名、密码向 auth认证授权服务(微信认证授权服务)请求令牌(access_token)
还是上面的代码,我们接着来访问:
http://localhost:8080/auth/oauth/token?client_id=c1&client_secret=secret&grant_type=password&username=zhangsan&password=123
参数列表如下:
client_id:客户端唯一标识。
client_secret:客户端秘钥。
grant_type:授权类型,填写password表示密码模式
username:资源拥有者用户名。
password:资源拥有者密码。