参考SpringBoot官方文档
Spring Framework
可以使用绝对文件路径导入
<import resource="file:C:/config/services.xml"/>
使用内部原理构建容器
GenericApplicationContext context = new GenericApplicationContext();
new XmlBeanDefinitionReader(context).loadBeanDefinitions("test1.xml");
context.refresh();
若没有id属性会使用name的第一个当作id其他为别名
<bean class="com.sk.springbootreference.bean.Cher" name="cher,test1,test2"/>
使用@ConstructorProperties(String[])显示指定参数名,不指定可以自动推断
@ConstructorProperties("cher")
public TestBean(Cher cher) {
    this.cher = cher;
}
使用Idref引用BeanId内容值防止出错(容器会检查该值是否为id)
<property name="tarId">
    <idref bean="cher"/>
</property>
lookup-method(由Spring实现)
//(public|protected) [abstract] <return-type> theMethodName(no-arguments);//方法格式
public abstract Cher cher();
或者
@Lookup("cher")//可以指定 不指定按类型匹配
public abstract Cher cher();
从 Spring 3.0 开始,线程作用域可用,但默认情况下未注册
<bean class="org.springframework.context.support.SimpleThreadScope" id="simpleThreadScope"/>
aop:scoped-proxy生成代理对象
<bean class="com.sk.springbootreference.property.YmlProperty" id="ymlProperty">
    <!--生成代理对象-->
    <aop:scoped-proxy/>
</bean>
使用CustomScopeConfigurer注册范围
<!--使用xml注册范围-->
<bean class="org.springframework.beans.factory.config.CustomScopeConfigurer">
    <property name="scopes">
        <map>
            <entry key="thread" value-ref="simpleThreadScope"/>
        </map>
    </property>
</bean>
若对象实现了AutoCloseable销毁时会自动调用该方法
public abstract class TestBean implements AutoCloseable //注意Closeable继承AutoCloseable
BeanPostProcessor,BeanFactoryPostProcessor
前者处理bean生成中,后者处理bean的元数据,都会忽略懒加载,推荐添加Order排序(注解/接口)
可以使用Optional或@Nullable没有时注入空(还是推荐直接使用Autowired的参数)
@Autowired
private Optional<MessageReceiver> optionalMessageReceiver;

@Autowired
void setMessageReceiver(@Nullable MessageReceiver messageReceiver){
    System.out.println(messageReceiver);
}
xml也可以指定qualifier
<bean class="com.sk.springbootreference.configuration.MyConfiguration" id="configuration">
    <!--type指定注解全名  因为是元注解-->
    <qualifier value="name" type="org.springframework.beans.factory.annotation.Qualifier"/>
    <qualifier type="org.springframework.beans.factory.annotation.Qualifier">
        <!--指定内部属性-->
        <attribute key="" value=""/>
    </qualifier>
</bean>
继承AutowireCandidateResolver自己控制qualifier装配
<bean id="customAutowireConfigurer"
        class="org.springframework.beans.factory.annotation.CustomAutowireConfigurer">
    <property name="customQualifierTypes">
        <set>
            <!--配置自定义的-->
            <value>example.CustomQualifier</value>
        </set>
    </property>
</bean>
context:component-scan隐式开启context:annotation-config
BeanNameGenerator控制bean的名称
//定制bean名称取消自动命名  需要注册到scan中
public class MyBeanNameGenerator implements BeanNameGenerator {

    @Override
    public String generateBeanName(BeanDefinition definition, BeanDefinitionRegistry registry) {
        return null;
    }

}
@Bean定义别名
@Bean({"objectMapper","ok"})//可以填写多个 其他的为别名
Profile默认并的关系可以取!
@Profile({"test","!ok"})
PropertySource自定义属性值
//继承PropertySource提供属性值
public class MyPropertySource extends PropertySource {

    public MyPropertySource(String name, Object source) {
        super(name, source);
    }

    @Override//提供对应的属性值
    public Object getProperty(String s) {
        return null;
    }

}
事件监听器指定条件
@EventListener(condition = "true")//可以使用SpEL表达式
context获取资源
Resource resource = context.getResource("");//根据前缀返回不同类别的对象 classpath: file: http: /
classpath*: 是任意路径下匹配子路径的文件
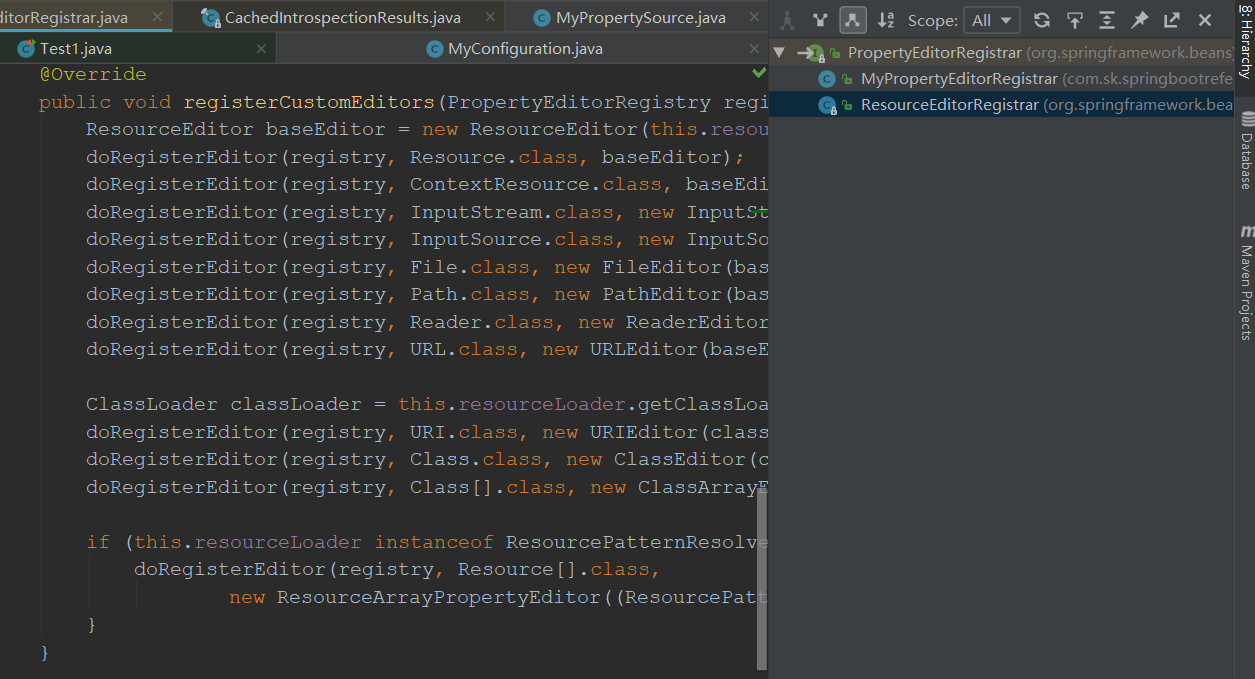
实现PropertyEditorRegistrar代码注人自定义属性编辑器
条件转换器ConditionalGenericConverter
public class MyConditionalConverter implements ConditionalGenericConverter {

    @Override//是否可以转换  根据条件
    public boolean matches(TypeDescriptor typeDescriptor, TypeDescriptor typeDescriptor1) {
        return false;
    }

    @Override//支持的类型
    public Set<ConvertiblePair> getConvertibleTypes() {
        return null;
    }

    @Override//转换逻辑
    public Object convert(Object o, TypeDescriptor typeDescriptor, TypeDescriptor typeDescriptor1) {
        return null;
    }

}
SpelParserConfiguration对表达式解析进行配置
//指定自动生成空值  自动增长集合
SpelParserConfiguration configuration = new SpelParserConfiguration(true, true);
//也可以指定编译模式   SpelCompilerMode(枚举)  构造函数中提供
SPEL对应java.lang包下的类不需要写全类名
//是基于  java.lang  包 构建的  其包下 都不需要写全
Class value = parser.parseExpression("T(String)").getValue(Class.class);
可以绑定方法并调用
context.setVariable("test",Integer.class.getMethod("parseInt", String.class));
Integer value1 = parser.parseExpression("#test('2233')").getValue(context, Integer.class);
System.out.println(value1);
ParserContext指定解析符号
Object value2 = parser.parseExpression("My Name is &{#name}", new ParserContext() {
    @Override
    public boolean isTemplate() {
        return true;
    }
    //手动指定解析符
    @Override
    public String getExpressionPrefix() {
        return "&{";
    }
    @Override
    public String getExpressionSuffix() {
        return "}";
    }
}).getValue(context);
切点表达式
注意 execution(* com.xyz.myapp.dao..(*)) (*) 注意* 是表示任意单个参数 不是 0+个参数
Pointcut传递参数
@Pointcut("execution(* com.sk.springbootreference.bean.MessageReceiver.receiver(..))&&args(name)")
public void pointCut(String name){}

//可以传递参数
@Before("pointCut(msg)")
public void before(String msg){

}
StopWatch用于统计时间的工具
StopWatch clock = new StopWatch("名字");
try {
    clock.start("开始");
} finally {
    clock.stop();//结束
    System.out.println(clock.prettyPrint());//格式化输出
}
aop:declare-parents添加方法
<aop:config>
    <aop:aspect>
        <!--
            types-matching指定类
            implement-interface方法接口
            default-impl方法实现
            -->
        <aop:declare-parents
                             types-matching="com.sk.springbootreference.bean.People"
                             implement-interface="com.sk.springbootreference.bean.ISinger"
                             default-impl="com.sk.springbootreference.bean.Singer"/>
    </aop:aspect>
</aop:config>
People bean = context.getBean(People.class);
bean.show();
ISinger singer= (ISinger) bean;//注意转接口
singer.sing();
<aop:config expose-proxy="true"> <!--指定暴露对象,可以直接在方法中访问代理对象-->
System.out.println(AopContext.currentProxy());//获取代理对象
@Configurable(preConstruction = true)
@Configurable(preConstruction = true)用于支持对象new出的对象自动注入需要对应jar包依赖
advisor与advice
ProxyFactory proxyFactory = new ProxyFactory(new Singer());
proxyFactory.addInterface(ISinger.class);
//advisor包含Advice并控制使用调用拦截方法
RegexpMethodPointcutAdvisor advisor=new RegexpMethodPointcutAdvisor();
advisor.setPattern(".*sing.*");
//Advice是拦截到执行的内容
advisor.setAdvice((MethodInterceptor) invocation -> {
    System.out.println("OK");
    return invocation.proceed();
});
proxyFactory.addAdvisor(advisor);
//暴露代理对象
proxyFactory.setExposeProxy(true);
ISinger proxy = (ISinger) proxyFactory.getProxy();
proxy.sing();
AOP常见属性
proxyTargetClass是否使用cglib
optimize是否积极化代理仅对cglib有效
frozen冻结属性一点小优化
exposeProxy暴露代理
HotSwappableTargetSource动态更改代理对象
ProxyFactory factory = new ProxyFactory();
//使用动态源对象
HotSwappableTargetSource targetSource = new HotSwappableTargetSource(new Singer());
factory.setTargetSource(targetSource);
factory.addAdvice((MethodInterceptor) invocation -> {
    System.out.println("OK");
    return invocation.proceed();
});
factory.setInterfaces(ISinger.class);
factory.setExposeProxy(true);
ISinger singer = (ISinger) factory.getProxy();
singer.sing();
targetSource.swap(new Singer2());//更改对象
singer.sing();
util:constant用于注入常量
<property name="pi">
    <util:constant static-field="java.lang.Math.PI"/>
</property>
util:property-path抽取bean的一部分为bean
<bean class="com.sk.springbootreference.bean.Singer" id="singer">
    <property name="pi">
        <util:constant static-field="java.lang.Math.PI"/>
    </property>
</bean>
<util:property-path path="singer.pi" id="bean"/>
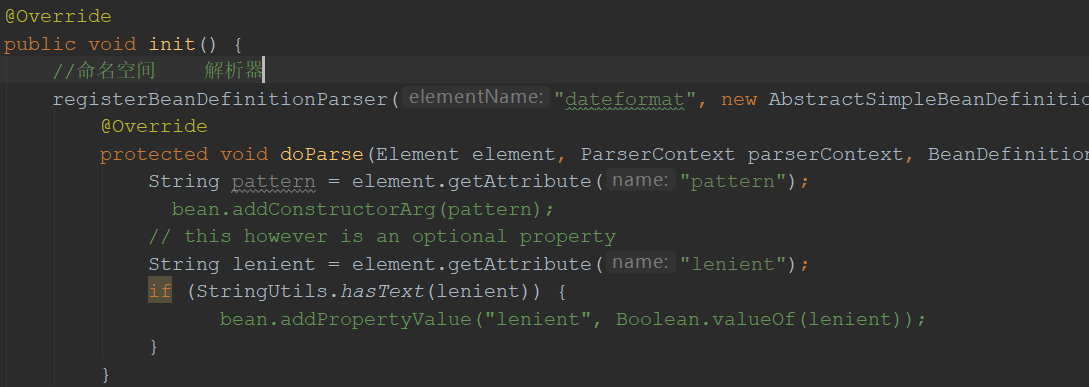
自定义命名空间并解析
1,编写对应的xsd文件
2,继承NamespaceHandlerSupport在init方法注册自定义解析器
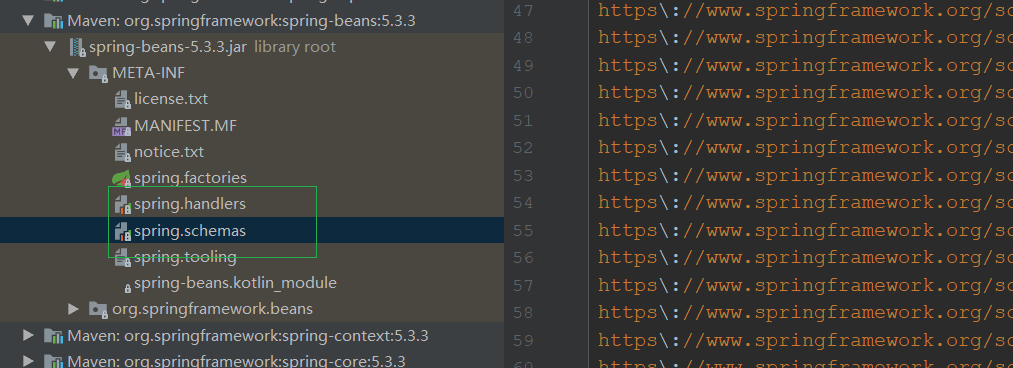
3,分别把配置文件,与处理类注册到org\springframework\spring-beans\5.3.3\spring-beans-5.3.3.jar!\META-INF\spring.schemas和org/springframework/spring-beans/5.3.3/spring-beans-5.3.3.jar!/META-INF/spring.handlers
Spring大部分注解都是元注解可以组合使用
SimpleJdbcInsert专门用于插入
//创建插入模板
SimpleJdbcInsert insert = new SimpleJdbcInsert(dataSource)
    .withTableName("cher")//并指定数据表
    .usingGeneratedKeyColumns("id")//指定主键
    .usingColumns("name");//指定操作的列
//执行并返回主键
Number number = insert.executeAndReturnKey(new BeanPropertySqlParameterSource(new Cher()));
继承MappingSqlQuery<T>定制查询
public class MyMappingSqlQuery extends MappingSqlQuery<Cher> {

    public MyMappingSqlQuery(DataSource ds) {
        super(ds, "select * from cher where id = ?");//构建sql
        declareParameter(new SqlParameter("id", Types.INTEGER));//声明参数
        compile();//编译
    }

    @Override//封装对象
    protected Cher mapRow(ResultSet rs, int rowNum) throws SQLException {
        return new Cher().setName(rs.getString("name"));
    }

}
继承SqlUpdate定制更新
public class MySqlUpdate extends SqlUpdate{

    public MySqlUpdate(DataSource ds) {//类似MappingSqlQuery
        super(ds, "update cher set name = ? where id = ?");//指定sql
        declareParameter(new SqlParameter("name", Types.VARCHAR));//按顺序指定参数
        declareParameter(new SqlParameter("id", Types.INTEGER));
        compile();//编译sql
    }

}
使用AbstractLobCreatingPreparedStatementCallback向数据库插入长文本或大对象
LobHandler handler=new DefaultLobHandler();//使用默认的就行
byte[] bytes = Files.readAllBytes(Paths.get("src/main/resources/application.yml"));
Integer execute = jdbcOperations.execute("insert test(a_blob) values (?)", new AbstractLobCreatingPreparedStatementCallback(handler) {
    @Override
    protected void setValues(PreparedStatement ps, LobCreator lobCreator) throws SQLException, DataAccessException {
        //设置字节对象
        lobCreator.setBlobAsBytes(ps, 1, bytes);
        //                lobCreator.setBlobAsBinaryStream();
        //                //设置长字符
        //                lobCreator.setClobAsAsciiStream();
        //                lobCreator.setClobAsCharacterStream();
        //                lobCreator.setClobAsString();
    }
});//返回影响行数
System.out.println(execute);
使用LobHandler获取大对象或长文本
LobHandler handler=new DefaultLobHandler();
jdbcOperations.query("select * from test where id = 1", rs -> {
    //获取二进制(方法都有 根据index或列名的)
    InputStream in = handler.getBlobAsBinaryStream(rs, 2);
    //            handler.getBlobAsBytes();
    //            //获取大文本
    //            handler.getClobAsAsciiStream();
    //            handler.getClobAsCharacterStream();
    //            handler.getClobAsString()
    try {
        Files.copy(in,Paths.get("C:\\Users\\邵康\\Desktop\\临时文件夹/test.yml"));
        in.close();
    } catch (IOException e) {
        e.printStackTrace();
    }
});
获取web上下文
Object attribute = request.getAttribute(DispatcherServlet.WEB_APPLICATION_CONTEXT_ATTRIBUTE);//实际可以直接注入
路径参数使用正则表达式
@GetMapping("/{name:\\w+}-{num:\\d+}")//指定名称与正则
public String testRex(@PathVariable String name,@PathVariable Integer num){
    System.out.println(name);
    System.out.println(num);
    return "<h1>HelloWorld</h1>";
}
produces指定不使用什么类型
@GetMapping(value = "/cher/{id}",produces = "!text/plain")
使用RequestMappingHandlerMapping手动添加映射
public void addHandler(RequestMappingHandlerMapping mapping){
    RequestMappingInfo info = RequestMappingInfo.paths("/addTest").methods(RequestMethod.GET)
        .build();//构建请求信息
    Method method = MyRestController2.class.getDeclaredMethod("test",
                                                              HttpServletRequest.class);//获取处理方法
    mapping.registerMapping(info,new MyRestController2(),method);//注册
}
使用@JsonView指定json样式
@Data
@AllArgsConstructor
@NoArgsConstructor
public class User {

    public interface NoPassword{}
    public interface WithPassword extends NoPassword{}//使用接口分户 可以继承

    @JsonView(NoPassword.class)//指定使用的字段分组
    private String username;
    @JsonView(WithPassword.class)
    private String password;

}
@JsonView(User.NoPassword.class)//指定使用样式
@GetMapping("/user")
public User getUser(){
    return new User("用户名","密码");
}
ControllerAdvice指定生效范围(包,指定类,注解标明类)
@ControllerAdvice(value = "com",assignableTypes = MyRestController2.class,annotations = RestController.class)
使用UriComponentsBuilder构建URL
UriComponents build = UriComponentsBuilder.fromUriString("http://test/{name}")
    .queryParam("name", "{test}")//添加查询参数
    .encode()
    .build();
System.out.println(build);
//填充参数
URI uri = build.expand("JustTest","博丽灵梦").toUri();
System.out.println(uri);
ResponseEntity使用缓存
@GetMapping("/user/{name}")
public ResponseEntity<User> showBook(@PathVariable String name) {
    User user=new User(name,name);
    return ResponseEntity
        .ok()//使用缓存   并设置缓存信息
        .cacheControl(CacheControl.maxAge(30, TimeUnit.DAYS))
        .eTag(name)
        .body(user);
}
AbstractPdfView使用(表格生成类似)
<!-- Pdf library -->
<dependency>
    <groupId>com.lowagie</groupId>
    <artifactId>itext</artifactId>
    <version>2.1.7</version>
</dependency>
public class MyPdfView extends AbstractPdfView {//继承AbstractPdfView

    @Override
    protected void buildPdfDocument(Map<String, Object> map, Document document, PdfWriter pdfWriter,
                                    HttpServletRequest httpServletRequest,
                                    HttpServletResponse httpServletResponse) throws Exception {
        Table table = new Table(3);
        table.addCell("Name");
        table.addCell("Test");
        table.addCell("Date");
        for (int i = 0; i < 10; i++) {
            table.addCell(UUID.randomUUID().toString().substring(0,10));
            table.addCell(Math.random()*100+"");
            table.addCell(new Date().toString());
        }
        document.addTitle("测试表格");
        document.add(table);//构建文档   返回该视图就行了
    }

}
继承WebMvcConfigurer配置web信息
@Configuration//用于自定义web配置
public class MyWebConfig implements WebMvcConfigurer{
    //重写方法实现配置
}
继承WebSocketConfigurer使用SpringWebSocket
@EnableWebSocket//开启WebSocket
@Configuration
public class MyWebSocketConfigurer implements WebSocketConfigurer {

    @Override
    public void registerWebSocketHandlers(WebSocketHandlerRegistry webSocketHandlerRegistry) {
        //映射处理器端点
        webSocketHandlerRegistry.addHandler(myHandler(),"/myWebSocket")
                .setAllowedOrigins("*").addInterceptors(new HttpSessionHandshakeInterceptor())
            	.withSockJS();//使用SockJS
    }

    @Bean
    public WebSocketHandler myHandler() {
        return new TextWebSocketHandler(){
            @Override//处理请求   也可拿到session发送信息
            protected void handleTextMessage(WebSocketSession session, TextMessage message) throws Exception {
                //处理文本信息
                System.out.println(message.getPayload());
                session.sendMessage(new TextMessage("HelloWorld"));//发送信息
            }
        };
    }

}
填充消息头信息
@JmsListener(destination = "test")//获取消息头信息  注意这里也可也传原对象  手动获取请求头
public void receiver(String msg, @Header(value = "name",required = false,defaultValue = "雾雨魔理沙")String name){
    System.out.println(msg+name);
}
使用SendTo指定发送目标
@SendTo("test")//指定返回值发送到
public String receiver(String msg, @Header(value = "name",required = false,
                                           defaultValue = "雾雨魔理沙")String name){
    System.out.println(msg+name);
    return "Ok";
}
使用JMX
spring:
  jmx:
    enabled: true    # 开启jmx功能  默认关闭   也可以使用注解打开  @EnableMBeanExport
@Component//注解配置
//objectName  指定在  bean包下   名称为jmxTest
@ManagedResource(objectName= "bean:name=jmxTest" , description= "My Managed Bean" )
@ToString
public class MyJmxBean{

    @Value("博丽灵梦")
    private String name;
    @Value("16")
    private Integer age;

    //指定操作
    @ManagedOperation(description = "打招呼")
    public String hello(){
        return "HelloWorld";
    }

    @ManagedOperation(description = "打印信息")
    @ManagedOperationParameter(name = "msg",description = "打印的消息")//不加也行
    public void print(String msg){
        System.out.println(msg);
    }

    @ManagedAttribute(description = "名字")//指定属性必须是get方法
    public String getName() {
        return name;
    }

    public void setName(String name) {
        this.name = name;
    }

    @ManagedAttribute(description = "年龄")
    public Integer getAge() {
        return age;
    }

    public void setAge(Integer age) {
        this.age = age;
    }
}
实现NotificationListener监听JMX事件,NotificationFilter过滤事件
@Component
public class MyNotificationListener implements NotificationListener, NotificationFilter {

    //处理监听结果
    public void handleNotification(Notification notification, Object handback) {
        System.out.println(notification);
        System.out.println(handback);
    }

    //监听属性改变  过滤
    public boolean isNotificationEnabled(Notification notification) {
        return AttributeChangeNotification.class.isAssignableFrom(notification.getClass());
    }

}
实现NotificationPublisherAware获取发布事件组件
@ManagedOperation(description = "打印信息")
@ManagedOperationParameter(name = "msg",description = "打印的消息")//不加也行
public void print(String msg){
    System.out.println(msg);
    //发布事件
    notificationPublisher.sendNotification(new Notification("test",this,0));
}
Spring Data JPA
Page与Slice
Page extends Slice 都可以翻页或判断是否有待翻页,但是Page会获取统计所有结果效果不好 Slice查询时才触发
NamedQuery使用
@NamedQuery(name = "Cher.test",query = "select c from Cher c where c.id = 7")//标注在实体类上
public class Cher {
//必须与name匹配  返回值.方法名  匹配规则
Cher test();
使用nativeQuery默认是面向对象查询
@Query(value = "select * from cher where id = 7",nativeQuery = true)//注意使用nativeQuery无法组合其他参数例如排序
Cher nativeQuery();
使用Query面向对象查询
//@Modifying//对于使用Query无法主动感知修改 需要使用Modifying提醒
@Query("select c from Cher c where c.name = :name")//支持使用el表达式特殊的 #{#entityName}是当前实体名称
Cher queryByParam(@Param("name") String name);//也可也使用java8特性
使用投影
public interface CherName {

//    @Value("#{target.name}")//还可以使用spel包装不过这时 会无法优化  不指定要用什么属性
    String getName();//声明接口包含  原实体类的部分get方法  获取其部分属性

}
使用Example指定例子,使用ExampleMatcher指定细节
Cher cher = new Cher().setName("风");
//并自动细节
ExampleMatcher matcher = ExampleMatcher.matching()
    .withMatcher("name", ExampleMatcher.GenericPropertyMatchers.contains());
//根据实体类创建例子
Example<Cher> example = Example.of(cher,matcher);//根据例子匹配
List<Cher> list = cherDao.findAll(example);//注意实体类不要使用基本数据类型  否则无法为空
System.out.println(list);
使用@Lock(LockModeType.READ);进行锁的控制
使用@EntityListeners监听实体类操作
@EntityListeners(EntryListener.class)//指定监听器
public class Order {
public class EntryListener {

    @PrePersist//还有其他注解不再举例
    public void prePersist(Order order){
        System.out.println(order);
    }
    //使用注解监听指定实体变化  可以预修改
    @PostPersist
    public void postPersist(Order order){
        System.out.println(order);
    }

}
开启审计
@EnableJpaAuditing//打开审计功能
@EntityListeners({AuditingEntityListener.class})//指定审计监听器  审计通过监听器实现
public class Order {

    @GeneratedValue(strategy = GenerationType.IDENTITY)
    @Id
    private Integer id;
    private String name;
    @CreatedBy//由谁创建
    private String username;
    @CreatedDate//创建日期
    private Date createData;
    @LastModifiedDate//最后修改日期
    private Date lastDate;
    @LastModifiedBy//最后修改人
    private String lastUsername;

}
@Component//负责生成修改人,创建人信息
public class MyAuditorAware implements AuditorAware<String> {//继承AuditorAware指定生成类型

    @Override
    public Optional<String> getCurrentAuditor() {
        return Optional.of("博丽灵梦");
    }

}
Spring Data Redis
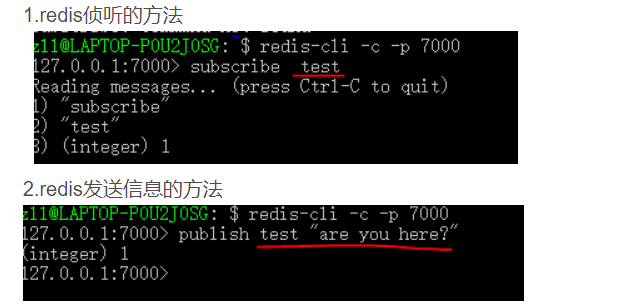
使用RedisTemplate发送消息
//发送信息
template.convertAndSend("hello","world");
使用事务
List<Object> list = template.execute(new SessionCallback<List<Object>>() {
    @Override
    public List<Object> execute(RedisOperations redisOperations) throws DataAccessException {
        redisOperations.multi();//开启事务
        redisOperations.opsForValue().set("name", "博丽灵梦");
        return redisOperations.exec();//提交事务
    }
});
System.out.println(list);
使用DefaultRedisXXX操作指定结构对象
//生成专门操作指定list的对象   也有 map set等的
DefaultRedisList<String> redisList = new DefaultRedisList<>("list", template);
redisList.add("博丽灵梦");
Redis存储序列化对象
RedisTemplate<String, Serializable> template = new RedisTemplate<>();
template.setConnectionFactory(factory);//设置连接工厂
template.setKeySerializer(new StringRedisSerializer());//设置key字符串序列化器
template.setValueSerializer(new GenericJackson2JsonRedisSerializer());//设置value  对象转json
template.afterPropertiesSet();//设置完属性必须调用  用于初始化
Redis缓存使用(更多使用注解方式的)
//使用  Reids创建缓存
RedisCacheManager manager = RedisCacheManager.create(connectionFactory);
manager.initializeCaches();
Cache cache = manager.getCache("test");
cache.put("name","博丽灵梦");//使用缓存
System.out.println(cache.get("name",String.class));
使用CrudRepository创建Redis模板类
@RedisHash("dog")//标识 Redis hash   标明实体  使用hash存放
@Data
@AllArgsConstructor
@NoArgsConstructor
public class Dog {

    //注意默认实体类型必须是简单类型
    @Indexed//建立索引
    private String name;
    private Integer age;
    private String sex;
    @Id//注意是 spring下的不是  jpa下的
    private Integer id;//标识ID
    private House house;//对于复杂属性需要提供转换器

}
public interface DogDao extends CrudRepository<Dog,Integer> {//继承CRUD接口


}
@Test
void test3(){
    //保存对象
    dogDao.save(new Dog("二哈",10,"男",1,new House("小狗之家")));
}

@Test
void test4(){
    //获取对象
    Optional<Dog> dog = dogDao.findById(1);
    dog.ifPresent(System.out::println);
}
@Component
@ReadingConverter//标明为读取转换器
public class HomeRead implements Converter<byte[], House> {

    private Jackson2JsonRedisSerializer<House> serializer;

    @Autowired
    public void setSerializer(Jackson2JsonRedisSerializer<House> serializer) {
        this.serializer = serializer;
    }

    @Override
    public House convert(byte[] bytes) {
        return serializer.deserialize(bytes);
    }

}
@Component
@WritingConverter//标明为写入转换器
public class HomeWrite implements Converter<House,byte[]> {

    private Jackson2JsonRedisSerializer<House> serializer;

    @Autowired
    public void setSerializer(Jackson2JsonRedisSerializer<House> serializer) {
        this.serializer = serializer;
    }

    @Override
    public byte[] convert(House house) {
        return serializer.serialize(house);
    }

}
//也支持按例子查找  要继承  QueryByExampleExecutor<Dog>
Example<Dog> example = Example.of(new Dog().setName("二哈"));
boolean exists = dogDao.exists(example);
System.out.println(exists);
@TimeToLive指定实体类的存活时间
@TimeToLive//指定存活时间  可以指定在 方法或属性上
public long timeToLive(){
    return 2233;
}
Spring Security
指定匹配网址及拦截网址和权限
//指定公开  网址
.antMatchers("/api/*").permitAll()
    //指定权限网址
    .antMatchers("/root/*").hasRole("root")
    .anyRequest().authenticated().and()//拦截全部请求
指定登录信息
//指定登录页面 全部放行
.formLogin().loginPage("/login").permitAll()
    //指定参数名称
    .usernameParameter("username").passwordParameter("password")
    //指定提交位置
    .loginProcessingUrl("/check").and()
退出登录配置
//指定退出登录网址     成功 返回的网址
.logout().logoutUrl("/logout").logoutSuccessUrl("/index")
    //指定删除session   并删除指定 name的cookie
    .invalidateHttpSession(true).deleteCookies("");
使用内存保存用户信息
BCryptPasswordEncoder encoder = new BCryptPasswordEncoder();
auth.inMemoryAuthentication()
    //添加编码器  必须使用编码器
    .passwordEncoder(encoder)
    //添加用户与权限
    .withUser("root").password(encoder.encode("123456")).roles("root").and()
    .withUser("user").password(encoder.encode("123456")).roles("user");
使用数据库保存信息
BCryptPasswordEncoder encoder = new BCryptPasswordEncoder();
auth.jdbcAuthentication()//使用数据库
    .dataSource(dataSource)
    .passwordEncoder(encoder)
    //添加用户
    .withUser("root").password(encoder.encode("123456")).roles("root");
自动配置原理
主要使用注解判断组件导入,使用@EnableAutoConfiguration导入META-INF/spring.factories中的对象,使用xxxProperties.java映射配置信息,使用各种条件注解导入组件
Spring Boot解决跨域问题
继承全局配置类WebMvcConfigurer重写addCorsMappings
添加CorsFilter拦截器
使用注解@CrossOrigin
spring-boot-starter-parent 有什么用
定义版本依赖,执行打包操作的配置,自动化的插件配置
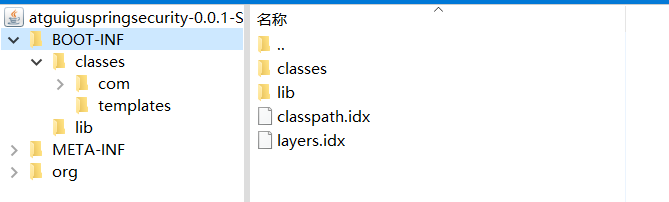
SpringBoot打成的jar包无法直接依赖,文件结构与一般jar包不同,可以直接运行