从零开始,写一个springboot项目

一.从spring官网创建一个新的项目
spring官网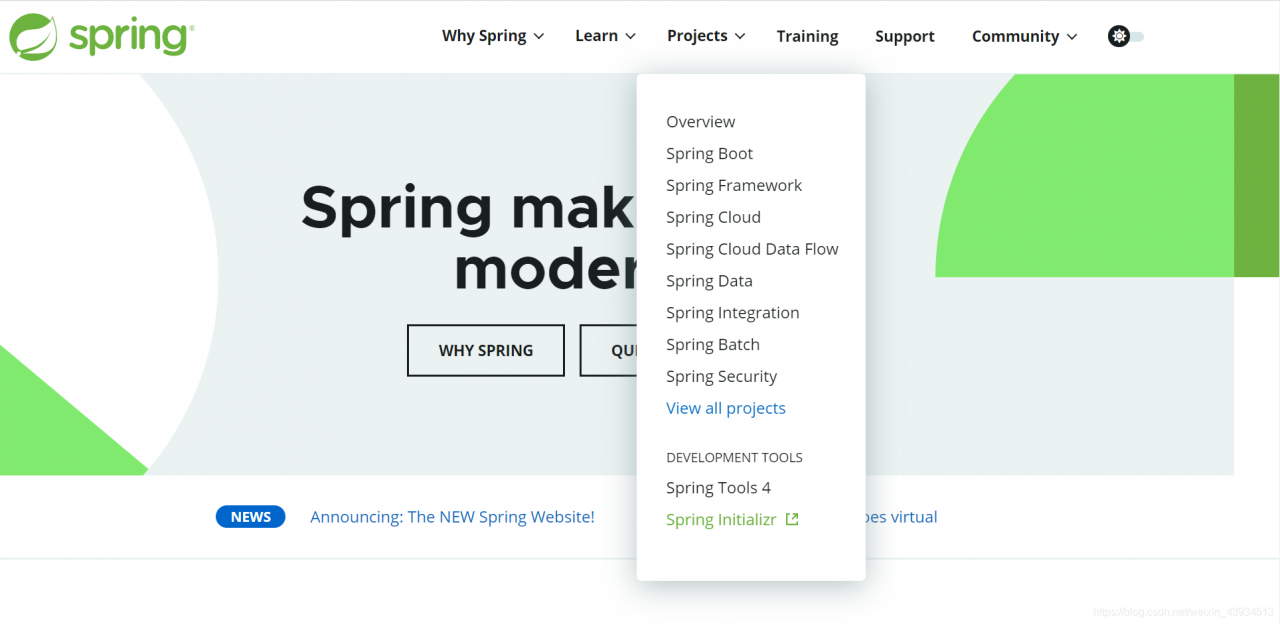
在projects中选择最后一项spring Intializr,进入如下界面。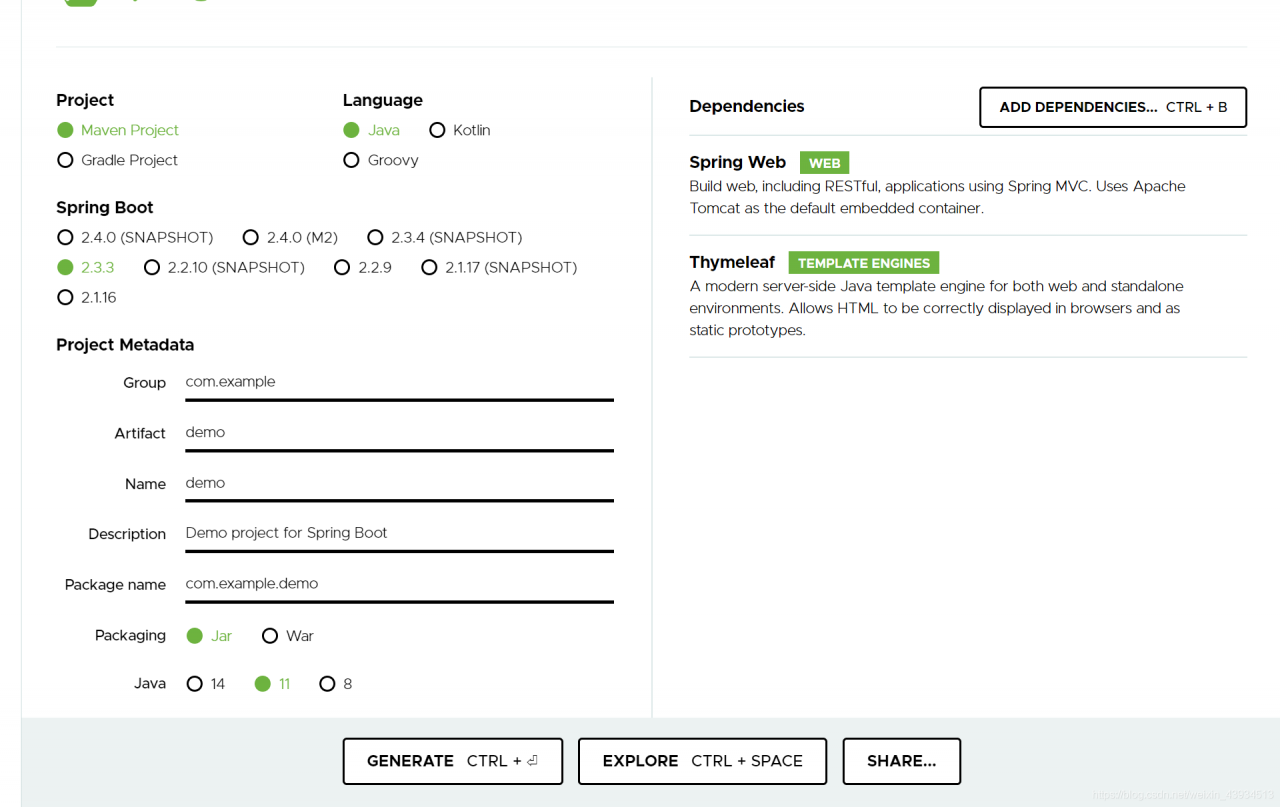
输入你的配置信息,右侧建议选择spring web和thymeleaf两个依赖,点击GENERATE生成springboot项目的压缩包。将这个压缩包解压到你想放的位置,打开后如下: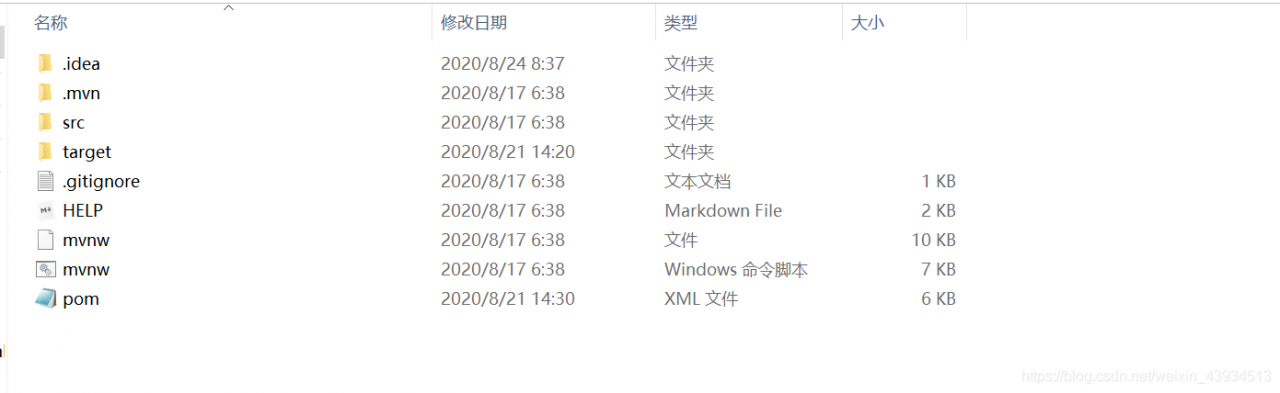
target文件需要项目编译运行后才会生成。
下面,用IDEA导入创建的springboot项目即可。
二.创建数据库
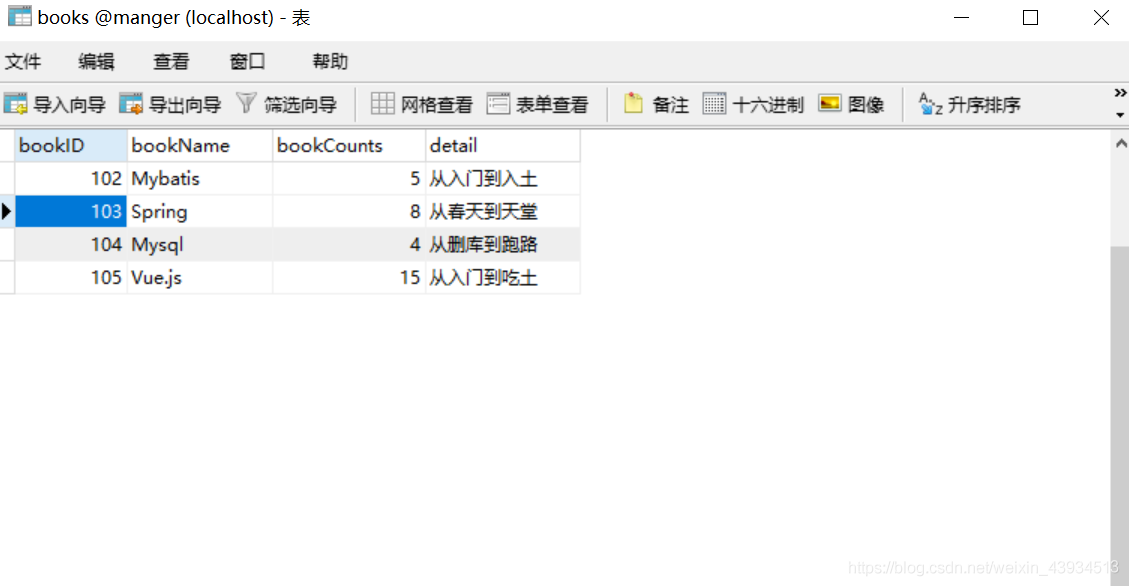
我这里是在数据库manger下面,创建一张书籍表books,字段如下:
create table books
(
    bookID     int(10) auto_increment comment '书号',
    bookName   varchar(10)  not null comment '书名',
    bookCounts int          not null comment '数量',
    detail     varchar(200) not null comment '描述'
)
    charset = utf8;

create index bookID
    on books (bookID);
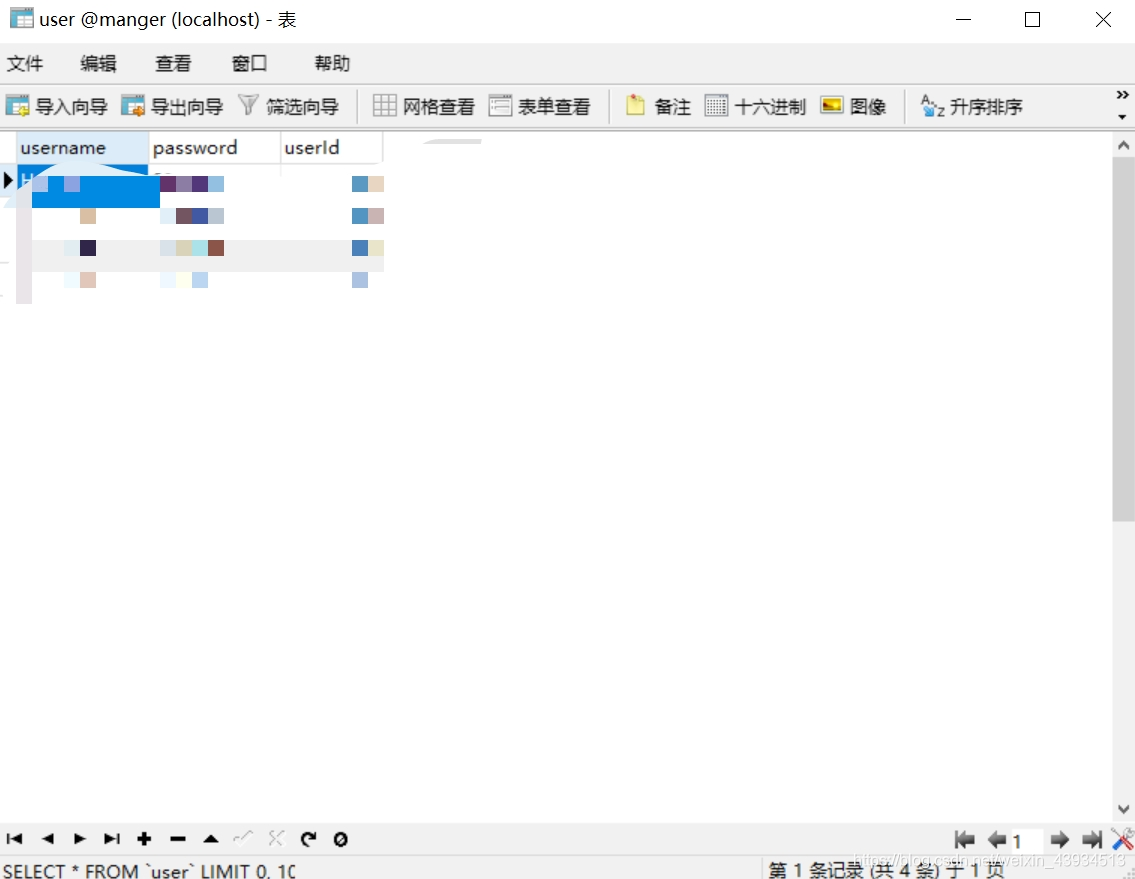
接下来再创建一张用户表user,用于登录认证,字段如下:
create table user
(
    username varchar(20) not null,
    password varchar(20) not null,
    userId   int(4)      not null
        primary key
);
三、创建项目架构

1、实体类的创建:pojo下面新建Books类,属性和数据库字段保持一致:
package com.han.pojo;

import lombok.AllArgsConstructor;
import lombok.Data;
import lombok.NoArgsConstructor;

@Data
@AllArgsConstructor
@NoArgsConstructor
public class Books {
    private int bookID;
    private String bookName;
    private int bookCounts;
    private String detail;
}
2、dao(mapper)层,新建BookMapper接口类
package com.han.dao;

import com.han.pojo.Books;
import org.apache.ibatis.annotations.Mapper;
import org.apache.ibatis.annotations.Param;
import org.springframework.stereotype.Repository;


import java.util.List;

@Repository    //mapper层注解专用,是一个component,service层是service,controller层是controller,都是component
@Mapper
public interface BookMapper {

    //增加一本书
    int addBook(Books books);

    //删除一本书
    int deleteBookById(@Param("bookId") int id);

    //更新一本书
    int updateBook(Books books);

    //查询一本书
    Books queryBooKById(@Param("bookId") int id);

    Books queryBooKByName(@Param("bookName") String bookName);

    //查询所有的书
    List<Books> queryAllBook();
}
3、在resources下面新建mapper文件夹,并创建BookMapper.xml配置文件,写入sql语句,实现BookMapper接口中的方法
因为要操作数据库,先在application.yml文件中配置数据库连接信息:
#数据库连接配置信息
spring:
  datasource:
    username: root
    password: root
    url: jdbc:mysql://localhost:3306/manger?serverTimezone=UTC&useUnicode=true&characterEncoding=utf-8
    driver-class-name: com.mysql.cj.jdbc.Driver
接着在application.properties配置文件中,整合mybatis
#springboot整合mybatis
mybatis.type-aliases-package=com.han.pojo
mybatis.mapper-locations=classpath:mapper/*.xml
上面两步是必须先完成的。接下来就可以写sql语句了:
<?xml version="1.0" encoding="UTF-8" ?>
<!DOCTYPE mapper
        PUBLIC "-//mybatis.org//DTD Config 3.0//EN"
        "http://mybatis.org/dtd/mybatis-3-mapper.dtd">
<!--一个mapper对应一个接口,通过namespace-->
<mapper namespace="com.han.dao.BookMapper">

<!--增加一本书-->

    <insert id="addBook" parameterType="Books">
      insert into manger.books (bookName, bookCounts, detail)
      values (#{bookName},#{bookCounts},#{detail});
    </insert>

<!--    删除一本书-->

    <delete id="deleteBookById" parameterType="int">
    delete from manger.books where bookID=#{bookId}
    </delete>

<!--    更新一本书-->

    <update id="updateBook" parameterType="Books">
    update manger.books set bookName=#{bookName},bookCounts=#{bookCounts},detail=#{detail}
    where bookID=#{bookID};
    </update>

<!--    根据id查询书-->

    <select id="queryBooKById" resultType="Books">
            select * from manger.books where bookID=#{bookId}
    </select>

<!--    根据书名查询书籍-->

    <select id="queryBooKByName" resultType="Books">
            select * from manger.books where bookName=#{bookName}
    </select>

<!--    查询数据库中所有书籍-->

    <select id="queryAllBook" resultType="Books">
    select * from manger.books
    </select>

</mapper>
4、Service层,新建BookService接口类
package com.han.service;

import com.han.pojo.Books;
import org.apache.ibatis.annotations.Param;

import java.util.List;

public interface BookService {

    //增加一本书
    int addBook(Books books);

    //删除一本书
    int deleteBookById( int id);

    //更新一本书
    int updateBook(Books books);

    //查询一本书
    Books queryBooKById( int id);

    Books queryBooKByName( String bookName);

    //查询所有的书
    List<Books> queryAllBook();

}
5、service层新建接口类实现类BookServiceImpl
package com.han.service;

import com.han.dao.BookMapper;
import com.han.pojo.Books;
import org.springframework.beans.factory.annotation.Autowired;
import org.springframework.stereotype.Service;

import java.util.List;

@Service
public class BookServiceImpl implements BookService {
    @Autowired
    BookMapper bookMapper;   //注入mapper层

    //重写方法
    @Override
    public int addBook(Books books) {
        return bookMapper.addBook(books);
    }

    @Override
    public int deleteBookById(int id) {
        return bookMapper.deleteBookById(id);
    }

    @Override
    public int updateBook(Books books) {
        return bookMapper.updateBook(books);
    }

    @Override
    public Books queryBooKById(int id) {
        return bookMapper.queryBooKById(id);
    }

    @Override
    public Books queryBooKByName(String bookName) {
        return bookMapper.queryBooKByName(bookName);
    }

    @Override
    public List<Books> queryAllBook() {
        return bookMapper.queryAllBook();
    }
}
到这里,mapper层和service层的代码就写好了。
6、在templates下新建需要的html,用于展示的增删改查
home.html:
<!DOCTYPE html>
<html lang="en" xmlns:th="http://www.thymeleaf.org" xmlns:sec="http://www.thymeleaf.org/thymeleaf-extras-springsecurity4">
<head>
    <meta charset="UTF-8">
    <title>书籍管理</title>
    <link rel="stylesheet" href="./css/layui.css">
</head>
<body>

<div style="background-color: #0e90d2;text-align: center;border-radius: 7px;margin-bottom: 20px;width: 60%;margin-left: 20%;margin-top: 20px;" >
    <h1>书籍管理中心</h1>
</div>

<div style="text-align: center;">
    <a class="layui-btn layui-btn-sm layui-btn-primary" href="/add">添加书籍</a>
    <a class="layui-btn layui-btn-sm layui-btn-primary" href="/tomain">返回主页</a>
</div>

<div style="margin-left: 10px; margin-bottom: 10px;text-align: center;width: 20%;">
    <p th:text="${error}" style="color: red; "></p>
</div>

<!--根据书名查找数据   th:action="@{/search}" -->

<form th:action="@{/search}" method="post" style="margin-left: 10px;margin-bottom: 10px;">
    <label>查询书籍:</label>
    <input type="text" name="queryBookName" placeholder="请输入要查询的书籍名称" >
    <input type="submit" value="查询" class="layui-btn layui-btn-sm layui-btn-primary">
</form>

<!--springboot2.0.9以下生效-->
<!--<div sec:authorize="isAuthenticated()">-->
<!--    <a>-->
<!--        用户名:<span sec:authentication="name"></span>-->
<!--    </a>-->
<!--</div>-->


<div style="margin-top: 20px;">

    <script src="./js/layui.js"></script>

    <table class="layui-table">
        <colgroup>
            <col width="350">
            <col width="350">
            <col width="350">
            <col>
        </colgroup>
        <thead>
        <tr>
            <th>bookID</th>
            <th>bookName</th>
            <th>bookCounts</th>
            <th>detail</th>
            <th>操作</th>
        </tr>
        </thead>
        <tbody>
<!--      拿到后端数据booklist数组,循环出来的每一项为listbook , 展示数据库中的书籍信息-->
        <tr th:each="listbook:${booklist}">
            <td th:text="${listbook.getBookID()}"></td>
            <td th:text="${listbook.getBookName()}"></td>
            <td th:text="${listbook.getBookCounts()}"></td>
            <td th:text="${listbook.getDetail()}"></td>
            <td>

            <!--     根据id删除: th:href="@{/del/}+${%20listbook.getBookID()%20}"-->
                <a class="layui-btn layui-btn-sm layui-btn-danger "   th:href="@{/del/}+${%20listbook.getBookID()%20}">删除</a>

           <!--      根据id修改  th:href="@{/upd/}+${%20listbook.getBookID()%20}"-->
                <a class="layui-btn layui-btn-sm layui-btn-primary"   th:href="@{/upd/}+${%20listbook.getBookID()%20}">修改</a>

            </td>
        </tr>
        </tbody>
    </table>

</div>
</body>
</html>
add.html:
<!DOCTYPE html>
<html lang="en" xmlns:th="http://www.w3.org/1999/xhtml">
<head>
    <meta charset="UTF-8">
    <title>添加书籍</title>
    <link rel="stylesheet" href="./css/layui.css">
</head>
<body>

<script src="./js/layui.js"></script>
<div style="background-color: #009E94;margin-top: 30px;margin-bottom: 30px;width: 20%;text-align: center;border-radius: 7px;">
    <h2>请输入书籍信息</h2>
</div>
<div>
    <form class="layui-form" th:action="@{/addbook}" method="post">

        <div class="layui-form-item" style="margin-bottom: 30px;">
            <label class="layui-form-label">书籍号</label>
            <div class="layui-input-block">
                <input style="width: 90%;" type="text" name="bookID" required lay-verify="required" placeholder="请输入书籍号" autocomplete="off" class="layui-input">
            </div>
        </div>


        <div class="layui-form-item" style="margin-bottom: 30px;">
            <label class="layui-form-label">书籍名称</label>
            <div class="layui-input-block">
                <input style="width: 90%;" type="number" name="bookName" required  lay-verify="required" placeholder="请输入书籍名称" autocomplete="off" class="layui-input">
            </div>
        </div>
        <div class="layui-form-item" style="margin-bottom: 30px;">
            <label class="layui-form-label">书籍数量</label>
            <div class="layui-input-block">
                <input style="width: 90%;" type="number" name="bookCounts" required lay-verify="required" placeholder="请输入书籍数量" autocomplete="off" class="layui-input">
            </div>
        </div>
        <div class="layui-form-item" style="margin-bottom: 30px;">
            <label class="layui-form-label">书籍描述</label>
            <div class="layui-input-block">
                <input style="width: 90%;" type="text" name="detail" required lay-verify="required" placeholder="请输入书籍描述" autocomplete="off" class="layui-input">
            </div>
        </div>

        <div class="layui-form-item" style="margin-bottom: 30px;">
            <div class="layui-input-block">
                <button class="layui-btn" lay-submit lay-filter="formDemo" >立即提交</button>
                <!--                <button type="reset" class="layui-btn layui-btn-primary">重置</button>-->
            </div>
        </div>
    </form>

    <script>
        //Demo
        layui.use('form', function(){
            var form = layui.form;

            //监听提交
            form.on('submit(formDemo)', function(data){
                layer.msg(JSON.stringify(data.field));
                return false;
            });
        });
    </script>
</div>

</body>
</html>
upd.html:
<!DOCTYPE html>
<html lang="en" xmlns:th="http://www.w3.org/1999/xhtml">
<head>
    <meta charset="UTF-8">
    <title>修改书籍</title>
    <link rel="stylesheet" href="./css/layui.css">
</head>
<body>

<script src="./js/layui.js"></script>

<div style="background-color: #009E94;margin-top: 30px;margin-bottom: 30px;width: 20%;text-align: center;border-radius: 7px;">
    <h2>请输入修改信息</h2>
</div>


<div>
    <form class="layui-form" th:action="@{/updbook}" method="post">

<!--        注意:这里必须要设置bookID的隐藏域,否则修改失败-->
        <input type="hidden"name="bookID" th:value="${books.getBookID()}">


        <div class="layui-form-item"style="margin-bottom: 30px;">
            <label class="layui-form-label" style="margin-bottom: 10px;">书籍名称</label>
            <div class="layui-input-block">
                <input style="width: 90%;" type="text" name="bookName" required  lay-verify="required" th:value="${books.getBookName()}" autocomplete="off" class="layui-input">
            </div>
        </div>


        <div class="layui-form-item"style="margin-bottom: 30px;">
            <label class="layui-form-label" style="margin-bottom: 10px;">书籍数量</label>
            <div class="layui-input-block">
                <input style="width: 90%;" type="number" name="bookCounts" required lay-verify="required" th:value="${books.getBookCounts()}" autocomplete="off" class="layui-input">
            </div>
        </div>
        <div class="layui-form-item" style="margin-bottom: 30px;">
            <label class="layui-form-label" style="margin-bottom: 10px;">书籍描述</label>
            <div class="layui-input-block">
                <input  style="width: 90%;" type="text" name="detail" required lay-verify="required" th:value="${books.getDetail()}" autocomplete="off" class="layui-input">
            </div>
        </div>

        <div class="layui-form-item" >
            <div class="layui-input-block">
                <button class="layui-btn" lay-submit lay-filter="formDemo">立即提交</button>
<!--                <button type="reset" class="layui-btn layui-btn-primary">重置</button>-->
            </div>
        </div>
    </form>

    <script>
        //Demo
        layui.use('form', function(){
            var form = layui.form;

            //监听提交
            form.on('submit(formDemo)', function(data){
                layer.msg(JSON.stringify(data.field));
                return false;
            });
        });
    </script>
</div>

</body>
</html>
7、controller层编写接口,传递数据并控制视图
package com.han.controller;


import com.han.pojo.Books;
import com.han.pojo.User;
import com.han.service.BookServiceImpl;
import com.han.service.UserService;

import org.springframework.beans.factory.annotation.Autowired;
import org.springframework.stereotype.Controller;
import org.springframework.ui.Model;

import org.springframework.web.bind.annotation.*;

import javax.servlet.http.HttpSession;
import java.util.ArrayList;
import java.util.Collection;
import java.util.List;

@Controller          //RestController=Controller+ResponseBody
public class MainController {

    @Autowired
    BookServiceImpl bookService;

    @Autowired
    UserService userService;

    //返回主页
    @GetMapping ("/tomain")
    public String tomain(){
        return "main";
    }


//    查询所有书籍展示在/home
    @GetMapping("/home")
    public  String main(Model model){
        Collection<Books> list=bookService.queryAllBook();
        model.addAttribute("booklist",list);
        return "home";
    }

//   根据id 删除书籍
    @GetMapping("/del/{id}")
    public String deleteById(@PathVariable("id") int id){ //PathVariable 表明它是前端传过来的一个参数
        int i=bookService.deleteBookById(id);
        if(i>0)
            System.out.println("删除成功");
        return "redirect:/home";
    }

//    根据id查出要修改的书籍已有的信息去修改书籍的页面
    @GetMapping("/upd/{id}")
    public String update(@PathVariable("id") int id,Model model){
        Books books=bookService.queryBooKById(id);
        model.addAttribute("books",books); //返回给前端要修改的书籍的所有信息
        return "upd";   //返回到修改书籍信息的页面
    }

//修改书籍的请求处理
    @PostMapping("/updbook")
    public String updatebook( Books books){
        bookService.updateBook(books);
        return "redirect:/home";
    }


    //    添加书籍的页面
    @GetMapping("/add")
    public String add(){
        return "add";   //返回到修改书籍信息的页面
    }


//添加书籍的请求处理
    @PostMapping("/addbook")
    public String addbook( Books books){
        bookService.addBook(books);
        return "redirect:/home";
    }


//  根据书名  查询书籍
    @PostMapping("/search")
    public  String search(String queryBookName,Model model){
        Books books=bookService.queryBooKByName(queryBookName);
//        System.out.println(books);

        List<Books> list=new ArrayList<Books>();
        list.add(books);

        if (books==null){
            list=bookService.queryAllBook();
            model.addAttribute("error","未查到相关书籍");
        }

        model.addAttribute("booklist",list);
        return "home";
    }
页面如下: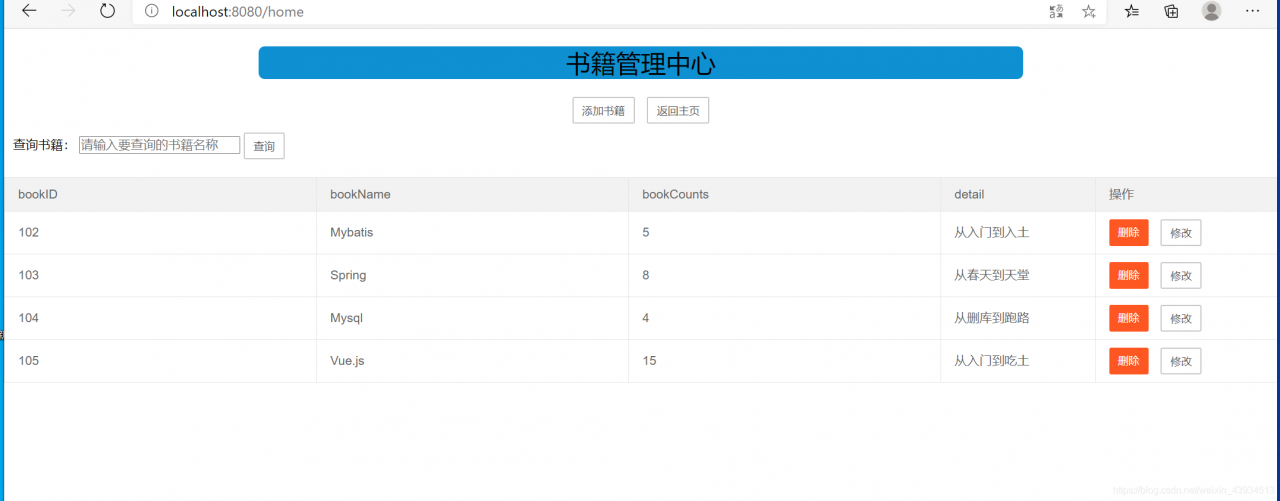
到这里,增删改查功能均实现,限于篇幅,不再演示。
四.用户登录认证
用户登录信息步骤和book是一样的,建立user表,建立实体类、mapper、service、controller等,基本完全一致,可自行试着写出。
后面登录就是用的user表里面的数据,每一条用户数据都可以用来登录。
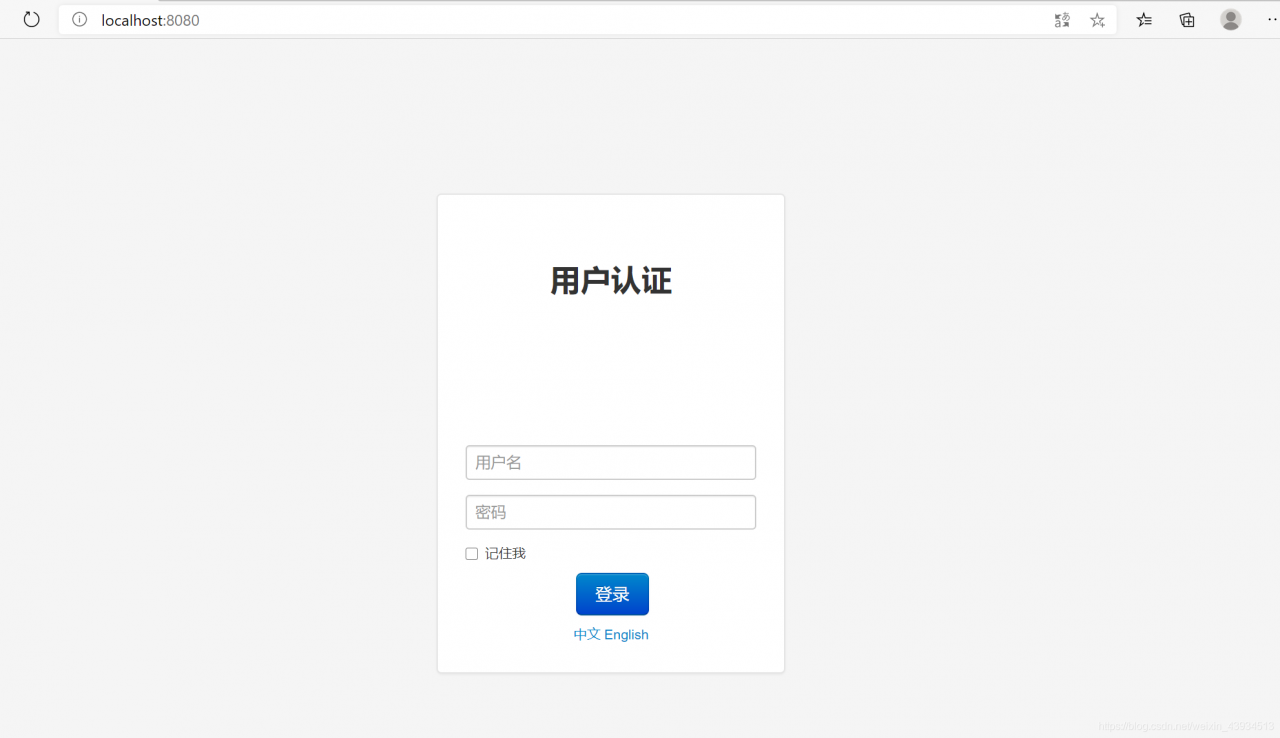
1.用户登录页面
<!DOCTYPE html>
<html lang="en" xmlns:th="http://www.thymeleaf.org">
  <head>
    <title>登录页面</title>
	<meta http-equiv="Content-Type" content="text/html;charset=utf-8">
    <!-- Bootstrap -->
    <link href="bootstrap/css/bootstrap.min.css" rel="stylesheet" media="screen">
    <link href="bootstrap/css/bootstrap-responsive.min.css" rel="stylesheet" media="screen">
    <link href="assets/styles.css" rel="stylesheet" media="screen">
     <!-- HTML5 shim, for IE6-8 support of HTML5 elements -->
    <!--[if lt IE 9]>
      <script src="http://html5shim.googlecode.com/svn/trunk/html5.js"></script>
    <![endif]-->
    <script src="js/vendor/modernizr-2.6.2-respond-1.1.0.min.js"></script>
  </head>
  <body id="login">
    <div class="container">

<!--      登录请求操作:将name属性提交到后端进行认证-->
      <form class="form-signin" action="/login" method="post">
        <h2 class="form-signin-heading" style="text-align: center;margin-bottom:150px;margin-top: 50px;">用户认证</h2>

<!--          <img style="width: 80px;height: 80px;" th:src="@{images/idea.jpg}"/>-->

        <p th:text="${msg}" style="color: red;"></p>
        <input type="text" name="username" value="HanYJ" class="input-block-level" placeholder="用户名" required>
        <input type="password"  name="password" value="888888" class="input-block-level" placeholder="密码" required>
        <label class="checkbox">
          <input type="checkbox" value="remember-me"> 记住我
        </label>
        <button class="btn btn-large btn-primary" type="submit" style="margin-left: 38%;margin-bottom: 10px">登录</button>

          <div style="text-align: center">
              <a>中文</a>
              <a>English</a>
          </div>
      </form>

    </div> <!-- /container -->
    <script src="vendors/jquery-1.9.1.min.js"></script>
    <script src="bootstrap/js/bootstrap.min.js"></script>
  </body>
</html>
2.通过session保存用户的用户名,根据这个用户名去数据库查询用户是否存在
    @PostMapping("/login")
    public  String loginByInfo(String username, String password, Model model, HttpSession session) {

//    通过session来进行登录认证
        User user = userService.queryUserByUsername(username);
        if (username.equals(user.getUsername())&&password.equals(user.getPassword())) {
            session.setAttribute("loginUser", username);
            return "main";
        }else{
            model.addAttribute("msg", "用户名或密码错误");
            return "index";
        }
    }
为了防止用户在没登录的情况下也能够进入系统的情况,需要设置拦截器。在config下新建LoginHanderInterceptor类文件,写入以下代码
package com.han.config;

//拦截器

import org.springframework.web.servlet.HandlerInterceptor;

import javax.servlet.http.HttpServletRequest;
import javax.servlet.http.HttpServletResponse;

//拦截器进行权限管理

public class LoginHandleInterceptor implements HandlerInterceptor {
    @Override
    public boolean preHandle(HttpServletRequest request, HttpServletResponse response, Object handler) throws Exception {

        Object loginUser=request.getSession().getAttribute("loginUser");

        if (loginUser==null){
            request.setAttribute("msg","没有权限,请先登录");
            request.getRequestDispatcher("/index.html").forward(request,response);
            return false;
        }else {
            return true;
        }
    }
}
接着在 config下建立MyMvcConfig类文件,写入以下代码,注册拦截器
package com.han.config;

import org.springframework.context.annotation.Configuration;
import org.springframework.web.servlet.config.annotation.InterceptorRegistry;
import org.springframework.web.servlet.config.annotation.ViewControllerRegistry;
import org.springframework.web.servlet.config.annotation.WebMvcConfigurer;

@Configuration
public class MyMvcConfig implements WebMvcConfigurer {

    @Override
    public void addViewControllers(ViewControllerRegistry registry) {
        //路径映射
        registry.addViewController("/index.html").setViewName("index");
//        registry.addViewController("/main.html").setViewName("main");

    }

//注册拦截器
    @Override
    public void addInterceptors(InterceptorRegistry registry) {
        registry.addInterceptor(new LoginHandleInterceptor()).addPathPatterns("/**")
                .excludePathPatterns("/index.html","/","/login","/css/**","/js/*","/bootstrap/*","/images/*");
    }
}
登录验证通过进入main页面:
main页面:
<!DOCTYPE html>
<html class="no-js" xmlns:th="http://www.thymeleaf.org" style="margin-top: 10px;">
<head>
<title>后台主页</title>
<!-- Bootstrap -->
<link href="bootstrap/css/bootstrap.min.css" rel="stylesheet" media="screen">
<link href="bootstrap/css/bootstrap-responsive.min.css" rel="stylesheet" media="screen">
<link href="vendors/easypiechart/jquery.easy-pie-chart.css" rel="stylesheet" media="screen">
<link href="assets/styles.css" rel="stylesheet" media="screen">
<meta http-equiv="Content-Type" content="text/html;charset=utf-8">
<!-- HTML5 shim, for IE6-8 support of HTML5 elements -->
<!--[if lt IE 9]>
<script src="http://html5shim.googlecode.com/svn/trunk/html5.js"></script>
<![endif]-->
<script src="vendors/modernizr-2.6.2-respond-1.1.0.min.js"></script>
</head>
<body>
<div class="navbar navbar-fixed-top">
<div class="navbar-inner">
<div class="container-fluid">
<a class="btn btn-navbar" data-toggle="collapse" data-target=".nav-collapse"> <span class="icon-bar"></span>
<span class="icon-bar"></span>
<span class="icon-bar"></span>
</a>
<a class="brand" href="#" style="font-size: 25px;font-weight: 600;">信息管理中心</a>
<div class="nav-collapse collapse">
<!-- <i class="icon-user" style="float: right" ></i>-->
<ul class="nav pull-right">
<li class="dropdown">
<!-- <i class="icon-user"></i>欢迎你<i class="caret"></i>-->
<i style="float: right;margin-top: 10px;" class="icon-user"></i>
<span style="line-height:40px; margin-right: 5px;margin-top: 8px;">欢迎你</span>
<a style="margin-right: 10px;color: #0000FF;font-weight: 900; margin-top: 8px;display: inline;" href="#" role="button" class="dropdown-toggle" data-toggle="dropdown" th:text="${session.loginUser}">
</a>
<ul class="dropdown-menu">
<li>
<a tabindex="-1" href="#">个人资料</a>
</li>
<li class="divider"></li>
<li>
<!--注销请求,删除session中存放的用户信息-->
<a tabindex="-1" href="/index">退出登录</a>
</li>
</ul>
</li>
</ul>
</div>
</div>
</div>
</div>
<div class="container-fluid">
<div class="row-fluid">
<div class="span2" id="sidebar">
<ul class="nav nav-list bs-docs-sidenav nav-collapse collapse">
<li class="active">
<a href="#">功能列表</a>
</li>
<li>
<a href="/home"> 书籍管理</a>
</li>
<li>
<a href="/file">文件管理</a>
</li>
<li>
<a href="/Email">发送邮件</a>
</li>
<li>
<a href="#">待定功能</a>
</li>
<li>
<a href="#">待定功能</a>
</li>
<li>
<a href="#"> 待定功能</a>
</li>
<li>
<a href="#"> 待定功能</a>
</li>
<li>
<a href="#">待定功能</a>
</li>
<li>
<a href="#"><span class="badge badge-success pull-right">131</span>待定功能</a>
</li>
</ul>
</div>
<!--/span-->
<div class="span10" id="content">
<div class="row-fluid">
<!-- <div class="alert alert-success">-->
<!-- <button type="button" class="close" data-dismiss="alert">×</button>-->
<!-- <h4>成功提示</h4>-->
<!-- 操作已经成功了!-->
<!-- </div>-->
<div class="navbar">
<div class="navbar-inner">
<ul class="breadcrumb">
<i class="icon-chevron-left hide-sidebar"><a href='#' title="Hide Sidebar" rel='tooltip'> </a></i>
<i class="icon-chevron-right show-sidebar" style="display:none;"><a href='#' title="Show Sidebar" rel='tooltip'> </a></i>
<li>
<a href="/tomain">返回首页</a> <span class="divider">/</span>
</li>
<li>
<a href="/home">书籍管理</a> <span class="divider">/</span>
</li>
</ul>
</div>
</div>
</div>
<div class="row-fluid">
<!-- block -->
<div class="block">
<div class="navbar navbar-inner block-header">
<div class="muted pull-left">统计</div>
<div class="pull-right"><span class="badge badge-warning">查看更多</span>
</div>
</div>
<div class="block-content collapse in">
<div class="span3">
<div class="chart" data-percent="73">73%</div>
<div class="chart-bottom-heading"><span class="label label-info">访问量</span>
</div>
</div>
<div class="span3">
<div class="chart" data-percent="53">53%</div>
<div class="chart-bottom-heading"><span class="label label-info">浏览量</span>
</div>
</div>
<div class="span3">
<div class="chart" data-percent="83">83%</div>
<div class="chart-bottom-heading"><span class="label label-info">用户</span>
</div>
</div>
<div class="span3">
<div class="chart" data-percent="13">13%</div>
<div class="chart-bottom-heading"><span class="label label-info">订单</span>
</div>
</div>
</div>
</div>
<!-- /block -->
</div>
<div class="row-fluid">
<div class="span6">
<!-- block -->
<div class="block">
<div class="navbar navbar-inner block-header">
<div class="muted pull-left">用户</div>
<div class="pull-right"><span class="badge badge-info">1,234</span>
</div>
</div>
<div class="block-content collapse in">
<table class="table table-striped">
<thead>
<tr>
<th>#</th>
<th>姓名</th>
<th>昵称</th>
<th>用户名</th>
</tr>
</thead>
<tbody>
<tr>
<td>1</td>
<td>Mark</td>
<td>Otto</td>
<td>@mdo</td>
</tr>
<tr>
<td>2</td>
<td>Jacob</td>
<td>Thornton</td>
<td>@fat</td>
</tr>
<tr>
<td>3</td>
<td>Vincent</td>
<td>Gabriel</td>
<td>@gabrielva</td>
</tr>
</tbody>
</table>
</div>
</div>
<!-- /block -->
</div>
<div class="span6">
<!-- block -->
<div class="block">
<div class="navbar navbar-inner block-header">
<div class="muted pull-left">订单</div>
<div class="pull-right"><span class="badge badge-info">752</span>
</div>
</div>
<div class="block-content collapse in">
<table class="table table-striped">
<thead>
<tr>
<th>#</th>
<th>产品名</th>
<th>订单日期</th>
<th>订单金额</th>
</tr>
</thead>
<tbody>
<tr>
<td>1</td>
<td>Coat</td>
<td>02/02/2013</td>
<td>$25.12</td>
</tr>
<tr>
<td>2</td>
<td>Jacket</td>
<td>01/02/2013</td>
<td>$335.00</td>
</tr>
<tr>
<td>3</td>
<td>Shoes</td>
<td>01/02/2013</td>
<td>$29.99</td>
</tr>
</tbody>
</table>
</div>
</div>
<!-- /block -->
</div>
</div>
<div class="row-fluid">
<div class="span6">
<!-- block -->
<div class="block">
<div class="navbar navbar-inner block-header">
<div class="muted pull-left">客户</div>
<div class="pull-right"><span class="badge badge-info">17</span>
</div>
</div>
<div class="block-content collapse in">
<table class="table table-striped">
<thead>
<tr>
<th>#</th>
<th>姓名</th>
<th>昵称</th>
<th>用户名</th>
</tr>
</thead>
<tbody>
<tr>
<td>1</td>
<td>Mark</td>
<td>Otto</td>
<td>@mdo</td>
</tr>
<tr>
<td>2</td>
<td>Jacob</td>
<td>Thornton</td>
<td>@fat</td>
</tr>
<tr>
<td>3</td>
<td>Vincent</td>
<td>Gabriel</td>
<td>@gabrielva</td>
</tr>
</tbody>
</table>
</div>
</div>
<!-- /block -->
</div>
<div class="span6">
<!-- block -->
<div class="block">
<div class="navbar navbar-inner block-header">
<div class="muted pull-left">购物清单</div>
<div class="pull-right"><span class="badge badge-info">812</span>
</div>
</div>
<div class="block-content collapse in">
<table class="table table-striped">
<thead>
<tr>
<th>#</th>
<th>日期</th>
<th>金额</th>
</tr>
</thead>
<tbody>
<tr>
<td>1</td>
<td>02/02/2013</td>
<td>$25.12</td>
</tr>
<tr>
<td>2</td>
<td>01/02/2013</td>
<td>$335.00</td>
</tr>
<tr>
<td>3</td>
<td>01/02/2013</td>
<td>$29.99</td>
</tr>
</tbody>
</table>
</div>
</div>
<!-- /block -->
</div>
</div>
</div>
</div>
<hr>
<footer>
<p>Copyright © 2018.Company name All rights reserved.<a target="_blank" href="http://www.4399.com">版权信息</a></p>
</footer>
</div>
<!--/.fluid-container-->
<script src="vendors/jquery-1.9.1.min.js"></script>
<script src="bootstrap/js/bootstrap.min.js"></script>
<script src="vendors/easypiechart/jquery.easy-pie-chart.js"></script>
<script src="assets/scripts.js"></script>
<script>
$(function() {
// Easy pie charts
$('.chart').easyPieChart({animate: 1000});
});
</script>
</body>
</html>
后台主页:
五.关于前端
本来不想讲的。最后,我们在跟着学习一个项目时,代码是跟的来的,但是前端页面和静态资源文件就比较为难了,所以只能放弃。我这个项目就是直接用的模板,完全可以自己找一个模板,将后端代码放进去即可。
模板之家免费网站模板
找到想用的模板下载下来,里面就包含了所有需要的静态资源。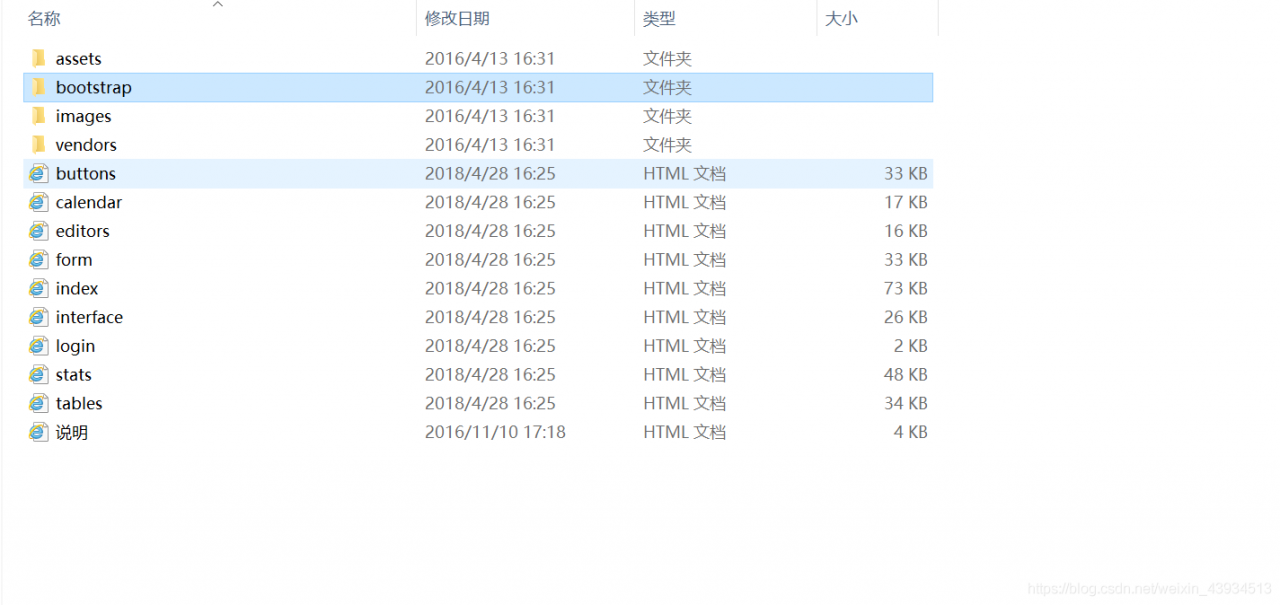
此外,还有比较好用的免费模板网站。
x-admin
以及前端组件官网。
semantic
Layui
BootStrap
结束。