QML中TableView与QAbstractTableModel之间的关联探索
背景
项目中有一个比较复杂的表格需要实现,数据来自后台,数据的行或列会动态变化,表头的内容也会改变,要求表格能动态的显示这些数据。需要使用Model/View的结构,,实现前后端的分离。以往在用QML做界面时,模型部分使用的是TableModel(需要导入import Qt.labs.qmlmodels 1.0,参考https://doc.qt.io/qt-5.14/qml-qt-labs-qmlmodels-tablemodel.html),这个模型可以很方便的做与TableView的关联,当然,涉及到模型的数据操作也会在QML中进行。
然而,现在的要求是将模型部分全部移到C++上,使用QAbstractTableModel做后端的逻辑及数据处理,Qt官网上也有相关的例程https://doc.qt.io/qt-5.14/qml-qtquick-tableview.html。
我用的Qt版本是Qt 5.14.2。这次会在官网的例程上做一些补充说明,便于以后更好的使用模型。如果我在文章中有地方说的不明白的或说错的,请大家留言评论,我会做补充和纠正。
QML的TabView 示例
创建C++模型TableModel
新建TableModel类,继承QAbstractTableModel。目录结构如下图所示。
其中基础代码如下,有修改:
tablemodel.h中的代码
#ifndef TABLEMODEL_H
#define TABLEMODEL_H

#include <QAbstractTableModel>

class TableModel : public QAbstractTableModel
{
    Q_OBJECT
public:
    TableModel();

    int rowCount(const QModelIndex & = QModelIndex()) const override
    {
        return 10;
    }

    int columnCount(const QModelIndex & = QModelIndex()) const override
    {
        return 10;
    }

    QVariant data(const QModelIndex &index, int role) const override
    {
        switch (role) {
            case Qt::DisplayRole:
                return QString("%1, %2").arg(index.row()).arg(index.column());
            default:
                break;
        }

        return QVariant();
    }

    QHash<int, QByteArray> roleNames() const override
    {
        return { {Qt::DisplayRole, "display"} };
    }
};

#endif // TABLEMODEL_H
tablemodel.cpp中的代码
#include "tablemodel.h"

TableModel::TableModel()
{

}
注册TableModel类型
在main.cpp中通过qmlRegisterType注册C++类型到QML中。
main.cpp中的代码
#include <QGuiApplication>
#include <QQmlApplicationEngine>

//添加头文件
#include <tablemodel.h>

int main(int argc, char *argv[])
{
    QCoreApplication::setAttribute(Qt::AA_EnableHighDpiScaling);

    QGuiApplication app(argc, argv);

    //注册C++类型至QML
    qmlRegisterType<TableModel>("TableModel", 0, 1, "TableModel");

    QQmlApplicationEngine engine;

    const QUrl url(QStringLiteral("qrc:/main.qml"));
    QObject::connect(&engine, &QQmlApplicationEngine::objectCreated,
                     &app, [url](QObject *obj, const QUrl &objUrl) {
        if (!obj && url == objUrl)
            QCoreApplication::exit(-1);
    }, Qt::QueuedConnection);
    engine.load(url);

    return app.exec();
}
创建TableView和绑定模型
在main.qml中创建TableView并绑定模型TableModel
main.qml中的代码
import QtQuick 2.14
import QtQuick.Controls 2.14

//导入C++的类
import TableModel 0.1

ApplicationWindow {
    visible: true
    width: 640
    height: 480

    TableView {
        anchors.horizontalCenter: parent.horizontalCenter
        anchors.fill: parent
        anchors.margins: 24

        interactive: false //禁止拂动

        columnSpacing: 8
        rowSpacing: 8
        clip: true

        model: TableModel {
            id: tableModel
        }

        delegate: Rectangle {
            implicitWidth: 50
            implicitHeight: 30
            Label {
                text: display
                anchors.centerIn: parent
            }
        }
    }
}
运行效果:
为了能更好的进行改造,我先对上述代码几个重点进行说明一下:
1. 数据角色
在tablemodel.h的roleNames函数中,返回了QHash类型的{ {Qt::DisplayRole, “display”} }值,对应的,在main.qml->TableView->delegate中,Label的属性text也绑定了display。
这么使用的原因是,QML会根据数据角色属性去使用tablemodel.h中的data()函数查找数据。在QML中如果绑定的属性是display,那么在data()中的role参数等于display对应的值。在tablemodel.h中使用qDebug()打印数据。为了进行测试,修改了tablemodel.h的代码和main.qml的代码
tablemodel.h中的修改代码
QVariant data(const QModelIndex &index, int role) const override
    {
        qDebug() << role << index.row() << index.column();
        switch (role) {
            case Qt::DisplayRole:
                if(index.column() == 0) {
                    return QString("display");
                } else {
                    return QString("");
                }
            case Qt::UserRole:
                if(index.column() == 1) {
                    return QString("user");
                } else {
                    return QString("");
                }
            case Qt::UserRole + 1:
                if(index.column() == 2) {
                    return QString("name");
                } else {
                    return QString("");
                }
            break;
            default:
                break;
        }

        return QVariant();
    }

    QHash<int, QByteArray> roleNames() const override
    {
        return { {Qt::DisplayRole, "display"}, {Qt::UserRole, "user"} , {Qt::UserRole + 1, "name"} };
    }
main.qml中的修改代码
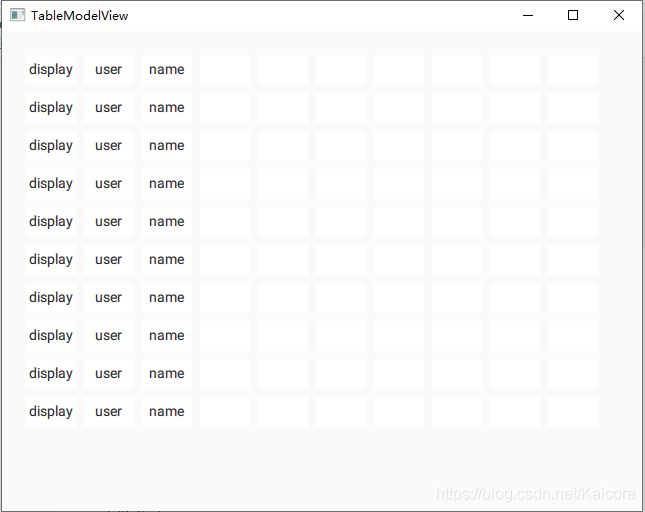
delegate: Rectangle {
            implicitWidth: 50
            implicitHeight: 30

            Label {
                text: display
                anchors.centerIn: parent
            }
            Label {
                text: user
                anchors.centerIn: parent
            }
            Label {
                text: name
                anchors.centerIn: parent
            }
        }
打印的内容中,256是Qt::UserRole的值,257是Qt::UserRole + 1的值,0是Qt::DisplayRole的值。可以看到,在TableView建立后,在代理中的每一个数据角色都会循环调用一遍data()。同时data()的调用是Z字形的,先查询一行的每列,再查询下一行。我这里在处理data()时,第一列显示角色为display的值,第二列显示角色为user的值,第三列显示角色为name的值。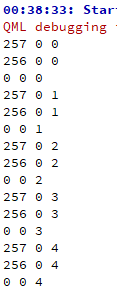
2. 未完待续。。。
今天先写到这里,后续将继续补充QML中TableView和C++ TableModel的联动。