一、介绍
美食杰的发布菜谱分为:介绍、原材料,使用了element来进行渲染。
介绍:

属性使用的是下拉框,,里面的数据是向后端请求的
原材料:

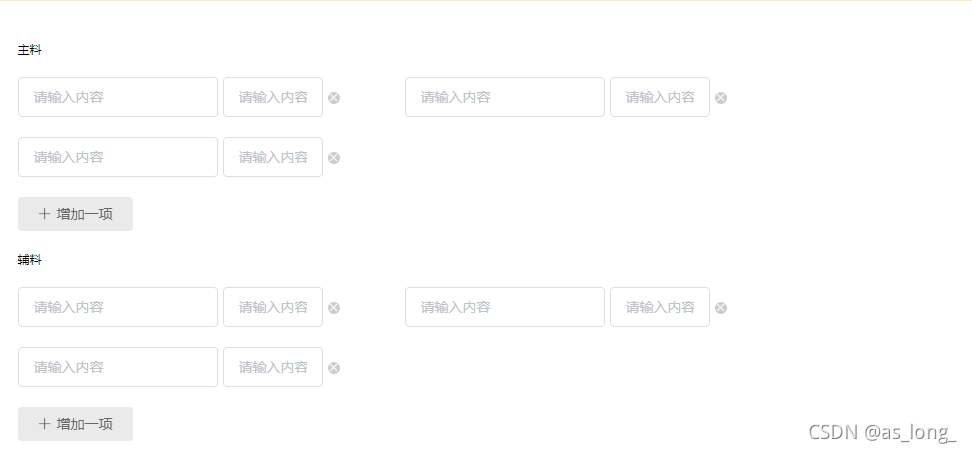
其中主料和辅料初始是三个输入框,可以点击增加添加输入框,也可以点击旁边的叉号删除,当只剩一个的时候,叉号会隐藏
代码:
通过element进行渲染
<div class="create">
    <h2>欢迎发布新菜谱,先介绍一下你的大作!</h2>
    <section class="create-introduce">
      <h5>标题</h5>
      {{backData.title}}
      <el-input v-model="backData.title" class="create-input" placeholder="请输入内容"></el-input>
      <h5>属性</h5>
      <div>
        <el-select v-for="item in propertyies" :key='item.parent_type'
        :placeholder="item.parent_name"
        v-model="backData.property[item.title]"
        >
          <el-option  v-for="option in item.list" :key="option.type"

          :value='option.name'
          >
          {{option.name}}
          </el-option>
        </el-select>
      </div>
      <h5>菜谱分类</h5>
      <div>
        <el-select placeholder="请选择菜谱分类"

        v-model="backData.classify">
          <el-option-group
          v-for='group in classifies'
          :key='group.parent_type'
          :label='group.parent_name'
            >
            <el-option
            v-for="item in group.list"
            :key='item.type'
            :value='item.type'
            :label='item.name'
              >
            </el-option>
          </el-option-group>
        </el-select>
      </div>
      <h5>成品图 (328*440)</h5>
      <div class="upload-img-box clearfix">
        <div class="upload-img">
          <upload-img
          action='/api/upload?type=product'
          :image-url='backData.product_pic_url'
          @gai='gai(url)'
          @res-url='(data)=>{backData.product_pic_url=data.resImgUrl}'
          ></upload-img>
        </div>
        <el-input
          class="introduce-text"
          type="textarea"
          :rows="10"
          placeholder="请输入内容"

        >
        </el-input>
      </div>
    </section>

    <h2>记录所有原材料</h2>
    <section class="create-introduce">
      <h5>主料</h5>
      <!--[ { "name": "", "specs": "" }, { "name": "", "specs": "" }, { "name": "", "specs": "" } ]-->
      <Stuff
      v-model='backData.raw_material.main_material'
      ></Stuff>
      <h5>辅料</h5>
      <Stuff
      v-model='backData.raw_material.accessories_material'
      ></Stuff>
    </section>

    <el-button
      class="send"
      type="primary"
      size="medium"
      :icon="icon"
      @click="submit"
    >搞定,提交审核</el-button>
  </div>
最后点击提交时向后端请求数据需要传参 backData:
backData:{
        title:'',
        property: {},
        classify:'',
        product_pic_url: '', // 成品图URL
        product_story: '', // 成品图故事
        raw_material: { // 料
          main_material: Array(3).fill(1).map(()=>({...raw_material_struct})), // 主料
          accessories_material: Array(3).fill(1).map(()=>({...raw_material_struct})), // 辅料
        },
        steps: [{img_url: '',describe: ''}]
      }
介绍里面的属性需要向后端请求数据,根据请求到的数据propertyies通过v-for进行遍历创建select,在根据propertyies下的list进行遍历创建option:
getProperty().then(res=>{
      this.propertyies=res.data
      console.log(this.propertyies);
      this.backData.property=res.data.reduce((o,item)=>{
        o[item.title]=''
        return o
      },{})
      console.log(res);
      console.log(this.backData.property);
    })
原材料里的主料和辅料用的是同一个组件Stuff,通过v-model进行传参,主料是backData.raw_material.main_material,辅料是backData.raw_material.accessories_material,在子组件里通过props获取传递的参数,获取数据用v-model。删除和添加输入框需要$emit传递给父组件改变数据:
<template>
  <div class="stuff">
    <div class="clearfix">

      <div class="raw-item"
      v-for="(item,index) in value"
      :key='index'
      >
        <el-input v-model="item.name" placeholder="请输入内容" style="width: 200px" ></el-input>
        <el-input v-model="item.specs" placeholder="请输入内容" style="width: 100px" ></el-input>
        <i class="delete-icon el-icon-close" v-show="value.length!==1" @click='remove(index)'></i>
      </div>
    </div>
    <el-button  class="eaeaea" type="primary" size="medium" icon="el-icon-plus"
    @click='add'>增加一项</el-button>
  </div>
</template>
<script>
//组建通信时 v-model会监听 在组件上面双向绑定 value 发布事件input
export default {
  props: {
    value:{
      type:Array,
      default:()=>[]
    }
  },
  methods:{
    add(){
      this.$emit('input',[
        ...this.value,
        {'name':'','specs':''}
      ])
    },
    remove(index){
      const newValue=this.value.filter((item,i)=>{
        return i!==index
      })
      this.$emit('input',newValue)
    }
  }
}
</script>
总结:
到这里就结束了,谢谢大家的观看
版权声明:本文为as_long_原创文章,遵循CC 4.0 BY-SA版权协议,转载请附上原文出处链接和本声明。