文章目录
- Spring Security 专题
- 一、基本概念
- 二、一个自己实现的权限模型 BasicAuth:
- 三、SpringBoot Security 快速上手
- 四、SpringBoot Security工作原理
- 五、分布式系统认证方案
- 六、OAuth2.0
- 七、 Spring Security OAuth2.0
- 八、主线问题总结
- 九、附录,HttpSecurity配置项
Spring Security 专题
一、基本概念
认证
用户认证就是判断一个用户的身份是否合法的过程,用户去访问系统资源时系统要求验证用户的身份信息,身份合法方可继续访问,不合法则拒绝访问。常见的用户身份认证方式有:用户名密码登录,二维码登录,手机短信登录,指纹认证等方式。
系统为什么要认证?
认证是为了保护系统的隐私数据与资源,用户的身份合法方可访问该系统的资源。
怎么进行认证?
授权
授权是用户认证通过后,根据用户的权限来控制用户访问资源的过程,拥有资源的访问权限则正常访问,没有权限则拒绝访问。
为什么要授权?
认证是为了保证用户身份的合法性,授权则是为了更细粒度的对隐私数据进行划分,授权是在认证通过后发生的,
控制不同的用户能够访问不同的资源。
会话
用户认证通过后,为了避免用户的每次操作都进行认证可将用户的信息保证在会话中。会话就是系统为了保持当前用户的登录状态所提供的机制,常见的有基于session方式、基于token方式等。
RBAC模型
主体 -》 角色 -》 资源 -》行为
如何设计一个权限系统?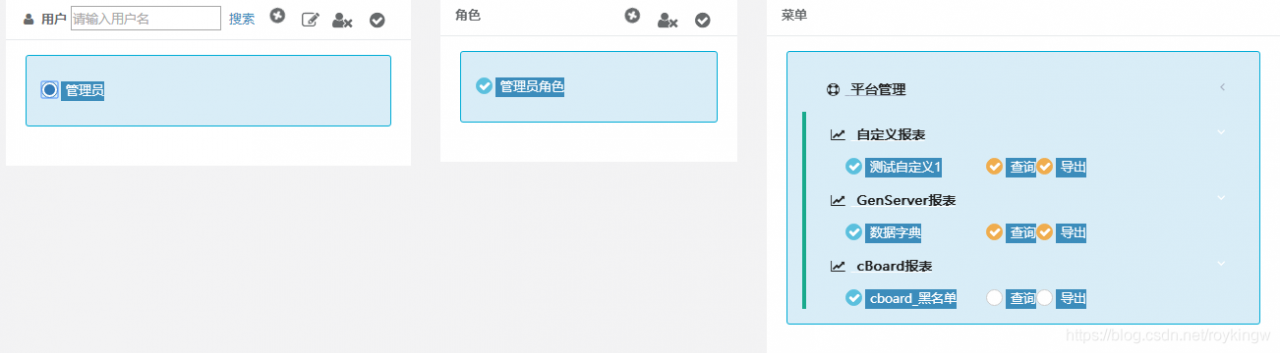
二、一个自己实现的权限模型 BasicAuth:
下面我们自己实现一个基于Session方式的RBAC模型的项目。
先创建一个maven父工程AuthDemo,管理maven版本。
<?xml version="1.0" encoding="UTF-8"?>
<project xmlns="http://maven.apache.org/POM/4.0.0"
         xmlns:xsi="http://www.w3.org/2001/XMLSchema-instance"
         xsi:schemaLocation="http://maven.apache.org/POM/4.0.0 http://maven.apache.org/xsd/maven-4.0.0.xsd">
    <modelVersion>4.0.0</modelVersion>

    <groupId>com.tuling</groupId>
    <artifactId>AuthDemo</artifactId>
    <packaging>pom</packaging>
    <version>1.0-SNAPSHOT</version>

    <properties>
        <maven.compiler.source>1.8</maven.compiler.source>
        <maven.compiler.target>1.8</maven.compiler.target>
        <java.version>1.8</java.version>
        <spring-boot-version>2.3.3.RELEASE</spring-boot-version>
        <spring-cloud-version>Greenwich.RELEASE</spring-cloud-version>
    </properties>

    <modules>
        <module>basicAuth</module>
    </modules>

    <dependencyManagement>
        <dependencies>
            <dependency>
                <groupId>org.springframework.boot</groupId>
                <artifactId>spring-boot-dependencies</artifactId>
                <version>${spring-boot-version}</version>
                <type>pom</type>
                <scope>import</scope>
            </dependency>
            <dependency>
                <groupId>org.springframework.cloud</groupId>
                <artifactId>spring-cloud-dependencies</artifactId>
                <version>${spring-cloud-version}</version>
                <type>pom</type>
                <scope>import</scope>
            </dependency>
            <dependency>
                <groupId>javax.interceptor</groupId>
                <artifactId>javax.interceptor-api</artifactId>
                <version>1.2</version>
            </dependency>
            <dependency>
                <groupId>com.alibaba</groupId>
                <artifactId>fastjson</artifactId>
                <version>1.2.47</version>
            </dependency>
            <dependency>
                <groupId>mysql</groupId>
                <artifactId>mysql-connector-java</artifactId>
                <version>5.1.47</version>
            </dependency>
            <dependency>
                <groupId>org.springframework.security</groupId>
                <artifactId>spring-security-jwt</artifactId>
                <version>1.1.1.RELEASE</version>
            </dependency>
            <dependency>
                <groupId>org.springframework.security.oauth.boot</groupId>
                <artifactId>spring-security-oauth2-autoconfigure</artifactId>
                <version>2.1.2.RELEASE</version>
            </dependency>
        </dependencies>
    </dependencyManagement>
</project>
注:目前我们需要使用到的就是spring-boot-dependencies。其他依赖包含了后面几个部分需要的依赖版本,在这里一次全部引入。
然后我们创建一个basicAuth的子工程。子工程是采用SpringBoot方式快速搭建的伪前后端分离的项目。
项目整体机构如下: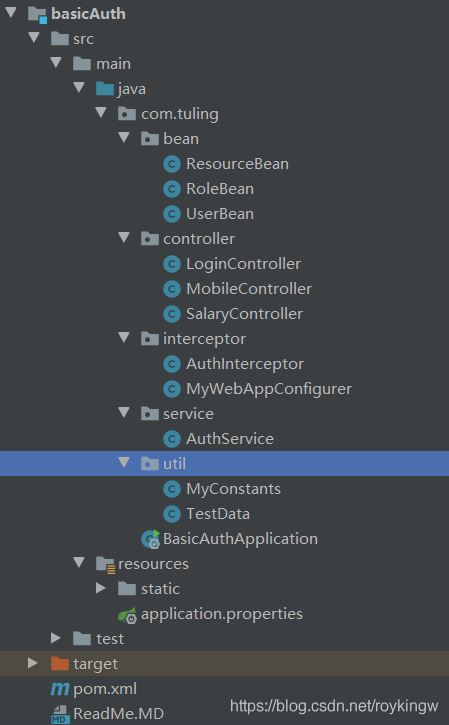
pom依赖非常简单,只需要引入spring-boot-starter 和 spring-boot-starter-web两个依赖。
<?xml version="1.0" encoding="UTF-8"?>
<project xmlns="http://maven.apache.org/POM/4.0.0"
         xmlns:xsi="http://www.w3.org/2001/XMLSchema-instance"
         xsi:schemaLocation="http://maven.apache.org/POM/4.0.0 http://maven.apache.org/xsd/maven-4.0.0.xsd">
    <parent>
        <artifactId>AuthDemo</artifactId>
        <groupId>com.tuling</groupId>
        <version>1.0-SNAPSHOT</version>
    </parent>
    <modelVersion>4.0.0</modelVersion>
    <artifactId>basicAuth</artifactId>

    <dependencies>
        <dependency>
            <groupId>org.springframework.boot</groupId>
            <artifactId>spring-boot-starter</artifactId>
        </dependency>
        <dependency>
            <groupId>org.springframework.boot</groupId>
            <artifactId>spring-boot-starter-web</artifactId>
        </dependency>
    </dependencies>

    <build>
        <plugins>
            <plugin>
                <groupId>org.springframework.boot</groupId>
                <artifactId>spring-boot-maven-plugin</artifactId>
                <version>${spring-boot-version}</version>
                <configuration>
                    <mainClass>com.tuling.BasicAuthApplication</mainClass>
                </configuration>
                <executions>
                    <execution>
                        <goals>
                            <goal>repackage</goal>
                        </goals>
                    </execution>
                </executions>
            </plugin>
            <plugin>
                <artifactId>maven-compiler-plugin</artifactId>
                <configuration>
                    <source>1.8</source>
                    <target>1.8</target>
                </configuration>
            </plugin>
        </plugins>
    </build>
</project>
然后创建启动类
package com.tuling.basicAuth;

import org.springframework.boot.SpringApplication;
import org.springframework.boot.autoconfigure.SpringBootApplication;

@SpringBootApplication
public class BasicApplication {

    public static void main(String[] args) {
        SpringApplication.run(BasicApplication.class,args);
    }
}
以及springboot的配置文件 application.properties,我们只简单定义下接口
server.port=8080
然后我们开始创建基于RBAC模型的三个关键实体
UserBean:
package com.tuling.basicAuth.bean;

import java.util.ArrayList;
import java.util.List;

public class UserBean {

    private String userId;
    private String userName;
    private String userPass;
    private List<RoleBean> userRoles = new ArrayList<>();
    private List<ResourceBean> resourceBeans = new ArrayList<>();

    public UserBean(){

    }
    public UserBean(String userId, String userName, String userPass) {
        this.userId = userId;
        this.userName = userName;
        this.userPass = userPass;
    }
   ...getter and setter...
    public boolean havaPermission(String resource) {
        return this.resourceBeans.stream()
                .filter(resourceBean -> resourceBean.getResourceName().equals(resource))
                .count()>0;
    }
}
RoleBean:
package com.tuling.basicAuth.bean;

import java.util.List;

public class RoleBean {

    private String roleId;
    private String roleName;
    private List<ResourceBean> resources;

    public RoleBean(){

    }

    public RoleBean(String roleId, String roleName) {
        this.roleId = roleId;
        this.roleName = roleName;
    }

    ... getter and setter ...
}
ResourceBean:
package com.tuling.basicAuth.bean;

/**
 * Spring Security中,资源被简化成一个字符串。
 * 而在自己设计资源时,可以设计不同类型的资源控制不同的行为。
 * 例如 菜单资源,Rest接口资源,页面控件资源等。
 */
public class ResourceBean {

    private String resourceId;
    private String resourceType;
    private String resourceName;

    public ResourceBean(){

    }

    public ResourceBean(String resourceId, String resourceName) {
        this.resourceId = resourceId;
        this.resourceName = resourceName;
    }
... getter and setter ...
}
然后我们定义三个Controller,其中MobileController和SalaryController就是需要控制权限的访问资源,LoginController就是登陆的入口。
MobileController:
package com.tuling.basicAuth.controller;

import org.springframework.web.bind.annotation.GetMapping;
import org.springframework.web.bind.annotation.RequestMapping;
import org.springframework.web.bind.annotation.RestController;

@RestController
@RequestMapping("/mobile")
public class MobileController {

    @GetMapping("/query")
    public String query(){
        return "mobile";
    }
}
SalaryController:
package com.tuling.basicAuth.controller;

import org.springframework.web.bind.annotation.GetMapping;
import org.springframework.web.bind.annotation.RequestMapping;
import org.springframework.web.bind.annotation.RestController;

@RestController
@RequestMapping("/salary")
public class SalaryController {

    @GetMapping("/query")
    public String query(){
        return "salary";
    }
}
LoginController:
package com.tuling.basicAuth.controller;

import com.tuling.basicAuth.bean.UserBean;
import com.tuling.basicAuth.service.AuthService;
import com.tuling.basicAuth.util.MyConstants;
import org.slf4j.Logger;
import org.slf4j.LoggerFactory;
import org.springframework.web.bind.annotation.PostMapping;
import org.springframework.web.bind.annotation.RequestMapping;
import org.springframework.web.bind.annotation.RestController;

import javax.annotation.Resource;
import javax.servlet.http.HttpServletRequest;
import javax.servlet.http.HttpSession;

@RestController
@RequestMapping("/common/")
public class LoginController {

    private final Logger logger = LoggerFactory.getLogger(this.getClass());

    @Resource
    private AuthService authService;

    @PostMapping("/login")
    public UserBean login(UserBean loginUser, HttpServletRequest request){
        UserBean user = authService.userLogin(loginUser);
        if(null != user){
            logger.info("user login succeed");
            request.getSession().setAttribute(MyConstants.FLAG_CURRENTUSER,user);
        }
        logger.info("user login failed");
        return user;
    }

    @PostMapping("/getCurrentUser")
    public Object getCurrentUser(HttpSession session){
        return session.getAttribute(MyConstants.FLAG_CURRENTUSER);
    }

    @PostMapping("/logout")
    public void logout(HttpSession session){
        session.removeAttribute(MyConstants.FLAG_CURRENTUSER);
    }
}
LoginController中依赖AuthService,来对登陆进行认证。
AuthService:
package com.tuling.basicAuth.service;

import com.tuling.basicAuth.bean.UserBean;
import com.tuling.basicAuth.util.TestData;
import org.springframework.stereotype.Service;

import javax.annotation.Resource;
import java.util.UUID;

@Service
public class AuthService {

    private final String demoUserName = "admin";
    private final String demoUserPass = "admin";

    @Resource
    private TestData testData;

    public UserBean userLogin(UserBean user){
        UserBean queryUser = testData.qeryUser(user);
        if(null != queryUser){
            queryUser.setUserId(UUID.randomUUID().toString());
        }
        return queryUser;
    }
}
然后AuthService中依赖testData作为模拟的用户数据来源。由于是演示,就不从数据库加载了。
TestData:
package com.tuling.basicAuth.util;

import com.tuling.basicAuth.bean.ResourceBean;
import com.tuling.basicAuth.bean.RoleBean;
import com.tuling.basicAuth.bean.UserBean;
import org.springframework.stereotype.Component;

import java.util.ArrayList;
import java.util.List;
import java.util.stream.Collectors;

@Component
public class TestData {

    private List<UserBean> allUser;

    /**
     * 模拟数据库获取到的数据。
     * admin用户 拥有admin角色,拥有mobile和salary两个资源。
     * mobile用户,拥有mobile角色,拥有mobile资源。
     * worker用户,拥有worker角色,没有资源。
     * @return
     */
    private List<UserBean> getAllUser(){
        if(null == allUser){
            allUser = new ArrayList<>();

            ResourceBean mobileResource = new ResourceBean("1","mobile");
            ResourceBean salaryResource = new ResourceBean("2","salary");
            List<ResourceBean> adminResources = new ArrayList<>();
            adminResources.add(mobileResource);
            adminResources.add(salaryResource);

            List<ResourceBean> managerResources = new ArrayList<>();
            managerResources.add(salaryResource);

            RoleBean adminRole = new RoleBean("1","mobile");
            adminRole.setResources(adminResources);
            RoleBean managerRole = new RoleBean("2","salary");
            managerRole.setResources(managerResources);
            List<RoleBean> adminRoles = new ArrayList<>();
            adminRoles.add(adminRole);
            List<RoleBean> managerRoles = new ArrayList<>();
            managerRoles.add(managerRole);

            UserBean user1 = new UserBean("1","admin","admin");
            user1.setUserRoles(adminRoles);
            user1.setResourceBeans(adminResources);
            UserBean user2 = new UserBean("2","manager","manager");
            user2.setUserRoles(managerRoles);
            user2.setResourceBeans(managerResources);
            UserBean user3 = new UserBean("3","worker","worker");

            allUser.add(user1);
            allUser.add(user2);
            allUser.add(user3);
        }
        return allUser;
    }

    public UserBean qeryUser(UserBean user){
        List<UserBean> allUser = this.getAllUser();
        List<UserBean> userList = allUser.stream().filter(userBean ->
                userBean.getUserName().equals(user.getUserPass())
                        && userBean.getUserPass().equals(user.getUserPass())
        ).collect(Collectors.toList());

        return userList.size()>0?userList.get(0):null;
    }
}
然后,还定义了一个常量类 MyConstants:
package com.tuling.basicAuth.util;

public class MyConstants {

    public static final String FLAG_CURRENTUSER = "currnetUser";

    public static final String RESOURCE_COMMON = "common";
    public static final String RESOURCE_MOBILE = "mobile";
    public static final String RESOURCE_SALARY = "salary";
}
然后,在static目录下有两个简单的页面index.html 登录页面和main.html登录后的主页面,引入jquery做简单的逻辑控制。前端不是我们的重点, 那就先直接复制下。
到这里呢。我们的这个SpringBoot工程就可以启动了。 启动后可以直接访问前端的两个页面,也是可以完成登录的。而且,登录后主页面上的两个按钮是可以随登录用户不同而部分隐藏的。但是,虽然页面上把访问按钮给隐藏了,我们还是可以通过直接访问后台接口来获取没有权限的资源。那后面我们就要添加后台的权限控制。
首先我们注入一个配置器WebMvcConfigurer,来对SpringBoot进行部分配置。
package com.tuling.basicAuth.config;

import org.springframework.stereotype.Component;
import org.springframework.web.servlet.config.annotation.InterceptorRegistry;
import org.springframework.web.servlet.config.annotation.ViewControllerRegistry;
import org.springframework.web.servlet.config.annotation.WebMvcConfigurer;
import javax.annotation.Resource;

@Component
public class MyWebAppConfigurer implements WebMvcConfigurer {

    @Resource
    private AuthInterceptor authInterceptor;
    //配置权限拦截器
    @Override
    public void addInterceptors(InterceptorRegistry registry) {
        registry.addInterceptor(authInterceptor).addPathPatterns("/**");
    }
    //简单配置启动页面
    @Override
    public void addViewControllers(ViewControllerRegistry registry)
    {
        registry.addViewController("/").setViewName("redirect:/index.html");
    }
}
其中这个AuthInterceptor,就是以拦截器的形式来实现权限管控。
package com.tuling.basicAuth.config;

import com.tuling.basicAuth.bean.UserBean;
import com.tuling.basicAuth.util.MyConstants;
import org.springframework.stereotype.Component;
import org.springframework.web.servlet.handler.HandlerInterceptorAdapter;

import javax.servlet.http.HttpServletRequest;
import javax.servlet.http.HttpServletResponse;

@Component
public class AuthInterceptor extends HandlerInterceptorAdapter {
    @Override
    public boolean preHandle(HttpServletRequest request, HttpServletResponse response, Object handler) throws Exception {
        //1、不需要登录就可以访问的路径
        String requestURI = request.getRequestURI();
        if (requestURI.contains(".") || requestURI.startsWith("/"+ MyConstants.RESOURCE_COMMON+"/")) {
            return true;
        }
        //2、未登录用户,直接拒绝访问
        if (null == request.getSession().getAttribute(MyConstants.FLAG_CURRENTUSER)) {
            response.setCharacterEncoding("UTF-8");
            response.getWriter().write("please login first");
            return false;
        } else {
            UserBean currentUser = (UserBean) request.getSession().getAttribute(MyConstants.FLAG_CURRENTUSER);
            //3、已登录用户,判断是否有资源访问权限
            if (requestURI.startsWith("/"+MyConstants.RESOURCE_MOBILE+"/")
                    && currentUser.havaPermission(MyConstants.RESOURCE_MOBILE)) {
                return true;
            } else if (requestURI.startsWith("/"+MyConstants.RESOURCE_SALARY+"/")
                    && currentUser.havaPermission(MyConstants.RESOURCE_SALARY)) {
                return true;
            } else {
                response.setCharacterEncoding("UTF-8");
                response.getWriter().write("no auth to visit");
                return false;
            }
        }
    }
}
这样我们的整个系统就完成了。
这其中,我们定义了三个用户, admin, manager ,worker 。有两个资源mobile(查看员工手机号) , salary(查看薪水)。
其中mobile资源就对应main.html上的 查看手机号 按钮,以及对应的访问地址 http://localhost:8080/mobile/query。 而salary资源则对应main.html上的 查看薪水 http://localhost:8080/salary/query 这就是需要控制的行为。
然后我们给admin赋予了两个资源,manager有salary资源,而worker未赋予任何资源。可以查看登录后的页面按钮以及后台查询地址的访问效果。
演示完我们自己的RBAC权限模型后,我们来体验下Spring Security如何让这个流程变得更健壮、优雅。
三、SpringBoot Security 快速上手
Spring-boot-Security: 基于Spring Boot整合的快速实现。
1、项目搭建步骤
1、创建maven工程。
父工程我们依然使用上面示例中的同一个父工程。
创建子模块spring-boot-security pom依赖:
	<?xml version="1.0" encoding="UTF-8"?>
<project xmlns="http://maven.apache.org/POM/4.0.0" xmlns:xsi="http://www.w3.org/2001/XMLSchema-instance"
         xsi:schemaLocation="http://maven.apache.org/POM/4.0.0 https://maven.apache.org/xsd/maven-4.0.0.xsd">
    <modelVersion>4.0.0</modelVersion>
    <parent>
        <artifactId>AuthDemo</artifactId>
        <groupId>com.tuling</groupId>
        <version>1.0-SNAPSHOT</version>
    </parent>
    <groupId>com.tuling</groupId>
    <artifactId>spring-boot-security</artifactId>
    <version>0.0.1</version>
    <name>spring-boot-security</name>
    <description>Demo project for Spring Boot</description>

    <properties>
        <java.version>1.8</java.version>
    </properties>

    <dependencies>
        <dependency>
            <groupId>org.springframework.boot</groupId>
            <artifactId>spring-boot-starter</artifactId>
        </dependency>

        <dependency>
            <groupId>org.springframework.boot</groupId>
            <artifactId>spring-boot-starter-security</artifactId>
        </dependency>

        <dependency>
            <groupId>org.springframework.boot</groupId>
            <artifactId>spring-boot-starter-web</artifactId>
        </dependency>

        <dependency>
            <groupId>org.springframework.boot</groupId>
            <artifactId>spring-boot-starter-thymeleaf</artifactId>
        </dependency>
    </dependencies>

    <build>
        <plugins>
            <plugin>
                <groupId>org.springframework.boot</groupId>
                <artifactId>spring-boot-maven-plugin</artifactId>
                <version>${spring-boot-version}</version>
            </plugin>
        </plugins>
    </build>
</project>
2、 在resources目录下创建application.properties。 --spring security不需要任何配置就可以直接启动
server.port=8080
spring.application.name=security-springboot
3、创建启动类,注意我们在启动类中,引入了一个Spring Security提供的注解@EnableWebSecurity。
package com.tuling.springbootsecurity;

import org.springframework.boot.SpringApplication;
import org.springframework.boot.autoconfigure.SpringBootApplication;
import org.springframework.security.config.annotation.web.configuration.EnableWebSecurity;

@SpringBootApplication
@EnableWebSecurity
public class SpringBootSecurityApplication {
    public static void main(String[] args) {
        SpringApplication.run(SpringBootSecurityApplication.class, args);
    }
}
4、创建几个简单的资源访问接口
package com.tuling.springbootsecurity.controller;

import org.springframework.web.bind.annotation.GetMapping;
import org.springframework.web.bind.annotation.RequestMapping;
import org.springframework.web.bind.annotation.RestController;

@RestController
@RequestMapping("/mobile")
public class MobileController {

    @GetMapping("/query")
    public String query(){
        return "mobile";
    }
}
package com.tuling.springbootsecurity.controller;

import org.springframework.web.bind.annotation.GetMapping;
import org.springframework.web.bind.annotation.RequestMapping;
import org.springframework.web.bind.annotation.RestController;

@RestController
@RequestMapping("/salary")
public class SalaryController {

    @GetMapping("/query")
    public String query(){
        return "salary";
    }
}
到这一步呢,我们就完成了一个SpringBoot工程的基础搭建。然后我们就可以启动引用访问MobileController和SalaryController的资源了,这时就会发现,访问这两个资源会转到一个登录页面,要求先登录。登录的用户名是user,密码会在日志中打印。
2、用SpringBoot Security重新实现我们上个应用的认证和授权逻辑。
5、注入免密解析器PasswordEncoder和用户来源UserDetailsService
package com.tuling.springbootsecurity.config;

import org.springframework.context.annotation.Bean;
import org.springframework.context.annotation.Configuration;
import org.springframework.security.core.userdetails.User;
import org.springframework.security.core.userdetails.UserDetailsService;
import org.springframework.security.crypto.bcrypt.BCryptPasswordEncoder;
import org.springframework.security.crypto.password.NoOpPasswordEncoder;
import org.springframework.security.crypto.password.PasswordEncoder;
import org.springframework.security.provisioning.InMemoryUserDetailsManager;
import org.springframework.web.servlet.config.annotation.ViewControllerRegistry;
import org.springframework.web.servlet.config.annotation.WebMvcConfigurer;

@Configuration
public class MyWebConfig implements WebMvcConfigurer {
    //默认Url根路径跳转到/login,此url为spring security提供
    @Override
    public void addViewControllers(ViewControllerRegistry registry)
    {
        registry.addViewController("/").setViewName("redirect:/login");
    }
    /**
     * 自行注入一个PasswordEncoder。
     * @return
     */
    @Bean
    public PasswordEncoder getPassWordEncoder(){
        return new BCryptPasswordEncoder(10);
//        return NoOpPasswordEncoder.getInstance();
    }

    /**
     * 自行注入一个UserDetailsService
     * 如果没有的话,在UserDetailsServiceAutoConfiguration中会默认注入一个包含user用户的InMemoryUserDetailsManager
     * 另外也可以采用修改configure(AuthenticationManagerBuilder auth)方法并注入authenticationManagerBean的方式。
     * @return
     */
    @Bean
    public UserDetailsService userDetailsService(){
        InMemoryUserDetailsManager userDetailsManager = new InMemoryUserDetailsManager(User.withUsername("admin").password(passwordEncoder().encode("admin")).authorities("mobile","salary").build(),
                                                                                       User.withUsername("manager").password(passwordEncoder().encode("manager")).authorities("salary").build(),
                                                                                       User.withUsername("worker").password(passwordEncoder().encode("worker")).authorities("worker").build());
        return userDetailsManager;
//      return new JdbcUserDetailsManager(DataSource dataSource);
    }
}
6、注入校验配置规则:
package com.tuling.springbootsecurity.config;

import org.springframework.security.config.annotation.web.builders.HttpSecurity;
import org.springframework.security.config.annotation.web.configuration.EnableWebSecurity;
import org.springframework.security.config.annotation.web.configuration.WebSecurityConfigurerAdapter;

/**
 * 注入一个自定义的配置
 */
@EnableWebSecurity
public class MyWebSecurityConfig extends WebSecurityConfigurerAdapter {

    //配置安全拦截策略
    @Override
    protected void configure(HttpSecurity http) throws Exception {
        //链式配置拦截策略
        http.csrf().disable()//关闭csrg跨域检查
                .authorizeRequests()
                .antMatchers("/mobile/**").hasAuthority("mobile") //配置资源权限
                .antMatchers("/salary/**").hasAuthority("salary")
                .antMatchers("/common/**").permitAll() //common下的请求直接通过
                .anyRequest().authenticated() //其他请求需要登录
                .and() //并行条件
                .formLogin().defaultSuccessUrl("/main.html").failureUrl("/common/loginFailed"); //可从默认的login页面登录,并且登录后跳转到main.html
    }
}
7、获取当前用户信息:Spring Security提供了多种获取当前用户信息的方法。
package com.tuling.springbootsecurity.controller;

import org.springframework.security.core.Authentication;
import org.springframework.security.core.context.SecurityContextHolder;
import org.springframework.security.core.userdetails.User;
import org.springframework.web.bind.annotation.GetMapping;
import org.springframework.web.bind.annotation.RequestMapping;
import org.springframework.web.bind.annotation.RestController;

import javax.servlet.http.HttpServletRequest;
import java.security.Principal;

@RestController
@RequestMapping("/common")
public class LoginController {

    @GetMapping("/getLoginUserByPrincipal")
    public String getLoginUserByPrincipal(Principal principal){
        return principal.getName();
    }
    @GetMapping(value = "/getLoginUserByAuthentication")
    public String currentUserName(Authentication authentication) {
        return authentication.getName();
    }
    @GetMapping(value = "/username")
    public String currentUserNameSimple(HttpServletRequest request) {
        Principal principal = request.getUserPrincipal();
        return principal.getName();
    }
    @GetMapping("/getLoginUser")
    public String getLoginUser(){
        User user = (User)SecurityContextHolder.getContext().getAuthentication().getPrincipal();
        return user.getUsername();
    }

}
然后我们把前台页面移植过来。
这样,一个简单的Spring Secuity工程就配置完成了。我们来简单总结下。
1、我们可以通过注入一个PasswordEncoder对象来实现密码加密。其中,NoOpPasswordEncoder是一个已过时的加密器,他不会对密码进行任何加密操作。而实际项目中,最常用的是BCryptPasswordEncoder。
2、我们通过注入一个UserDetailsService来管理系统的实体数据。如果我们不自己注入UserDetailsService,那在UserDetailsServiceAutoConfiguration中会默认注入一个包含user用户的UserDetailsService,user用户的密码会打印在控制台日志中。而除了我们系统中使用到的InMemoryUserDetailsManager外,SpringSecurity还提供了JdbcUserDetailsManager来实现对对数据库中的用户数据管理。
另外,关于用户数据来源,可以通过覆盖WebSecurityConfigurerAdapter中的configure(AuthenticationManagerBuilder auth)方法,并注入authenticationManagerBean()的方式进行干预。
3、目前示例中的权限规则都是从内存直接写死的,实际项目中显然都是要从数据库进行加载。而且,目前我们的规则都是基于web请求路径来定制的,而Spring Security实际上还提供了基于注解的方法级别规则配置。
3、项目测试
这样就可以启动任务进行测试了。启动后,可以访问security默认提供的登录页面 http://localhost:8080/login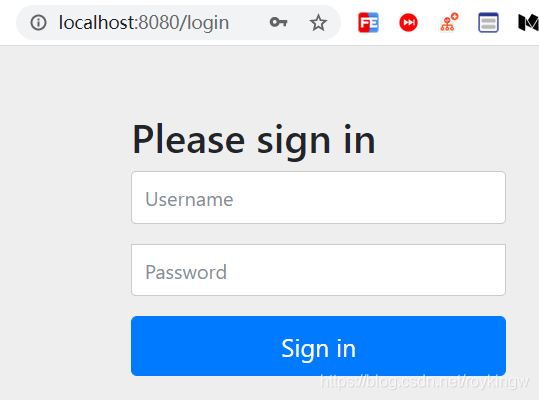
然后就可以使用之前创建的三个用户分别登陆,登陆后进入测试主页面。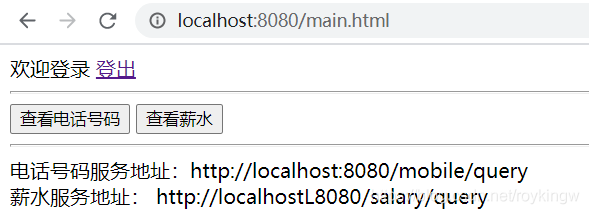
测试页面中,登出 使用的是Security框架提供的默认登出地址 /logout。分别访问mobile和salary下的服务可以看到权限有控制。
4、了解SpringBoot Security项目的扩展点
这样,一个基本的spring-boot-security项目就很快搭建起来了。而Spring Security实际上还提供了相当丰富的扩展点,包括用户名密码校验规则、资源校验规则、Session管理规则等。我们需要了解这些扩展点,这样才能在实际项目中,运用上Spring Security。
1、主体数据来源
SpringSecurity通过引用Spring容器中的UserDetailsService对象来管理主体数据。默认情况下,会注入一个包含user用户的默认主体管理服务。我们演示中就通过注入一个InMemoryUserDetailsManager对象覆盖了默认的主体管理器。
实际项目中的用户信息大都会来自于数据库。在SpringSecurity中,也提供了JdbcUserDetailsManager来实现对数据库的用户信息进行管理。而如果这些不满足实际需求,可以通过自己实现一个UserDetailsService对象并注入到Spring容器中,来实现自定义的主体数据管理。
2、密码解析器
Spring Security提供了很多密码解析器,包括CryptPassEncoder、Argon2PasswordEncoder、Pbkdf2PasswordEncoder等,具体可以参看PassEncoder接口的实现类。其中最常用的一般就是BCryptPasswordEncoder。其中要注意的是,我们在选择不同的密码解析器后,后台存储用户密码时要存储对应的密文。
3、自定义授权及安全拦截策略
最常规的方式是通过覆盖WebSecurityConfigurerAdapter中的protected void configure(HttpSecurity http)方法。通过http来配置自定义的拦截规则。包含访问控制、登录页面及逻辑、退出页面及逻辑等。
自定义登录:http.loginPage()方法配置登录页,http.loginProcessingUrl()方法定制登录逻辑。要注意的是,SpringSecurity的登录页和登录逻辑是同一个地址/login,如果使用自定义的页面,需要将登录逻辑地址也分开。例如: http.loginPage("/index.html").loginProcessingUrl("/login")。
而登录页面的一些逻辑处理,可以参考系统提供的默认登录页。但是这里依然要注意登录页的访问权限。而关于登录页的源码,可以在DefaultLoginPageGeneratingFilter中找到。
记住我功能:登录页面提供了记住我功能,此功能只需要往登录时提交一个remeber-me的参数,值可以是 on 、yes 、1 、 true,就会记住当前登录用户的token到cookie中。http.rememberMe().rememberMeParameter(“remeber-me”),使用这个配置可以定制参数名。而在登出时,会清除记住我功能的cookie。
拦截策略:antMachers()方法设置路径匹配,可以用两个星号代表多层路径,一个星号代表一个或多个字符,问号代表一个字符。然后配置对应的安全策略:
permitAll()所有人都可以访问。denyAll()所有人都不能访问。 anonymous()只有未登录的人可以访问,已经登录的无法访问。
hasAuthority、hasRole这些是配置需要有对应的权限或者角色才能访问。 其中,角色就是对应一个ROLE_角色名 这样的一个资源。
另外的两个配置对象中,AuthenticationManagerBuilder配置认证策略,WebSecurity配置补充的Web请求策略。
4、关于csrf
csrf全称是Cross—Site Request Forgery 跨站点请求伪造。这是一种安全攻击手段,简单来说,就是黑客可以利用存在客户端的信息来伪造成正常客户,进行攻击。例如你访问网站A,登录后,未退出又打开一个tab页访问网站B,这时候网站B就可以利用保存在浏览器中的sessionId伪造成你的身份访问网站A。
我们在示例中是使用http.csrf().disable()方法简单的关闭了CSRF检查。而其实Spring Security针对CSRF是有一套专门的检查机制的。他的思想就是在后台的session中加入一个csrf的token值,然后向后端发送请求时,对于GET、HEAD、TRACE、OPTIONS以外的请求,例如POST、PUT、DELETE等,会要求带上这个token值进行比对。
当我们打开csrf的检查,再访问默认的登录页时,可以看到在页面的登录form表单中,是有一个name为csrf的隐藏字段的,这个就是csrf的token。例如我们在freemarker的模板语言中可以使用添加这个参数。
而在查看Spring Security后台,有一个CsrfFilter专门负责对Csrf参数进行检查。他会调用HttpSessionCsrfTokenRepository生成一个CsrfToken,并将值保存到Session中。
5、注解级别方法支持 : 在@Configuration支持的注册类上打开注解@EnableGlobalMethodSecurity(prePostEnabled = true,securedEnabled = true,jsr250Enabled = true)即可支持方法及的注解支持。prePostEnabled属性 对应@PreAuthorize。securedEnabled 属性支持@Secured注解,支持角色级别的权限控制。jsr250Enabled属性对应@RolesAllowed注解,等价于@Secured。
6、异常处理:现在前后端分离的状态可以使用@ControllerAdvice注入一个异常处理类,以@ExceptionHandler注解声明方法,往前端推送异常信息。
四、SpringBoot Security工作原理
1、 结构总览
Spring Security是解决安全访问控制的问题,说白了就是认证和授权两个问题。而至于像之前示例中页面控件的查看权限,是属于资源具体行为。Spring Security虽然也提供了类似的一些支持,但是这些不是Spring Security控制的重点。Spring Security功能的重点是对所有进入系统的请求进行拦截,校验每个请求是否能够访问它所期望的资源。而Spring Security对Web资源的保护是通过Filter来实现的,所以要从Filter入手,逐步深入Spring Security原理。
当初始化Spring Security时,在org.springframework.security.config.annotation.web.configuration.WebSecurityConfiguration中会往Spring容器中注入一个名为SpringSecurityFilterChain的Servlet过滤器,类型为org.springframework.security.web.FilterChainProxy。它实现了javax.servlet.Filter,因此外部的请求都会经过这个类。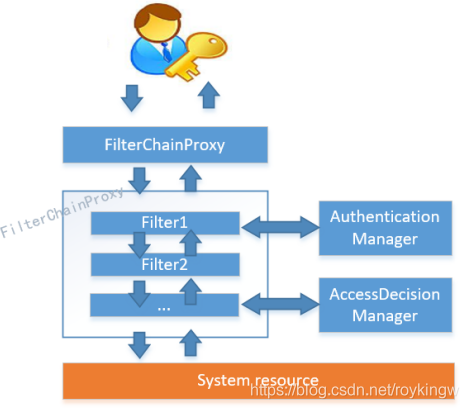
而FilterChainProxy是一个代理,真正起作用的是FilterChainProxy中SecurityFilterChain所包含的各个Filter,同时,这些Filter都已经注入到Spring容器中,他们是Spring Security的核心,各有各的职责。但是他们并不直接处理用户的认证和授权,而是把他们交给了认证管理器(AuthenticationManager)和决策管理器(AccessDecisionManager)进行处理。下面是FilterChainProxy相关类的UML图示: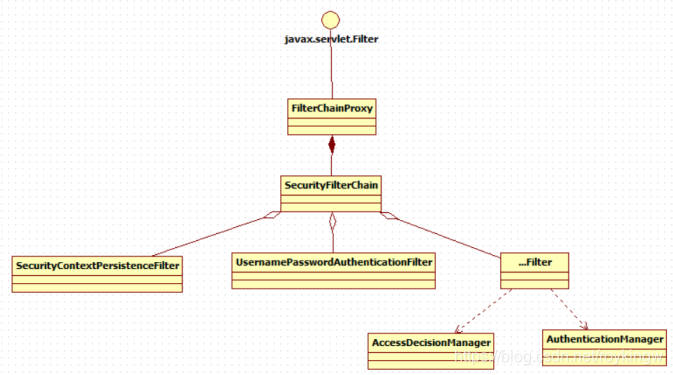
Spring Security的功能实现主要就是由一系列过滤器链相互配合完成的。在启动过程中可以看到有info日志。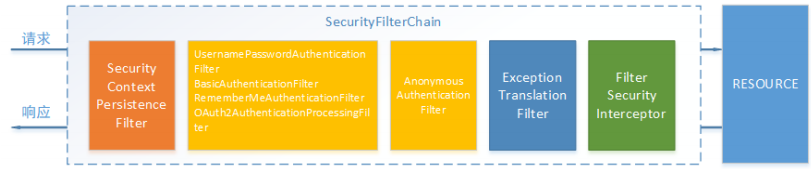
下面介绍过滤器链中主要的几个过滤器及其作用:
SecurityContextPersistenceFilter 这个Filter是整个拦截过程的入口和出口(也就是第一个和最后一个拦截器),会在请求开始时从配置好的 SecurityContextRepository 中获取 SecurityContext,然后把它设置给SecurityContextHolder。在请求完成后将SecurityContextHolder 持有的 SecurityContext 再保存到配置好的 SecurityContextRepository,同时清除 securityContextHolder 所持有的 SecurityContext;
UsernamePasswordAuthenticationFilter 用于处理来自表单提交的认证。该表单必须提供对应的用户名和密码,其内部还有登录成功或失败后进行处理的 AuthenticationSuccessHandler 和 AuthenticationFailureHandler,这些都可以根据需求做相关改变;
FilterSecurityInterceptor 是用于保护web资源的,使用AccessDecisionManager对当前用户进行授权访问,前面已经详细介绍过了;
ExceptionTranslationFilter 能够捕获来自 FilterChain 所有的异常,并进行处理。但是它只会处理两类异常:AuthenticationException 和 AccessDeniedException,其它的异常它会继续抛出。
2、认证流程
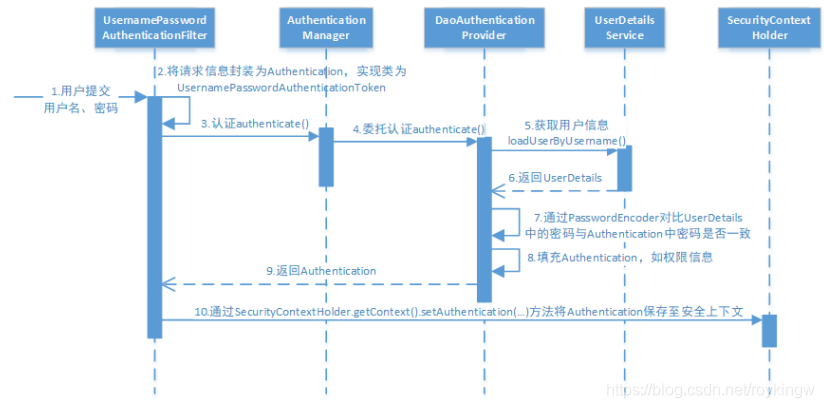
让我们仔细分析认证过程:
1、用户提交用户名、密码被SecurityFilterChain中的 UsernamePasswordAuthenticationFilter 过滤器获取到,封装为请求Authentication,通常情况下是UsernamePasswordAuthenticationToken这个实现类。
2、 然后过滤器将Authentication提交至认证管理器(AuthenticationManager)进行认证
3、认证成功后, AuthenticationManager 身份管理器返回一个被填充满了信息的(包括上面提到的权限信息,身份信息,细节信息,但密码通常会被移除) Authentication 实例。
4、SecurityContextHolder 安全上下文容器将第3步填充了信息的 Authentication ,通过SecurityContextHolder.getContext().setAuthentication(…)方法,设置到其中。可以看出AuthenticationManager接口(认证管理器)是认证相关的核心接口,也是发起认证的出发点,它的实现类为ProviderManager。而Spring Security支持多种认证方式,因此ProviderManager维护着一个List 列表,存放多种认证方式,最终实际的认证工作是由AuthenticationProvider完成的。咱们知道web表单的对应的AuthenticationProvider实现类为DaoAuthenticationProvider,它的内部又维护着一个UserDetailsService负责UserDetails的获取。最终AuthenticationProvider将UserDetails填充至Authentication。
调试代码从UsernamePasswordAuthenticationFilter 开始跟踪。
最后的认证流程在AbstractUserDetailsAuthenticationProvider的authenticate方法中。获取用户在retrieveUser方法。密码比较在additionalAuthenticationChecks方法
几个核心的组件的调用流程: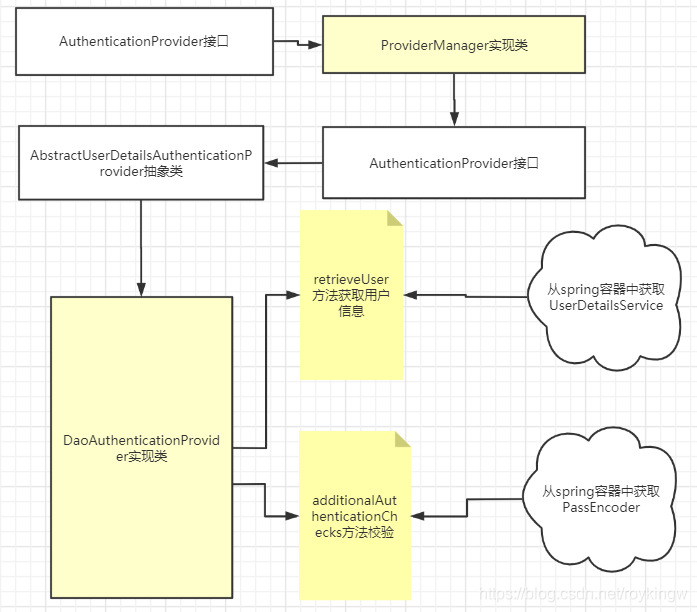
2.1 AuthenticationProvider接口:认证处理器
public interface AuthenticationProvider {
    //认证的方法
   Authentication authenticate(Authentication authentication) throws AuthenticationException;
    //支持哪种认证
   boolean supports(Class<?> var1); }
这里对于AbstractUserDetailsAuthenticationProvider,他的support方法就表明他可以处理用户名密码这样的认证。
    public boolean supports(Class<?> authentication) {
        return UsernamePasswordAuthenticationToken.class.isAssignableFrom(authentication);
    }
2.2 Authentication认证信息
继承自Principal类,代表一个抽象主体身份。继承了一个getName()方法来表示主体的名称。
public interface Authentication extends Principal, Serializable {
	//获取权限信息列表
    Collection<? extends GrantedAuthority> getAuthorities();
	//获取凭证信息。用户输入的密码字符串,在认证过后通常会被移除,用于保障安全。
    Object getCredentials();
	//细节信息,web应用中的实现接口通常为 WebAuthenticationDetails,它记录了访问者的ip地 址和sessionId的值。
    Object getDetails();
	//身份信息,大部分情况下返回的是UserDetails接口的实现类
    Object getPrincipal();

    boolean isAuthenticated();

    void setAuthenticated(boolean var1) throws IllegalArgumentException;
}
2.3 UserDetailsService接口: 获取用户信息
获取用户信息的基础接口,只有一个根据用户名获取用户信息的方法。
public interface UserDetailsService {
    UserDetails loadUserByUsername(String var1) throws UsernameNotFoundException;
}
在DaoAuthenticationProvider的retrieveUser方法中,会获取spring容器中的UserDetailsService。如果我们没有自己注入UserDetailsService对象,那么在UserDetailsServiceAutoConfiguration类中,会在启动时默认注入一个带user用户的UserDetailsService。
我们可以通过注入自己的UserDetailsService来实现加载自己的数据。
2.4 UserDetails: 用户信息实体
代表了一个用户实体,包括用户、密码、权限列表,还有一些状态信息,包括账号过期、认证过期、是否启用。
public interface UserDetails extends Serializable {
    Collection<? extends GrantedAuthority> getAuthorities();

    String getPassword();

    String getUsername();

    boolean isAccountNonExpired();

    boolean isAccountNonLocked();

    boolean isCredentialsNonExpired();

    boolean isEnabled();
}
2.5 PasswordEncoder 密码解析器
用来对密码进行加密及解析
public interface PasswordEncoder {、
    //加密
    String encode(CharSequence var1);
	//比较密码
    boolean matches(CharSequence var1, String var2);

    default boolean upgradeEncoding(String encodedPassword) {
        return false;
    }
}
DaoAuthenticationProvider在additionalAuthenticationChecks方法中会获取Spring容器中的PasswordEncoder来对用户输入的密码进行比较。
2.6 BCryptPasswordEncoder:
这是SpringSecurity中最常用的密码解析器。他使用BCrypt算法。他的特点是加密可以加盐sault,但是解密不需要盐。因为盐就在密文当中。这样可以通过每次添加不同的盐,而给同样的字符串加密出不同的密文。
密文形如:$2a10 1010vTUDYhjnVb52iM3qQgi2Du31sq6PRea6xZbIsKIsmOVDnEuGb/.7K
其中:$是分割符,无意义;2a是bcrypt加密版本号;10是cost的值;而后的前22位是salt值;再然后的字符串就是密码的密文了
3、授权流程
3.1 整体流程
授权是在用户认证通过后,对访问资源的权限进行检查的过程。Spring Security可以通过http.authorizeRequests()对web请求进行授权保护。Spring Security使用标准Filter建立了对web请求的拦截,最终实现对资源的授权访问。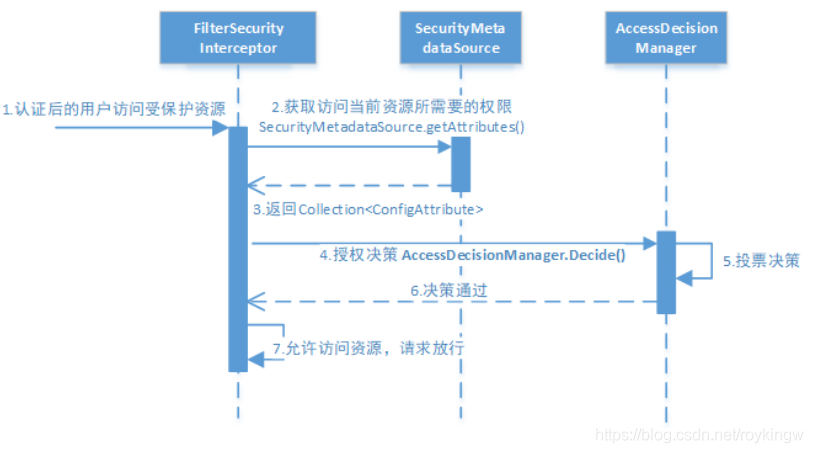
授权的流程:
1、拦截请求,已认证用户访问受保护的web资源将被SecurityFilterChain中(实现类为DefaultSecurityFilterChain)的 FilterSecurityInterceptor 的子类拦截。
2、获取资源访问策略,FilterSecurityInterceptor会从 SecurityMetadataSource 的子类
DefaultFilterInvocationSecurityMetadataSource 获取要访问当前资源所需要的权限
Collection 。
SecurityMetadataSource其实就是读取访问策略的抽象,而读取的内容,其实就是我们配置的访问规则,读取访问策略如:
http.csrf().disable()//关闭csrg跨域检查
        //这里注意matchere是有顺序的。
        .authorizeRequests()
        .antMatchers("/mobile/**").hasAuthority("mobile")
        .antMatchers("/salary/**").hasAuthority("salary")
        .antMatchers("/common/**").permitAll() //common下的请求直接通过
        .anyRequest().authenticated() //其他请求需要登录
        .and() //并行条件
        .formLogin().defaultSuccessUrl("/main.html").failureUrl("/common/loginFailed");
3、最后,FilterSecurityInterceptor会调用 AccessDecisionManager 进行授权决策,若决策通过,则允许访问资源,否则将禁止访问。
关于AccessDecisionManager接口,最核心的就是其中的decide方法。这个方法就是用来鉴定当前用户是否有访问对应受保护资源的权限。
public interface AccessDecisionManager {
	//通过传递的参数来决定用户是否有访问对应受保护资源的权限
	void decide(Authentication authentication, Object object,
			Collection<ConfigAttribute> configAttributes) throws AccessDeniedException,
			InsufficientAuthenticationException;
}
这里着重说明一下decide的参数:
authentication:要访问资源的访问者的身份
object:要访问的受保护资源,web请求对应FilterInvocation
configAttributes:是受保护资源的访问策略,通过SecurityMetadataSource获取。
3.2 决策流程
在AccessDecisionManager的实现类ConsensusBased中,是使用投票的方式来确定是否能够访问受保护的资源。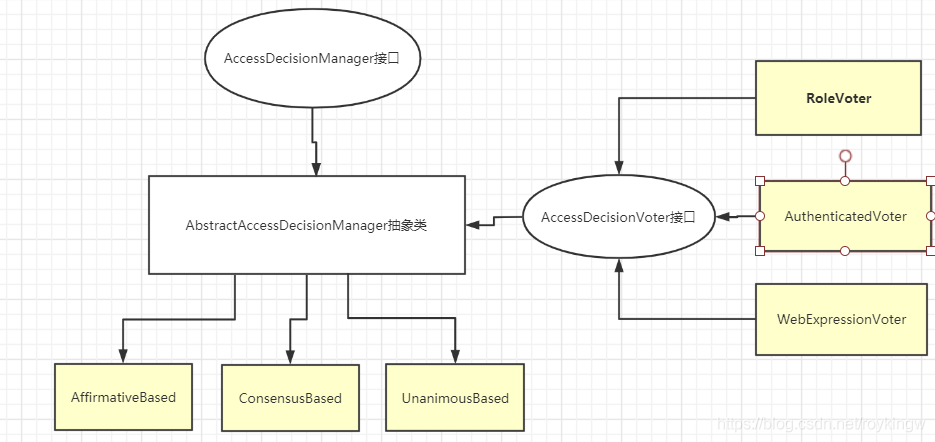
AccessDecisionManager中包含了一系列的AccessDecisionVoter讲会被用来对Authentication是否有权访问受保护对象进行投票,AccessDecisionManager根据投票结果,做出最终角色。
为什么要投票? 因为权限可以从多个方面来进行配置,有角色但是没有资源怎么办?这就需要有不同的处理策略
AccessDecisionVoter是一个接口,定义了三个方法
public interface AccessDecisionVoter<S> {
   int ACCESS_GRANTED = 1;
   int ACCESS_ABSTAIN = 0;
   int ACCESS_DENIED = -1;

   boolean supports(ConfigAttribute attribute);

   boolean supports(Class<?> clazz);

   int vote(Authentication authentication, S object,
         Collection<ConfigAttribute> attributes);
}
vote()就是进行投票的方法。投票可以表示赞成、拒绝、弃权。
Spring Security内置了三个基于投票的实现类,分别是AffirmativeBased,ConsensusBasesd和UnanimaousBased
AffirmativeBased是Spring Security默认使用的投票方式,他的逻辑是只要有一个投票通过,就表示通过。
1、只要有一个投票通过了,就表示通过。
2、如果全部弃权也表示通过。
3、如果没有人投赞成票,但是有人投反对票,则抛出AccessDeniedException.
ConsensusBased的逻辑是:多数赞成就通过
1、如果赞成票多于反对票则表示通过
2、如果反对票多于赞成票则抛出AccessDeniedException
3、如果赞成票与反对票相同且不等于0,并且属性allowIfEqualGrantedDeniedDecisions的值为true,则表示通过,否则抛出AccessDeniedException。参数allowIfEqualGrantedDeniedDecisions的值默认是true。
4、如果所有的AccessDecisionVoter都弃权了,则将视参数allowIfAllAbstainDecisions的值而定,如果该值为true则表示通过,否则将抛出异常AccessDeniedException。参数allowIfAllAbstainDecisions的值默认为false。
UnanimousBased相当于一票否决。
1、如果受保护对象配置的某一个ConfifigAttribute被任意的AccessDecisionVoter反对了,则将抛出AccessDeniedException。
2、如果没有反对票,但是有赞成票,则表示通过。
3、如果全部弃权了,则将视参数allowIfAllAbstainDecisions的值而定,true则通过,false则抛出AccessDeniedException。
Spring Security默认是使用的AffirmativeBased投票器,我们同样可以通过往Spring容器里注入的方式来选择投票决定器
@Bean
public AccessDecisionManager accessDecisionManager() {
    List<AccessDecisionVoter<? extends Object>> decisionVoters
      = Arrays.asList(
        new WebExpressionVoter(),
        new RoleVoter(),
        new AuthenticatedVoter(),
        new MinuteBasedVoter());
    return new UnanimousBased(decisionVoters);
}
然后在configure中配置
@Override
protected void configure(HttpSecurity http) throws Exception {
    http
    ...
    .anyRequest()
    .authenticated()
    .accessDecisionManager(accessDecisionManager());
}
4、自定义认证
4.1、自定义登录页面及登录过程
 //配置安全拦截机制
@Override
protected void configure(HttpSecurity http) throws Exception {
   http
           .authorizeRequests()
           .antMatchers("/r/**").authenticated()
           .anyRequest().permitAll()
           .and()
           .formLogin()//允许表单登录
         .loginPage("/login‐view")//自定义登录页面
         .loginProcessingUrl("/login")//自定义登录处理地址
       	.defaultSuccessUrl("/main.html")//指定登录成功后的跳转地址-页面重定向
        // .successForwardUrl("/login‐success")//指定登录成功后的跳转URL - 后端跳转
         .permitAll();
}
4.2、将数据源改为从数据库获取数据
修改UserDetails,从数据库加载用户信息。
修改HttpSecurity,从数据库加载授权配置。
–用户信息可以使用JDBCUserDetailsService,也可以自己实现。 略过。
4.3 配置方法与资源绑定关系
1、代码方式配置
Spring Security可以通过HttpSecurity配置URL授权信息,保护URL常用的方法有:
authenticated() 保护URL,需要用户登录
permitAll() 指定URL无需保护,一般应用与静态资源文件
hasRole(String role) 限制单个角色访问。角色其实相当于一个"ROLE_"+role的资源。
hasAuthority(String authority) 限制单个权限访问
hasAnyRole(String… roles)允许多个角色访问.
hasAnyAuthority(String… authorities) 允许多个权限访问.
access(String attribute) 该方法使用 SpEL表达式, 所以可以创建复杂的限制.
hasIpAddress(String ipaddressExpression) 限制IP地址或子网
2、注解方式配置
Spring Security除了可以通过HttpSecurity配置授权信息外,还提供了注解方式对方法进行授权。
注解方式需要先在启动加载的类中打开 @EnableGlobalMethodSecurity(securedEnabled=true) 注解,然后在需要权限管理的方法上使用@Secured(Resource)的方式配合权限。其中
@EnableGlobalMethodSecurity(securedEnabled=true) 开启@Secured 注解过滤权限
	打开后@Secured({"ROLE_manager","ROLE_admin"}) 表示方法需要有manager和admin两个角色才能访问
	另外@Secured注解有些关键字,比如IS_AUTHENTICATED_ANONYMOUSLY 表示可以匿名登录。
@EnableGlobalMethodSecurity(jsr250Enabled=true)	开启@RolesAllowed 注解过滤权限

@EnableGlobalMethodSecurity(prePostEnabled=true) 使用表达式时间方法级别的安全性,打开后可以使用一下几个注解。
    @PreAuthorize 在方法调用之前,基于表达式的计算结果来限制对方法的访问。例如@PreAuthorize("hasRole('normal') AND hasRole('admin')")
    @PostAuthorize 允许方法调用,但是如果表达式计算结果为false,将抛出一个安全性异常。此注释支持使用returnObject来表示返回的对象。例如@PostAuthorize(" returnObject!=null &&  returnObject.username == authentication.name")
    @PostFilter 允许方法调用,但必须按照表达式来过滤方法的结果
    @PreFilter 允许方法调用,但必须在进入方法之前过滤输入值
5、会话控制
5.1 获取当前用户信息
用户认证通过后,为了避免用户的每次操作都进行认证可将用户的信息保存在会话中。spring security提供会话管
理,认证通过后将身份信息放入SecurityContextHolder上下文,SecurityContext与当前线程进行绑定,方便获取
用户身份。
可以通过为SecurityContextHolder.getContext().getAuthentication()获取当前登录用户信息。
@RestController
@RequestMapping("/common")
public class LoginController {

    @GetMapping("/getLoginUserByPrincipal")
    public String getLoginUserByPrincipal(Principal principal){
        return principal.getName();
    }
    @GetMapping(value = "/getLoginUserByAuthentication")
    public String currentUserName(Authentication authentication) {
        return authentication.getName();
    }
    @GetMapping(value = "/username")
    public String currentUserNameSimple(HttpServletRequest request) {
        Principal principal = request.getUserPrincipal();
        return principal.getName();
    }
    @GetMapping("/getLoginUser")
    public String getLoginUser(){
        Principal principal = (Principal)SecurityContextHolder.getContext().getAuthentication().getPrincipal();
        return principal.getName();
    }

}
5.2 会话控制
可以通过配置sessonCreationPolicy参数来了控制如何管理Session。
@Override
protected void configure(HttpSecurity http) throws Exception {
  http.sessionManagement()
       .sessionCreationPolicy(SessionCreationPolicy.IF_REQUIRED) }
这个属性有几个选项:
| 机制 | 描述 |
|---|---|
| always | 如果没有Session就创建一个 |
| ifRequired | 如果需要就在登录时创建一个,默认策略 |
| never | SpringSecurity将不会创建Session。但是如果应用中其他地方创建了Session,那么Spring Security就会使用。 |
| stateless | SpringSecurity将绝对不创建Session,也不使用。适合于一些REST API的无状态场景。 |
5.3 会话超时
会话超时时间可以通过spring boot的配置直接审定。
server.servlet.session.timeout=3600s
session超时后,可以通过SpringSecurity的http配置跳转地址
http.sessionManagement()
   .expiredUrl("/login‐view?error=EXPIRED_SESSION")
   .invalidSessionUrl("/login‐view?error=INVALID_SESSION");
expired是指session过期,invalidSession指传入的sessionId失效。
5.4 安全会话cookie
我们可以使用httpOnly和secure标签来保护我们的会话cookie:
httpOnly:如果为true,那么浏览器脚本将无法访问cookie
secure:如果为true,则cookie将仅通过HTTPS连接发送
spring boot 配置文件:
server.servlet.session.cookie.http‐only=true
server.servlet.session.cookie.secure=true
5.5 退出
Spring Security默认实现了logout退出,直接访问/logout就会跳转到登出页面,而ajax访问/logout就可以直接退出。
在WebSecurityConfifig的config(HttpSecurity http)中,也是可以配置退出的一些属性,例如自定义退出页面、定义推出后的跳转地址。
http
.and()
.logout() //提供系统退出支持,使用 WebSecurityConfigurerAdapter 会自动被应用
.logoutUrl("/logout") //默认退出地址
.logoutSuccessUrl("/login‐view?logout") //退出后的跳转地址
    .addLogoutHandler(logoutHandler) //添加一个LogoutHandler,用于实现用户退出时的清理工作.默认 SecurityContextLogoutHandler 会被添加为最后一个 LogoutHandler 。
    .invalidateHttpSession(true);  //指定是否在退出时让HttpSession失效,默认是true
在退出操作时,会做以下几件事情:
1、使HTTP Session失效。
2、清除SecurityContextHolder
3、跳转到定义的地址。
logoutHandler
一般来说, LogoutHandler 的实现类被用来执行必要的清理,因而他们不应该抛出异常。
下面是Spring Security提供的一些实现:
PersistentTokenBasedRememberMeServices 基于持久化token的RememberMe功能的相关清理
TokenBasedRememberMeService 基于token的RememberMe功能的相关清理
CookieClearingLogoutHandler 退出时Cookie的相关清理
CsrfLogoutHandler 负责在退出时移除csrfToken
SecurityContextLogoutHandler 退出时SecurityContext的相关清理
链式API提供了调用相应的 LogoutHandler 实现的快捷方式,比如deleteCookies()。
五、分布式系统认证方案
1、分布式系统认证需求分析
随着软件环境和需求的变化,软件的架构通常都会由单体结构演变成具有分布式架构的分布式系统。而分布式系统的每个服务都会有认证、授权的需求。如果每个服务都实现一套认证逻辑,就会非常冗余并且不现实。而针对分布式系统的特点,一般就会需要一套独立的第三方系统来提供统一的授权认证服务。分布式系统认证的需求总结如下:
1、统一认证授权
提供独立的认证服务,统一处理认证授权。无论是不同类型的用户、还是不同类型的客户端(Web、H5、App等),均采用一致的认证、授权、会话判断机制,实现统一认证授权服务。
要实现这种统一则认证方式必须可扩展,支持各种认证需求。例如用户名密码、短信验证码、二维码、人脸识别等各种认证方式,并可以灵活的切换。
2、多样的认证场景
例如购物、支付需要有不同的安全级别,也就需要有对应的认证场景。
3、应用接入认证
应提供扩展和开放的能力,提供安全的系统对接机制,并可开放部分API给第三方使用。并且内部服务和外部第三方服务均采用统一的接入机制。
2、分布式认证方案
分布式环境下的认证方案主要有基于Session和基于Token两种方案。
1、基于Session的认证方式:
这种方式依然是由服务端保存统一的用户信息。只是在分布式环境下,将Session信息同步到各个服务中,并对请求进行均衡的负载。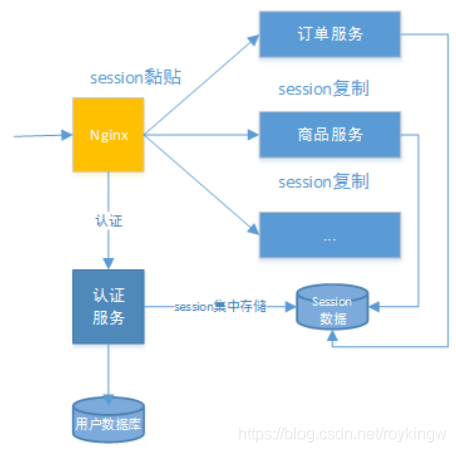
这种方案下,通常有以下几种做法:
1、Session复制。在多台应用服务器之间同步session,并使session保持一致,对外透明。
2、Session黏贴。当用户访问集群中某台服务器后,强制指定后续所有强求均落到此机器上。
3、Session集中存储。将Session存入分布式缓存中,所有服务器应用实例都统一从分布式缓存中获取Session信息。
总体来讲,基于Session认证的方式,可以更好的在服务端对会话进行控制,且安全性较高。但是,session机制总体是基于cookie的,客户端需要保存sessionId,这在复杂多样的客户端上不能有效的使用。另外随着系统的扩展需要提高session的复制、黏贴及存储的容错性。
2、基于Token的认证方式
基于Token的认证方式,服务端不再存储认证数据,易维护,扩展性强。客户端可以把Token存在任意地方,并且可以实现web和app统一认证机制。其缺点也很明显,客户端信息容易泄露,token由于包含了大量信息,因此一般数据量较大,而且每次请求都需要传递,因此比较占带宽。另外,token的签名延签操作也会给系统带来额外的负担。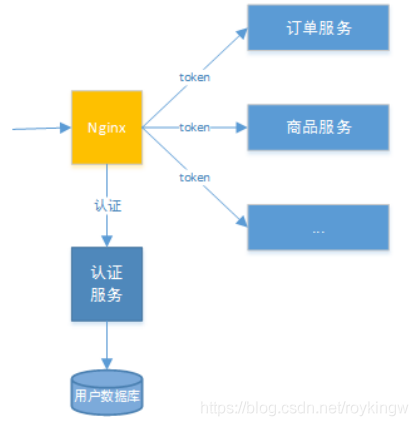
3、方案选型
通常情况下,还是会选择更通用的基于token的方式,这样能保证整个系统更灵活的扩展性,并减轻服务端的压力。
在这种方案下,一般会独立出 统一认证服务(UAA) 和网关两个部分来一起完成认证授权服务。
其中,统一认证服务承载接入方认证、登入用户认证、授权以及令牌管理的职责,完成实际的用户认证、授权功能。
而API网关会作为整个分布式系统的唯一入口,API网关为接入方提供API结合。它本身还可能具有其他辅助职责,如身份验证、监控、负载均衡、缓存、协议转换等功能。API网关方式的核心要点是,所有的接入方和消费端都通过统一的网关接入微服务,在网关层处理所有与业务无关的功能。正题流程如下图: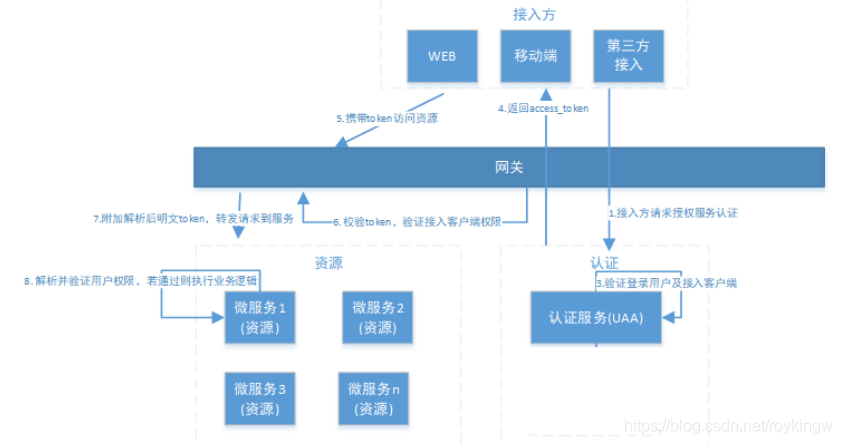
六、OAuth2.0
6.1 OAuth2.0介绍
6.1.1、什么是OAuth2.0?
OAuth(开放授权)是一个开放标准,允许用户授权第三方应用访问他们存储在另外的服务提供者上的信息,而不需要将用户名和密码供给第三方应用或分享他们数据的所有内容。OAuth2.0是OAuth协议的延续版本,但不向后兼容OAuth 1.0即完全废止了OAuth1.0。很大公司如Google,Yahoo,Microsoft等都提供了OAUTH认证服务,这些都足以说明OAUTH标准逐渐成为开放资源授权的标准。
Oauth协议目前发展到2.0版本,1.0版本过于复杂,2.0版本已得到广泛应用。
参考:https://baike.baidu.com/item/oAuth/7153134?fr=aladdin
Oauth协议:https://tools.ietf.org/html/rfc6749
6.2.2、OAuth2.0流程示例
OAuth认证流程,简单理解,就是允许我们将之前实现的认证和授权的过程交由一个独立的第三方来进行担保。而OAuth协议就是用来定义如何让这个第三方的担保有效且双方可信。例如我们下面以用户访问百度登录后的资源为例:
2.1 用户希望登录百度,访问百度登录后的资源。而用户可以选择使用微信账号进行登录,实际是将授权认证的流程交由微信(独立第三方)来进行担保。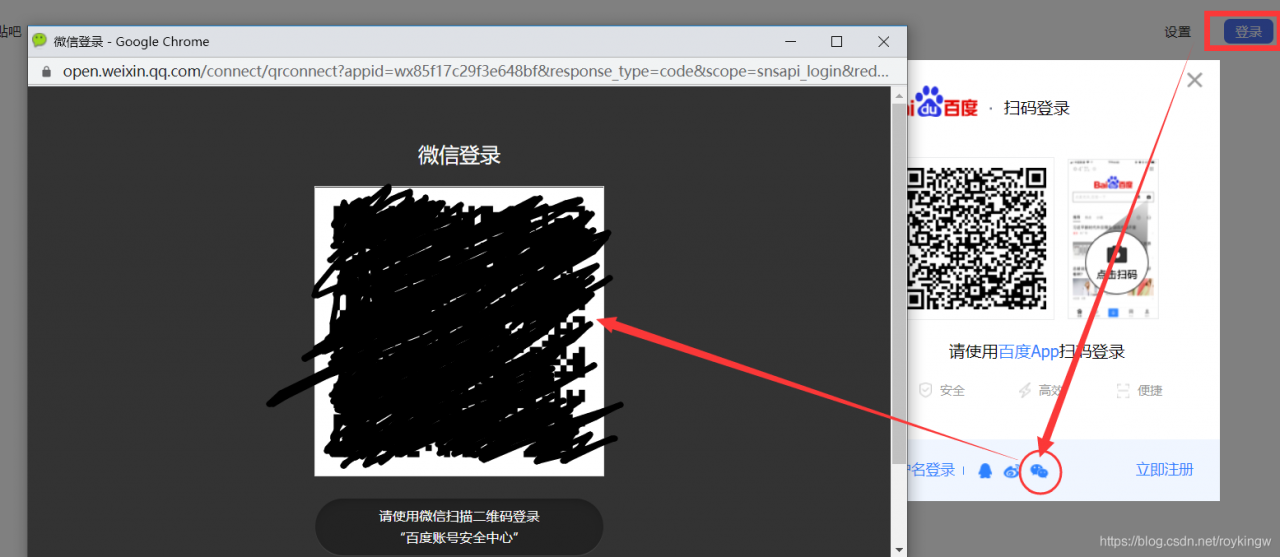
2.2 用户以扫描二维码的方式,在微信完成登录认证。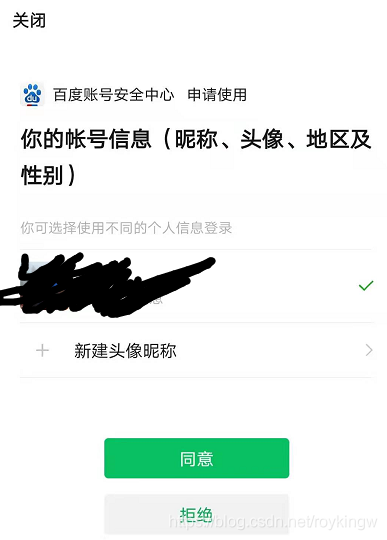
2.3 用户选择同意后,进入百度的流程。这时,百度会获取用户的微信身份信息,与百度自己的一个注册账号完成绑定。绑定完成了之后,就会用这个绑定后的账号完成自己的登录流程。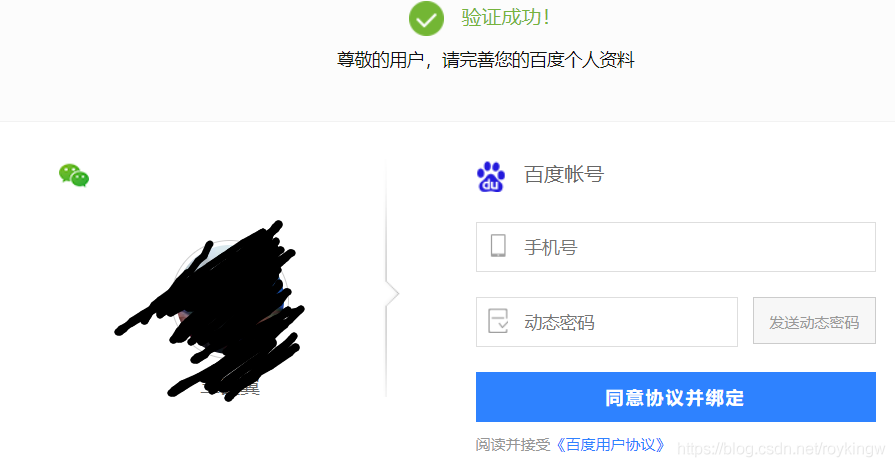
以上这个过程,实际上就是一个典型的OAuth2.0的认证流程。在这个登录认证的过程中,实际上是只有用户和百度之间有资源访问的关系,而微信就是作为一个独立的第三方,使用用户在微信里的身份信息,来对用户的身份进行了一次担保认证。认证完成后,百度就可以获取到用户的微信身份信息,进入自己的后续流程,与百度内部的一个用户信息完成绑定及登录。整个流程大致是这样: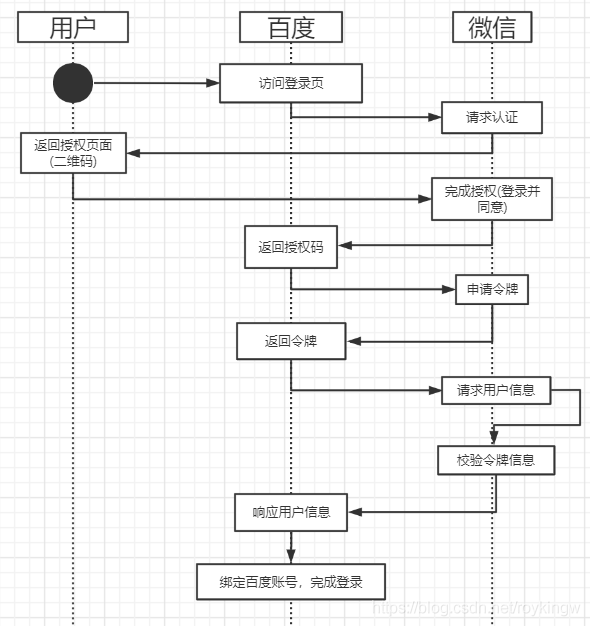
我们来分析这整个过程,其中最重要的问题,显然是如何让用户、百度和微信这三方实现权限认证的共信。这其中涉及到非常多的细节问题,而OAuth2.0协议就是用来定义这个过程中,各方的行为标准。
6.3.3、OAuth2.0协议
接下来,我们引用OAuth2.0的官方图,来深入了解下OAuth2.0协议: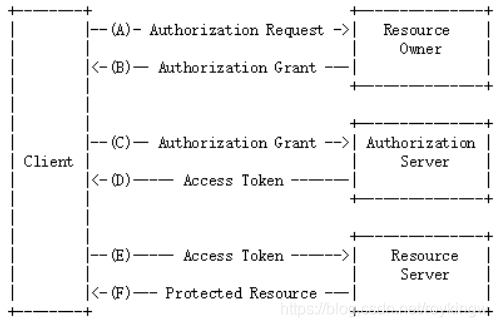
OAuth2.0协议包含以下几个角色:
1、客户端 - 示例中的浏览器、微信客户端
本身不存储资源,需要通过资源拥有者的授权去请求资源服务器的资源。
2、资源拥有者 - 示例中的用户(拥有微信账号)
通常是用户,也可以是应用程序,即该资源的拥有者。
3、授权服务器(也称为认证服务器) - 示例中的微信
用于服务提供者对资源拥有的身份进行认证,对访问资源进行授权,认证成功后会给客户端发放令牌(access_token),作为客户端访问资源服务器的凭据。
4、资源服务器 - 示例中的微信 和 百度
存储资源的服务器。本示例中,微信 通过OAuth协议让百度可以获取到自己存储的用户信息,而百度则通过OAuth协议,让用户可以访问自己的受保护资源。
这其中还有几个重要的概念:
clientDetails(client_id):客户信息。代表百度 在微信中的唯一索引。 在微信中用appid区分
secret:秘钥。代表百度获取微信信息需要提供的一个加密字段。这跟微信采用的加密算法有关。
scope:授权作用域。代表百度可以获取到的微信的信息范围。例如登录范围的凭证无法获取用户信息范围的信息。
access_token:授权码。百度获取微信用户信息的凭证。微信中叫做接口调用凭证。
grant_type: 授权类型。例如微信目前仅支持基于授权码的 authorization_code 模式。而OAuth2.0还可以有其他的授权方式,例如输入微信的用户名和密码的方式。
userDetails(user_id):授权用户标识。在示例中代表用户的微信号。 在微信中用openid区分.
然后,关于微信登录的功能介绍,可以查看微信的官方文档:https://developers.weixin.qq.com/doc/oplatform/Mobile_App/WeChat_Login/Development_Guide.html。
七、 Spring Security OAuth2.0
7.1 环境介绍
根据我们之前的学习, OAuth是一个开放的授权标准,而Spring Security Oauth2是对OAuth2协议的一种实现框架。下面我们来搭建自己的Spring Security OAuth2的服务框架。
OAuth2的服务提供方包含两个服务,即授权服务(Authorization Server,也叫做认证服务)和资源服务(Resource Server),使用Spring Security OAuth2的时候,可以选择在同一个应用中来实现这两个服务,也可以拆分成多个应用来实现同一组授权服务。
**授权服务(Authorization Server)**应包含对接入端以及登入用户的合法性进行验证并颁发token等功能,对令牌的请求断点由Spring MVC控制器进行实现,下面是配置一个认证服务必须的endpoints:
- AuthorizationEndpoint服务于认证请求。默认URL:/oauth/authorize
- TokenEndpoint服务于访问令牌的请求。默认URL:/oauth/token
- OAuth2AuthenticationProcessingFilter用来对请求给出的身份令牌进行解析健全。
我们搭建的示例项目大致如下: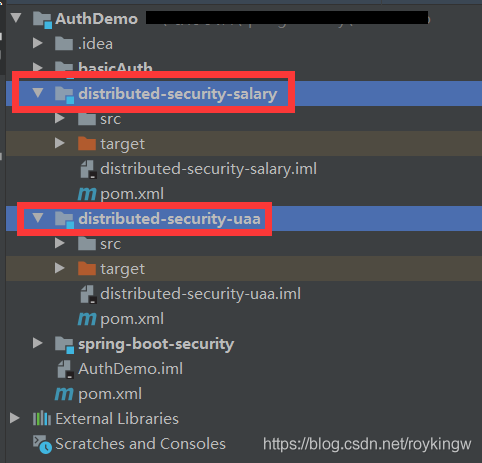
其中,distributed-security-uaa模块将用来实现认证授权服务,而distributed-security-salary模块用来实现资源服务。认证的大致流程如下:
1、客户请求distributed-security-uaa授权服务申请access_token
2、客户携带申请到的access_token访问distributed-security-salary中的服务。
3、distributed-security-salary将检验access_token的合法性,验证合法后才返回资源信息。
7.2 基础环境搭建
7.2.1 父工程搭建
父工程主要管理子模块及各个依赖的版本。pom.xml文件如下:
<?xml version="1.0" encoding="UTF-8"?>
<project xmlns="http://maven.apache.org/POM/4.0.0"
         xmlns:xsi="http://www.w3.org/2001/XMLSchema-instance"
         xsi:schemaLocation="http://maven.apache.org/POM/4.0.0 http://maven.apache.org/xsd/maven-4.0.0.xsd">
    <modelVersion>4.0.0</modelVersion>

    <groupId>com.tuling</groupId>
    <artifactId>AuthDemo</artifactId>
    <packaging>pom</packaging>
    <version>1.0-SNAPSHOT</version>

    <properties>
        <maven.compiler.source>1.8</maven.compiler.source>
        <maven.compiler.target>1.8</maven.compiler.target>
        <java.version>1.8</java.version>
        <spring-boot-version>2.3.3.RELEASE</spring-boot-version>
        <spring-cloud-version>Greenwich.RELEASE</spring-cloud-version>
    </properties>

    <modules>
        <module>spring-boot-security</module>
        <module>basicAuth</module>
        <module>distributed-security-uaa</module>
        <module>distributed-security-salary</module>
    </modules>

    <dependencyManagement>
        <dependencies>
            <dependency>
                <groupId>org.springframework.boot</groupId>
                <artifactId>spring-boot-dependencies</artifactId>
                <version>${spring-boot-version}</version>
                <type>pom</type>
                <scope>import</scope>
            </dependency>
            <dependency>
                <groupId>org.springframework.cloud</groupId>
                <artifactId>spring-cloud-dependencies</artifactId>
                <version>${spring-cloud-version}</version>
                <type>pom</type>
                <scope>import</scope>
            </dependency>
            <dependency>
                <groupId>javax.servlet</groupId>
                <artifactId>javax.servlet-api</artifactId>
                <version>3.1.0</version>
            </dependency>
            <dependency>
                <groupId>javax.interceptor</groupId>
                <artifactId>javax.interceptor-api</artifactId>
                <version>1.2</version>
            </dependency>
            <dependency>
                <groupId>com.alibaba</groupId>
                <artifactId>fastjson</artifactId>
                <version>1.2.47</version>
            </dependency>
            <dependency>
                <groupId>mysql</groupId>
                <artifactId>mysql-connector-java</artifactId>
                <version>5.1.47</version>
            </dependency>
            <dependency>
                <groupId>org.springframework.security</groupId>
                <artifactId>spring-security-jwt</artifactId>
                <version>1.1.1.RELEASE</version>
            </dependency>
            <dependency>
                <groupId>org.springframework.security.oauth.boot</groupId>
                <artifactId>spring-security-oauth2-autoconfigure</artifactId>
                <version>2.1.2.RELEASE</version>
            </dependency>
        </dependencies>
    </dependencyManagement>

    <build>
        <plugins>
            <plugin>
                <groupId>org.springframework.boot</groupId>
                <artifactId>spring-boot-maven-plugin</artifactId>
                <version>${spring-boot-version}</version>
                <configuration>
                    <mainClass>com.tuling.springbootsecurity.SpringBootSecurityApplication</mainClass>
                </configuration>
                <executions>
                    <execution>
                        <goals>
                            <goal>repackage</goal>
                        </goals>
                    </execution>
                </executions>
            </plugin>
            <plugin>
                <artifactId>maven-compiler-plugin</artifactId>
                <configuration>
                    <source>1.8</source>
                    <target>1.8</target>
                </configuration>
            </plugin>
        </plugins>
    </build>
</project>
7.2.2 UAA授权服务模块
1、创建distributed-security-uaa模块,作为授权服务工程,pom.xml依赖如下:
<?xml version="1.0" encoding="UTF-8"?>
<project xmlns="http://maven.apache.org/POM/4.0.0"
        xmlns:xsi="http://www.w3.org/2001/XMLSchema-instance"
        xsi:schemaLocation="http://maven.apache.org/POM/4.0.0 http://maven.apache.org/xsd/maven-4.0.0.xsd">
   <parent>
       <artifactId>AuthDemo</artifactId>
       <groupId>com.tuling</groupId>
       <version>1.0-SNAPSHOT</version>
   </parent>
   <modelVersion>4.0.0</modelVersion>

   <artifactId>distributed-security-uaa</artifactId>

   <dependencies>
       <dependency>
           <groupId>org.springframework.boot</groupId>
           <artifactId>spring-boot-starter-web</artifactId>
       </dependency>
       <dependency>
           <groupId>org.springframework.data</groupId>
           <artifactId>spring-data-commons</artifactId>
       </dependency>
       <dependency>
           <groupId>org.springframework.cloud</groupId>
           <artifactId>spring-cloud-starter-security</artifactId>
       </dependency>
       <dependency>
           <groupId>org.springframework.cloud</groupId>
           <artifactId>spring-cloud-starter-oauth2</artifactId>
       </dependency>
       <dependency>
           <groupId>org.springframework.security</groupId>
           <artifactId>spring-security-jwt</artifactId>
       </dependency>
       <dependency>
           <groupId>javax.interceptor</groupId>
           <artifactId>javax.interceptor-api</artifactId>
           <version>1.2</version>
       </dependency>
<!--        <dependency>-->
<!--            <groupId>mysql</groupId>-->
<!--            <artifactId>mysql-connector-java</artifactId>-->
<!--        </dependency>-->
<!--        <dependency>-->
<!--            <groupId>org.springframework.boot</groupId>-->
<!--            <artifactId>spring-boot-starter-jdbc</artifactId>-->
<!--        </dependency>-->
       <dependency>
           <groupId>com.alibaba</groupId>
           <artifactId>fastjson</artifactId>
       </dependency>
   </dependencies>

   <build>
       <plugins>
           <plugin>
               <groupId>org.springframework.boot</groupId>
               <artifactId>spring-boot-maven-plugin</artifactId>
               <version>${spring-boot-version}</version>
               <configuration>
                   <mainClass>com.tuling.security.distributed.uaa.UaaServerApplication</mainClass>
               </configuration>
               <executions>
                   <execution>
                       <goals>
                           <goal>repackage</goal>
                       </goals>
                   </execution>
               </executions>
           </plugin>
           <plugin>
               <artifactId>maven-compiler-plugin</artifactId>
               <configuration>
                   <source>1.8</source>
                   <target>1.8</target>
               </configuration>
           </plugin>
       </plugins>
   </build>
</project>
2、创建启动类
package com.tuling.security.distributed.uaa;

import org.springframework.boot.SpringApplication;
import org.springframework.boot.autoconfigure.SpringBootApplication;
import org.springframework.cloud.client.discovery.EnableDiscoveryClient;
import org.springframework.security.oauth2.config.annotation.web.configuration.EnableAuthorizationServer;

@SpringBootApplication
//@EnableDiscoveryClient
@EnableAuthorizationServer
public class UaaServerApplication {

    public static void main(String[] args) {
        SpringApplication.run(UaaServerApplication.class,args);
    }
}
3、配置文件 application.properties
spring.application.name=uaa‐service
server.port=53020
spring.main.allow‐bean‐definition‐overriding=true
server.servlet.context‐path=/uaa
#要自定义前台页面时需要
#spring.freemarker.enabled=true
#spring.freemarker.suffix=.html
#spring.freemarker.request‐context‐attribute=rc
#spring.freemarker.content‐type=text/html
#spring.freemarker.charset=UTF-8
spring.mvc.throw‐exception‐if‐no‐handler‐found=true
spring.resources.add‐mappings=false
#使用数据库加载时需要
#spring.datasource.url=jdbc:mysql://localhost:3306/user_db?useUnicode=true
#spring.datasource.username=root
#spring.datasource.password=mysql
#spring.datasource.driver‐class‐name=com.mysql.jdbc.Driver
#eureka.client.serviceUrl.defaultZone=http://localhost:53000/eureka/
#eureka.instance.preferIpAddress=true
#eureka.instance.instance‐id=${spring.application.name}:${spring.cloud.client.ip‐address}:${spring.application.instance_id:${server.port}}
management.endpoints.web.exposure.include=refresh,health,info,env
7.2.3 Salary资源服务模块
这个工程主要是测试认证授权功能,并不涉及薪水管理的相关业务。访问本工程的资源将需要进行OAuth认证。
1、创建distributed-security-salary模块,pom.xml依赖如下:
<?xml version="1.0" encoding="UTF-8"?>
<project xmlns="http://maven.apache.org/POM/4.0.0"
         xmlns:xsi="http://www.w3.org/2001/XMLSchema-instance"
         xsi:schemaLocation="http://maven.apache.org/POM/4.0.0 http://maven.apache.org/xsd/maven-4.0.0.xsd">
    <parent>
        <artifactId>AuthDemo</artifactId>
        <groupId>com.tuling</groupId>
        <version>1.0-SNAPSHOT</version>
    </parent>
    <modelVersion>4.0.0</modelVersion>
    <artifactId>distributed-security-salary</artifactId>
    <version>0.0.1</version>

    <dependencies>
        <dependency>
            <groupId>org.springframework.boot</groupId>
            <artifactId>spring-boot-starter-actuator</artifactId>
        </dependency>
        <dependency>
            <groupId>org.springframework.boot</groupId>
            <artifactId>spring-boot-starter-web</artifactId>
        </dependency>
        <dependency>
            <groupId>org.springframework.cloud</groupId>
            <artifactId>spring-cloud-starter-security</artifactId>
        </dependency>
        <dependency>
            <groupId>org.springframework.cloud</groupId>
            <artifactId>spring-cloud-starter-oauth2</artifactId>
        </dependency>
        <dependency>
            <groupId>javax.interceptor</groupId>
            <artifactId>javax.interceptor-api</artifactId>
        </dependency>
        <dependency>
            <groupId>com.alibaba</groupId>
            <artifactId>fastjson</artifactId>
        </dependency>
    </dependencies>

    <build>
        <plugins>
            <plugin>
                <groupId>org.springframework.boot</groupId>
                <artifactId>spring-boot-maven-plugin</artifactId>
                <version>${spring-boot-version}</version>
                <configuration>
                    <mainClass>com.tuling.security.distributed.salary.SalaryResourceApplication</mainClass>
                </configuration>
                <executions>
                    <execution>
                        <goals>
                            <goal>repackage</goal>
                        </goals>
                    </execution>
                </executions>
            </plugin>
            <plugin>
                <artifactId>maven-compiler-plugin</artifactId>
                <configuration>
                    <source>1.8</source>
                    <target>1.8</target>
                </configuration>
            </plugin>
        </plugins>
    </build>
</project>
2、创建启动类
package com.tuling.security.distributed.salary;

import org.springframework.boot.SpringApplication;
import org.springframework.boot.autoconfigure.SpringBootApplication;
import org.springframework.security.oauth2.config.annotation.web.configuration.EnableResourceServer;

@SpringBootApplication
@EnableResourceServer
public class SalaryResourceApplication {

    public static void main(String[] args) {
        SpringApplication.run(SalaryResourceApplication.class,args);
    }
}
3、配置文件 application.properties
spring.application.name=salary‐service
server.port=53021
spring.main.allow‐bean‐definition‐overriding=true
logging.level.root=debug
logging.level.org.springframework.web=info
server.servlet.context‐path=/resource
spring.mvc.throw‐exception‐if‐no‐handler‐found=true
spring.resources.add‐mappings=false
management.endpoints.web.exposure.include=refresh,health,info,env
这样,我们的基础开发框架就搭建起来了。然后我们开始进行配置。
7.3 授权服务配置
这一阶段的目的是配置出给客户颁发access_token的服务。这一步主要在授权服务模快中完成
7.3.1 打开@EnableAuthorizationServer 注解
这个注解是Spring Security打开OAuth认证服务的基础注解,可以在启动类或者任意一个@Configuration声明的启动类中打开这个注释。
之前我们配置Spring Security时,利用了WebSecurityConfigurerAdapter注入一个配置对象来完成对基础认证授权功能的配置。 在使用OAuth2时,Spring Security也提供了一个类似的适配器来帮助我们完成配置。
package com.tuling.security.distributed.uaa.config;

import org.springframework.context.annotation.Configuration;
import org.springframework.security.oauth2.config.annotation.web.configuration.AuthorizationServerConfigurerAdapter;

@Configuration
public class MyAuthorizationConfig extends AuthorizationServerConfigurerAdapter  {


}
AuthorizationServerConfigurerAdapter要求配置以下几个类,这几个类是由Spring创建的独立的配置对象,它们会被Spring传入AuthorizationServerConfigurer中进行配置。
public class AuthorizationServerConfigurerAdapter implements AuthorizationServerConfigurer {
   public void configure(AuthorizationServerSecurityConfigurer security) throws Exception {}
   public void configure(ClientDetailsServiceConfigurer clients) throws Exception {}
   public void configure(AuthorizationServerEndpointsConfigurer endpoints) throws Exception {}
}
这三个配置也是整个授权认证服务中最核心的配置。
ClientDetailsServiceConfigurer:用来配置客户端详情服务(ClientDetailsService),客户端详情信息在这里进行初始化,你能够把客户端详情信息写死在这里或者是通过数据库来存储调取详情信息。
AuthorizationServerEndpointsConfifigurer:用来配置令牌(token)的访问端点和令牌服务(tokenservices)。
AuthorizationServerSecurityConfifigurer:用来配置令牌端点的安全约束.
7.3.2 配置客户端详细信息
ClientDetailsServiceConfigurer能够使用内存或者JDBC来实现客户端详情服务(ClientDetailsService),ClientDetailsService负责查找ClientDetails,一个ClientDetails代表一个需要接入的第三方应用,例如我们上面提到的OAuth流程中的百度。ClientDetails中有几个重要的属性如下:
- clientId: 用来标识客户的ID。必须。
- secret: 客户端安全码,如果有的话。在微信登录中就是必须的。
- scope: 用来限制客户端的访问范围,如果是空(默认)的话,那么客户端拥有全部的访问范围。
- authrizedGrantTypes:此客户端可以使用的授权类型,默认为空。在微信登录中,只支持authorization_code这一种。
- authorities:此客户端可以使用的权限(基于Spring Security authorities)
- redirectUris:回调地址。授权服务会往该回调地址推送此客户端相关的信息。
Client Details客户端详情,能够在应用程序运行的时候进行更新,可以通过访问底层的存储服务(例如访问mysql,就提供了JdbcClientDetailsService)或者通过自己实现ClientRegisterationService接口(同时也可以实现ClientDetailsService接口)来进行定制。
示例中我们暂时使用内存方式存储客户端详情信息,配置如下:
    @Override
    public void configure(ClientDetailsServiceConfigurer clients) throws Exception {
        //内存配置的方式配置用户信息
        clients.inMemory()//内存方式
                .withClient("c1") //client_id
                .secret(new BCryptPasswordEncoder().encode("secret"))//客户端秘钥
                .resourceIds("order")//客户端拥有的资源列表
                .authorizedGrantTypes("authorization_code",
                        "password", "client_credentials", "implicit", "refresh_token")//该client允许的授权类型
                .scopes("all")//允许的授权范围
                .autoApprove(false)//跳转到授权页面
                .redirectUris("http://www.baidu.com");//回调地址
//                .and() //继续注册其他客户端
//                .withClient()
//                ...
//   加载自定义的客户端管理服务 //   clients.withClientDetails(clientDetailsService);
    }
管理令牌
AuthorizationServerTokenService接口定义了一些对令牌进行管理的必要操作,令牌可以被用来加载身份信息,里面包含了这个令牌的相关权限。
实现一个AuthorizationServerTokenServices这个接口,需要继承DefaultTokenServices这个类。 该类中包含了一些有用的实现。你可以使用它来修改令牌的格式和令牌的存储。默认情况下,他在创建一个令牌时,是使用随机值来进行填充的。这个类中完成了令牌管理的几乎所有的事情,唯一需要依赖的是spring容器中的一个TokenStore接口实现类来定制令牌持久化。而这个TokenStore,有一个默认的实现,就是ImMemoryTokenStore,这个类会将令牌保存到内存中。除此之外,还有几个默认的TokenStore实现类可以使用。
- InMemoryTokenStore:这个是默认采用的方式。他可以在单服务器上完美运行(即并发访问压力不大的情况下,并且他在失败时不会进行备份)。大多数的项目都可以使用这个实现类来进行尝试。也可以在并发的时候来进行管理,因为不会被保存到磁盘中,所以更易于调试。
- JdbcTokenStore:这是一个基于JDBC的实现类,令牌会被保存到关系型数据库中。使用这个实现类,可以在不同的服务器之间共享令牌信息。当然,这个是需要使用spring boot jdbc相关的依赖的。类似的,还有RedisTokenStore基于Redis存储令牌信息。
- JwtTokenStore:全程是JSON Web Token。他可以把令牌信息全部编码整合进令牌本身,这样后端服务可以不用存储令牌相关信息,这是他最大的优势。但是他也有缺点, 那就是撤销一个已经授权的令牌会非常困难。所以他通常用来处理一个生命周期较短的令牌以及撤销刷新令牌(refresh_token)。而另一个缺点就是这个令牌会比较大,因为他要包含较多的用户凭证信息。JwtTokenStore不会保存任何数据,但是他在转换令牌值以及授权信息方面和DefaultTokenServices所扮演的角色是一样的。
所以我们下面的步骤首先是要定义一个TokenStore
1、注入TokenConfig
我们先定义一个TokenConfig,往Spring容器中注入一个InMemoryTokenStore,生成一个普通令牌。
@Configuration
public class TokenConfig {
    @Bean
    public TokenStore tokenStore(){
        //使用基于内存的普通令牌
        return new InMemoryTokenStore();
    }
2、注入AuthorizationServerTokenService
在AuthorizationServer中定义AuthorizationServerTokenServices
    @Autowired
	private TokenStore tokenStore;
	//会通过之前的ClientDetailsServiceConfigurer注入到Spring容器中
	@Autowired
	private ClientDetailsService clientDetailsService;

    public AuthorizationServerTokenServices tokenService() {
        DefaultTokenServices service = new DefaultTokenServices();
        service.setClientDetailsService(clientDetailsService); //客户端详情服务
        service.setSupportRefreshToken(true); //允许令牌自动刷新
        service.setTokenStore(tokenStore); //令牌存储策略-内存
        service.setAccessTokenValiditySeconds(7200); // 令牌默认有效期2小时
        service.setRefreshTokenValiditySeconds(259200); // 刷新令牌默认有效期3天
        return service;
    }
7.3.3 令牌访问端点配置
AuthorizationServerEndpointsConfigurer这个对象的实例可以完成令牌服务以及令牌服务各个endpoint配置。
配置授权类型(Grant Types)
AuthorizationServerEndpointsConfigurer对于不同类型的授权类型,也需要配置不同的属性。
- authenticationManager:认证管理器。当你选择了password(资源所有者密码)这个授权类型时,就需要指定authenticationManager对象来进行鉴权。
- userDetailsService:用户主体管理服务。如果设置了这个属性,那说明有一个自己的UserDetailsService接口的实现,或者你可以把这个东东设置到全局域(例如GlobalAuthenticationManagerConfigurer)上去,当你设置了这个之后,那么refresh_token刷新令牌方式的授权类型流程中就会多包含一个检查步骤,来确保这个账号是否仍然有效。
- authorizationCodeServices:这个属性是用来设置授权服务器的,主要用于 authorization_code 授权码类型模式。
- implicitGrantService:这个属性用于设置隐式授权模式的状态。
- tokenGranter:如果设置了这个东东(即TokenGranter接口的实现类),那么授权将会全部交由你来自己掌控,并且会忽略掉以上几个属性。这个属性一般是用作深度拓展用途的,即标准的四种授权模式已经满足不了你的需求时,才会考虑使用这个。
配置授权断点的URL(Endpoint URLS):
AuthorizationServerEndpointsConfifigurer这个配置对象首先可以通过pathMapping()方法来配置断点URL的链接地址。即将oauth默认的连接地址替代成其他的URL链接地址。例如spring security默认的授权同意页面/auth/confirm_access非常简陋,就可以通过passMapping()方法映射成自己定义的授权同意页面。
框架默认的URL链接有如下几个:
/oauth/authorize : 授权端点
/auth/token : 令牌端点
/oauth/confirm_access : 用户确认授权提交的端点
/oauth/error : 授权服务错误信息端点。
/oauth/check_token : 用于资源服务访问的令牌进行解析的端点
/oauth/token_key : 使用Jwt令牌需要用到的提供公有密钥的端点。
需要注意的是,这几个授权端点应该被Spring Security保护起来只供授权用户访问。
在AuthorizationServer配置令牌访问端点
   @Autowired
	private AuthorizationCodeServices authorizationCodeServices;
	@Autowired
	private AuthenticationManager authenticationManager;

   @Override
    public void configure(AuthorizationServerEndpointsConfigurer endpoints) throws Exception {
        endpoints
//                .pathMapping("/oauth/confirm_access","/customer/confirm_access")//定制授权同意页面
                .authenticationManager(authenticationManager)//认证管理器
                .userDetailsService(userDetailsService)//密码模式的用户信息管理
                .authorizationCodeServices(authorizationCodeServices)//授权码服务
                .tokenServices(tokenService())//令牌管理服务
                .allowedTokenEndpointRequestMethods(HttpMethod.POST);
    }

        //设置授权码模式的授权码如何存取,暂时用内存方式。
    @Bean
    public AuthorizationCodeServices authorizationCodeServices(){
        return new InMemoryAuthorizationCodeServices();
        //JdbcAuthorizationCodeServices
    }
7.3.4 令牌端点的安全约束
AuthorizationServerSecurityConfifigurer , 用来配置令牌端点(Token Endpoint)的安全约束,在AuthorizationServer中配置如下:
    @Override
    public void configure(AuthorizationServerSecurityConfigurer security) throws Exception {
        security
                .tokenKeyAccess("permitAll()") // oauth/token_key公开
                .checkTokenAccess("permitAll()") // oauth/check_token公开
                .allowFormAuthenticationForClients(); // 表单认证,申请令牌
    }
7.3.5 授权服务配置总结:
OAuth2的授权服务配置是大家使用Spring Security OAuth最头疼的地方。其实具体的配置方式可以不用着重记忆,翻翻API基本能看懂大概。但是这三块核心的配置对象一定要理解记忆。
1、ClientDetailsServiceConfigurer 配置客户端信息。
2、AuthorizationServerEndpointsConfigurer 配置令牌服务。首选需要配置token如何存取,以及客户端支持哪些类型的token。然后不同的令牌服务需要不同的其他服务。authorization_code类型需要配置authorizationCodeServices来管理授权码,password类型需要UserDetailsService来验证用户身份。
3、AuthorizationServerSecurityConfigurer 对相关endpoint定义一些安全约束。
7.3.6 web安全配置
完成上面的OAuth配置后,还要注意添加之前Spring Security相关的安全配置。这也是跟之前的Sprnig Security整合的关键。
package com.tuling.security.distributed.uaa.config;

import org.springframework.beans.factory.annotation.Autowired;
import org.springframework.context.annotation.Bean;
import org.springframework.security.authentication.AuthenticationManager;
import org.springframework.security.config.annotation.method.configuration.EnableGlobalMethodSecurity;
import org.springframework.security.config.annotation.web.builders.HttpSecurity;
import org.springframework.security.config.annotation.web.configuration.EnableWebSecurity;
import org.springframework.security.config.annotation.web.configuration.WebSecurityConfigurerAdapter;
import org.springframework.security.core.userdetails.User;
import org.springframework.security.core.userdetails.UserDetailsService;
import org.springframework.security.crypto.bcrypt.BCryptPasswordEncoder;
import org.springframework.security.crypto.password.PasswordEncoder;
import org.springframework.security.oauth2.provider.ClientDetailsService;
import org.springframework.security.oauth2.provider.token.TokenStore;
import org.springframework.security.provisioning.InMemoryUserDetailsManager;

/**
 * 注入一个自定义的配置
 */
@EnableWebSecurity
@EnableGlobalMethodSecurity(prePostEnabled = true,securedEnabled = true)
public class MyWebSecurityConfig extends WebSecurityConfigurerAdapter {

    @Autowired
    private ClientDetailsService clientDetailsService;
    @Autowired
    private TokenStore tokenStore;

    @Bean
    public PasswordEncoder passwordEncoder() {
//        return NoOpPasswordEncoder.getInstance();
        return new BCryptPasswordEncoder();
    }
    //从父类加载认证管理器
    @Bean
    public AuthenticationManager authenticationManagerBean() throws Exception {
        return super.authenticationManagerBean();
    }

    @Bean
    public UserDetailsService userDetailsService(){
        InMemoryUserDetailsManager userDetailsManager = new InMemoryUserDetailsManager(User.withUsername("admin").password(passwordEncoder().encode("admin")).authorities("mobile","salary").build()
                ,User.withUsername("manager").password(passwordEncoder().encode("manager")).authorities("salary").build()
                ,User.withUsername("worker").password(passwordEncoder().encode("worker")).authorities("worker").build());
        return userDetailsManager;
    }

    //配置用户的安全拦截策略
    @Override
    protected void configure(HttpSecurity http) throws Exception {
        //链式配置拦截策略
        http.csrf().disable()//关闭csrf跨域检查
                .authorizeRequests()
                .anyRequest().authenticated() //其他请求需要登录
                .and() //并行条件
                .formLogin(); //可从默认的login页面登录,并且登录后跳转到main.html
    }
}
7.4 授权服务流程测试:
在之前配置客户端详细信息时,我们配置了客户端可以支持的授权类型
 client.authorizedGrantTypes("authorization_code",
                        "password", "client_credentials", "implicit", "refresh_token")//该client允许的授权类型
这里就列出了OAuth2支持的四种授权类型。其实是代表了OAuth授权三方的不同互信程度。
1、客户端模式 client_credentials:
这种模式是最简单的模式,流程如下: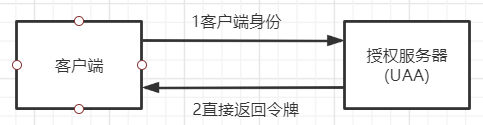
(1) 客户端向授权服务器发送自己的身份信息,请求令牌access_token。请求地址:
/uaa/oauth/token?client_id=c1&client_secret=secret&grant_type=client_credentials
参数列表:
grant_type :授权类型,需要填写client_credentials,客户端模式
client_id :客户端标识
client_secret :客户端密钥
(2)授权服务器确认客户端身份后,直接将令牌access_token返回给客户端。
用POSTMAN进行测试的截图如下: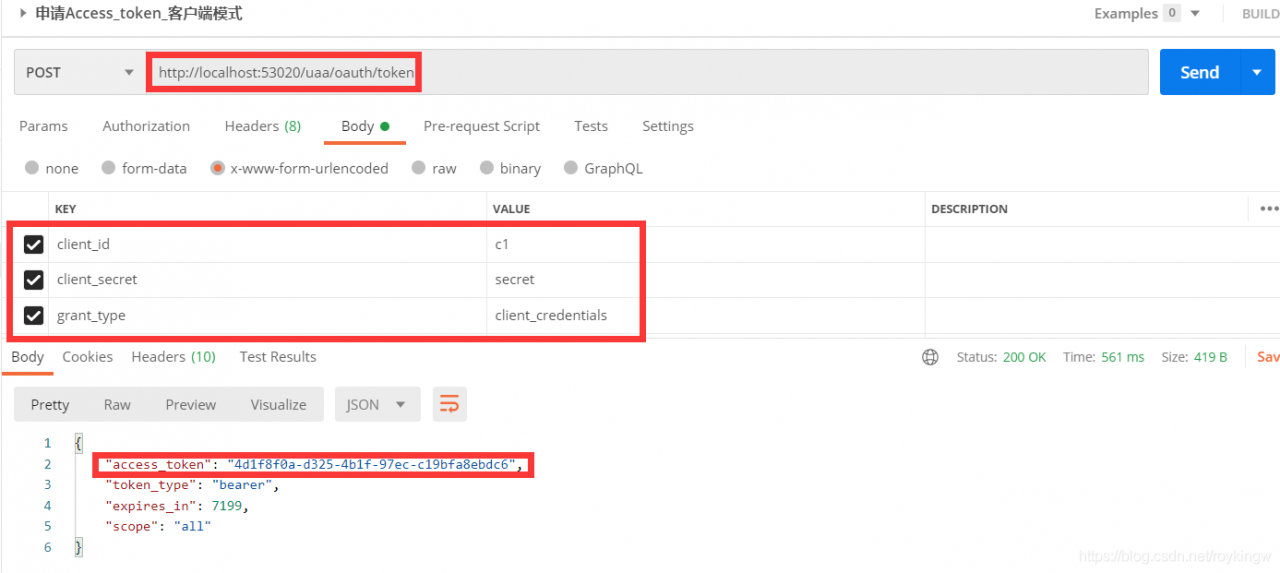
这种模式是最方便但是也最不安全的模式,代表了授权服务器对客户端的完全互信。因此,这种模式一般可以用在授权服务器对客户端完全信任的场景,例如内部系统或者协议合作方系统对接。
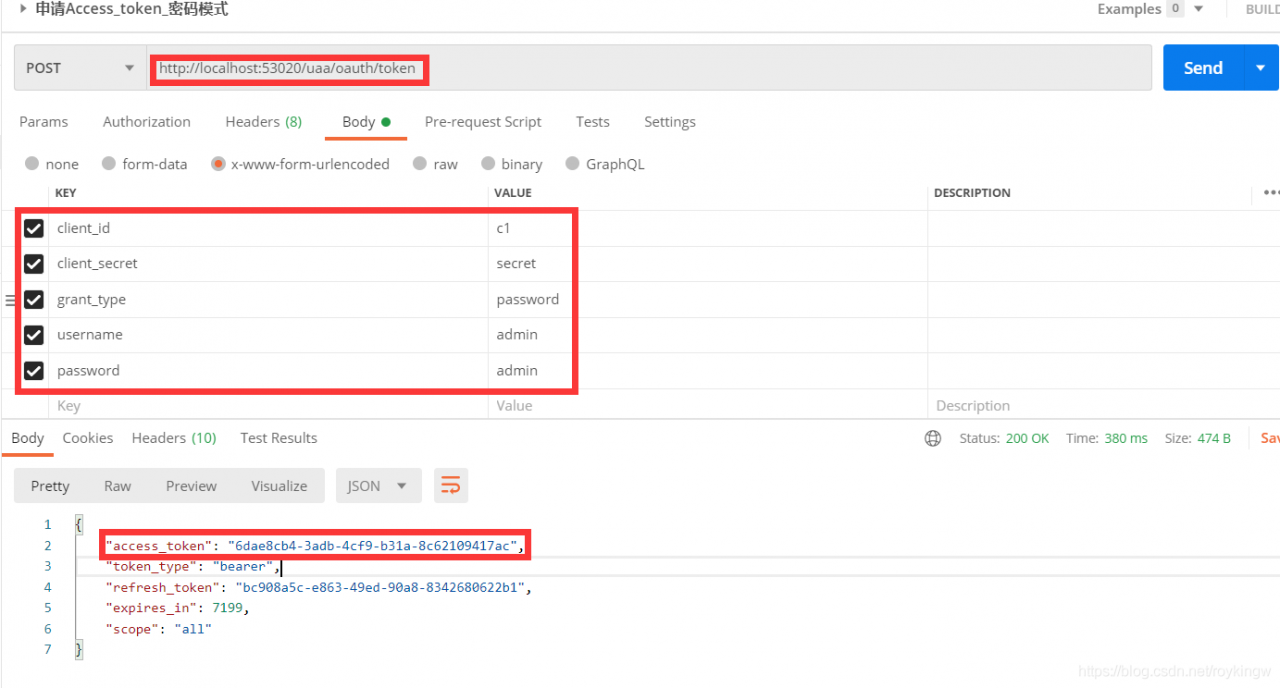
2、密码模式 password:
该模式的流程如下: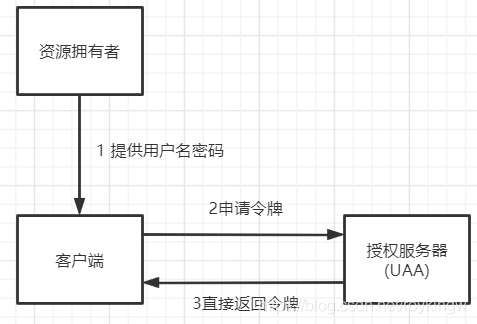
(1) 资源拥有者将用户名、密码发送给客户端
(2)客户端拿着资源拥有者的用户名、密码向授权服务器请求令牌access_token,请求如下:
/uaa/oauth/token?
client_id=c1&client_secret=secret&grant_type=password&username=admin&password=admin
参数列表:
grant_type :授权类型,需要填写password,密码模式
client_id : 客户端标识
client_secret :客户端密钥
username : 资源拥有者用户名
password :资源拥有者密码
(3) 授权服务器将令牌access_token发送给客户端
用POSTMAN测试的示例如下:
这种模式用户会把用户名和密码直接泄漏给客户端,代表了资源拥有者和授权服务器对客户端的绝对互信,相信客户端不会做坏事。一般适用于内部开发的客户端的场景。
3、简化模式 implicit:
这种模式的流程如下: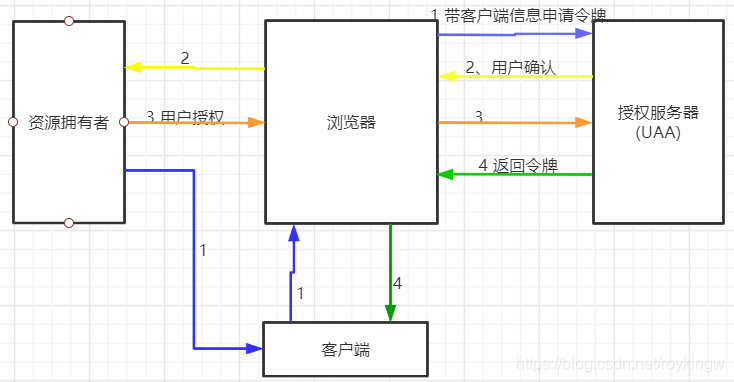
(1)用户访问客户端,客户端将向授权服务器申请授权。
(2)授权服务器将引导用户进入授权验证页面,等待用户同意授权。
(3)用户在授权验证页面同意进行授权。
(4)用户同意授权后,授权服务器向客户端返回令牌access_token
测试流程如下:
(1)客户端引导用户,直接访问授权服务器的授权申请地址: http://localhost:53020/uaa/oauth/authorize?client_id=c1&response_type=token&scope=all&redirect_uri=http://www.baidu.com。此时,会跳转到授权服务器的登录页面,需要用户自己输入用户名密码,进行登录。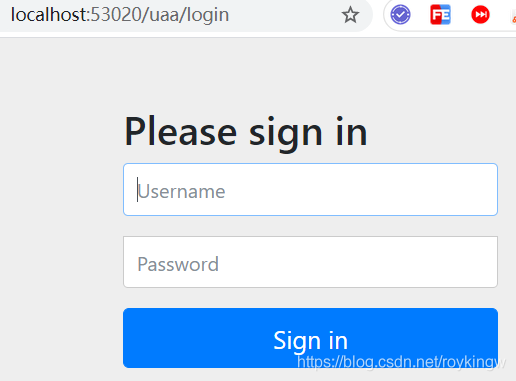
(2)用户使用admin/admin登录后,进入授权确认页面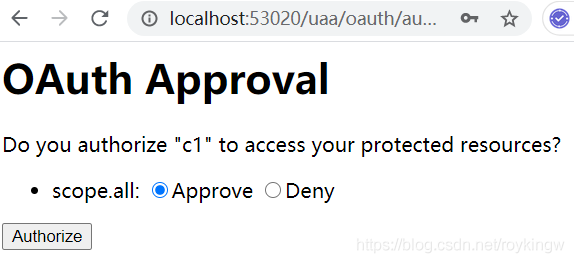
(3)用户在页面选择同意,并提交。
(4)此时页面就会跳转到指定的redirect uri(我们配置的www.baidu.com。此地址需要授权服务器预先配置,同时客户端需要提交参数)。在跳转地址上,直接带上了access_token,这个就是访问令牌。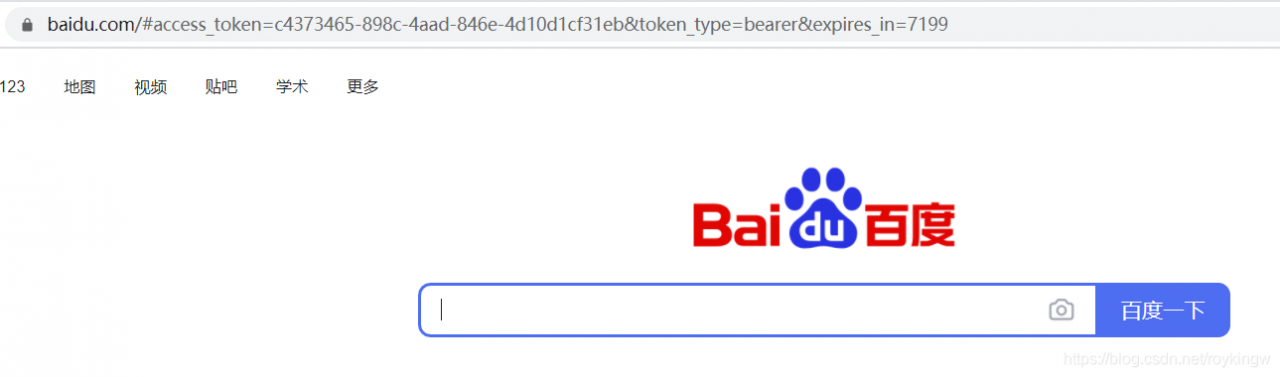
这种方案下,一般redirect uri会配置成客户端自己的一个相应地址。这个相应地址接收到授权服务器推送过来的访问令牌后,就可以将访问令牌在本地进行保存,然后在需要调用资源服务时,再拿出来通过资源服务的认证。
注意下,这种模式下,access_token并不是以Get请求参数的形式推送的,而是以#fragmenet的方式返回的。
这种模式下,oauth三方的数据已经进行了隔离。这种模式一般用于没有服务端的第三方单页面应用,这样可以在JS里直接相应access_token。
4、授权码模式 authorization_code :
微信登录就是采用的这种模式。这种模式的流程如下: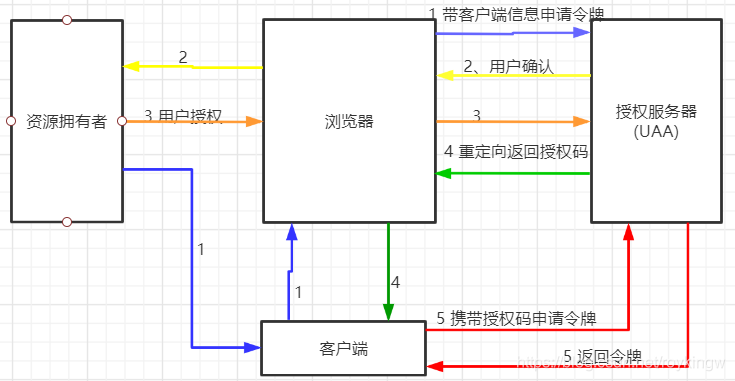
相比上面的简化模式,就是在后面第4步,授权服务器先返回给客户端一个授权码,也就是authorization_code。客户端拿到授权码后,再向授权服务器申请令牌。
测试流程如下:
(1)用户申请access_token时(访问地址http://localhost:53020/uaa/oauth/authorize?client_id=c1&response_type=code&scope=all&redirect_uri=http://www.baidu.com),会首先跳转登录页面,需要用户进行登录。–微信中,将这个登录页面定制成了扫二维码登录的页面。
(2)使用admin用户登录完成后,会弹出默认的授权页面。–微信将授权页面进行了定制
(3)选择同意后,会跳转到我们指定的百度网页,并带上了授权码code。–实际项目中应该是指向自己客户端工程的一个路径,后台获取code后保存起来。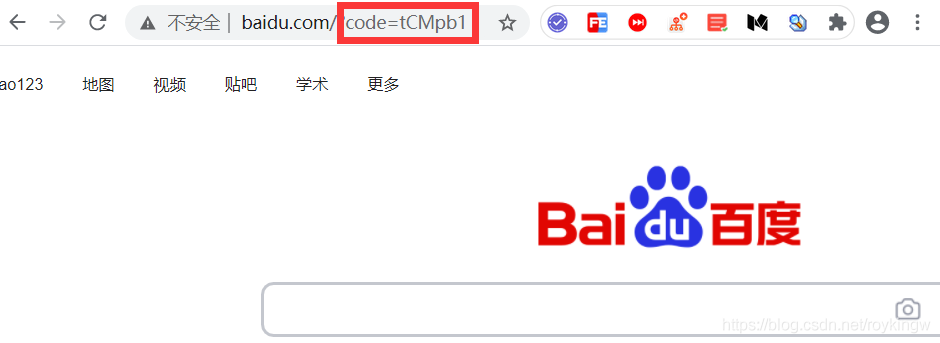
拿到code后,就可以向UAA工程申请access_token
以这种方式就能获得access_token。这里注意,redirect_uri需要与上一步一致。
这种模式是四种模式中最安全的一种。这种模式下,oauth2认证的三方可以在互不信任的情况下完成担保认证过程。而且,这种模式下,access_token是直接在后台服务端之间进行交互,这样也较小了令牌泄漏的风险。
5、刷新令牌 refresh_token
最后还一个授权类型refresh_token,这个其实严格来说不算是一种授权类型,只是代表一个刷新令牌的端口。当令牌access_token超时后,可以申请这个端口获取更新的令牌。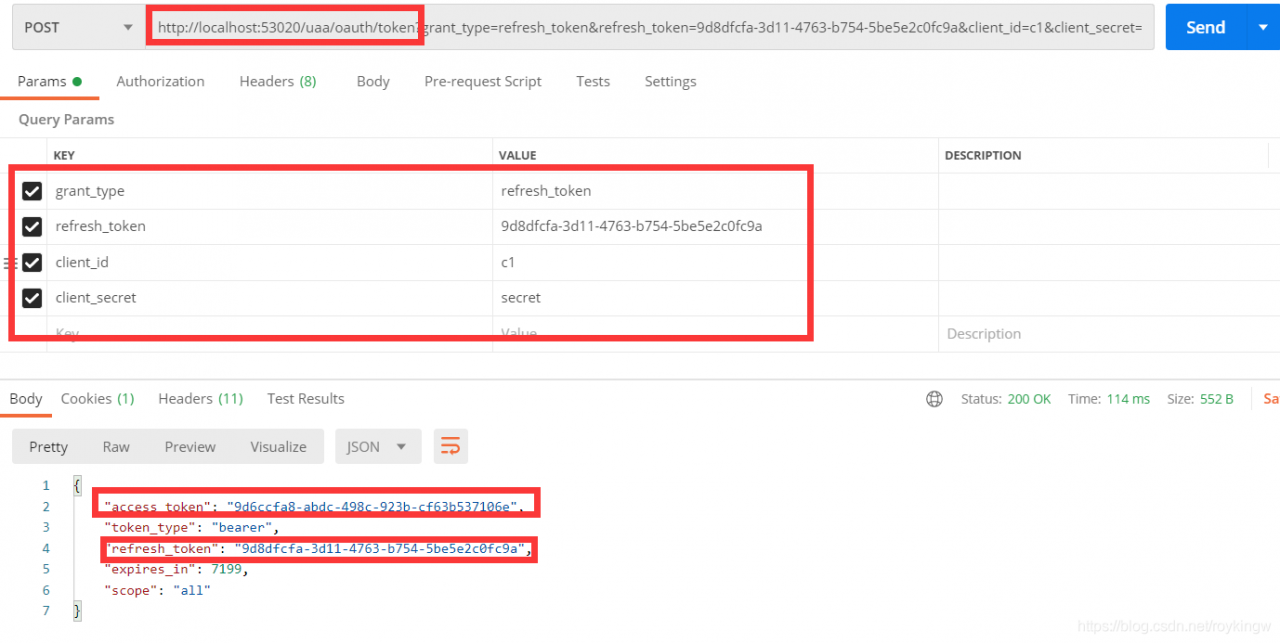
这里用到的refresh_token是随access_token一起申请到的。
6、验证令牌接口
这个接口也是oauth的统一定义端口,他的权限不在客户端配置中配置,而是在AuthorizationServerSecurityConfigurer对象中配置。这里只是一并进行测试: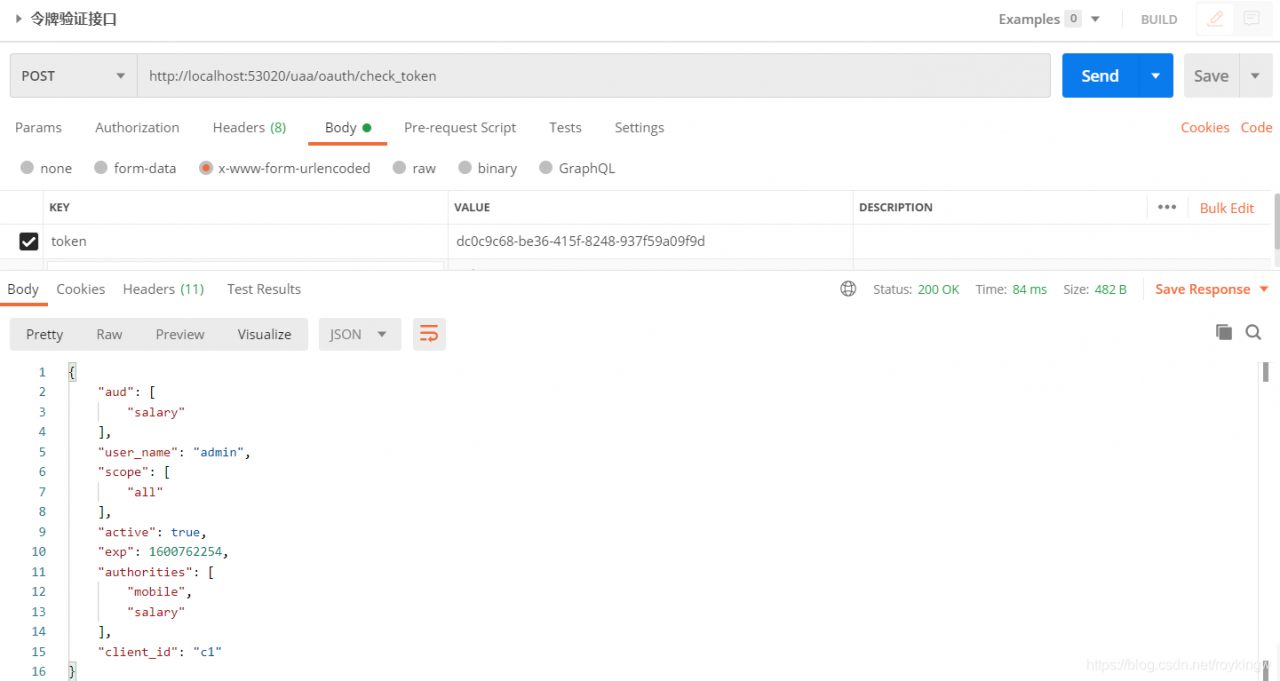
7.5 资源服务配置
前面完成的授权服务实际上是OAuth协议中最复杂的部分,他规定了三方在互不信任的假设下如何进行担保认证。而到了资源服务这一步,其实就比较简单了。资源服务只要在访问资源之前,进行令牌验证即可。
7.5.1 打开@EnableResourceServer注解
这个注解是Spring Security打开OAuth资源服务的基础注解,可以在启动类或者任意一个@Configuration声明的启动类中打开这个注释。
7.5.2 资源服务器核心配置
然后,与之前的配置方式类似,Spring Security也提供了ResourceServerConfigurerAdapter适配器来协助完成资源服务器的配置。这个适配器提供了多个configure方法,对以下两个核心对象进行配置。
ResourceServerSecurityConfigurer中主要包含:
- tokenServices : ResourceServerTokenServices类的实例,用来实现令牌服务,即如何验证令牌。
- tokenStore : TokenStore类的实例,指定令牌如何访问,与tokenServices配置可选
- resourceId : 这个资源服务的ID,是可选的。但是推荐设置并在授权服务中进行验证。
- 其他的扩展属性例如tokenExtractor令牌提取器用来提取请求中的令牌。
HttpSecurity,这个配置与Spring Security类似:
- authorizeRequests()方法验证请求。antMatchers方法匹配访问路径。access()方法配置需要的权限。
- .sessionManagement()方法配置session管理策略。
- 其他自定义权限保护规则也通过HttpSecurity来配置。
@EnableResourceServer注解会自动增加一个类型为OAuth2AuthenticationProcessingFilter的过滤器链。
ResourceServerConfig示例内容如下:
package com.tuling.security.distributed.salary.config;

import org.springframework.context.annotation.Configuration;
import org.springframework.security.config.annotation.web.builders.HttpSecurity;
import org.springframework.security.config.http.SessionCreationPolicy;
import org.springframework.security.oauth2.config.annotation.web.configuration.ResourceServerConfigurerAdapter;
import org.springframework.security.oauth2.config.annotation.web.configurers.ResourceServerSecurityConfigurer;
import org.springframework.security.oauth2.provider.token.RemoteTokenServices;
import org.springframework.security.oauth2.provider.token.ResourceServerTokenServices;

@Configuration
public class MyResourceServerConfig extends ResourceServerConfigurerAdapter {

    public static final String RESOURCE_SALARY = "salary";

    @Override
    public void configure(ResourceServerSecurityConfigurer resources) throws Exception {
        resources.resourceId(RESOURCE_SALARY) //资源ID
                .tokenServices(tokenServices()) //使用远程服务验证令牌的服务
                .stateless(true); //无状态模式
    }

    //配置安全策略
    @Override
    public void configure(HttpSecurity http) throws Exception {
        http.authorizeRequests() //校验请求
                .antMatchers("/order/**") // 路径匹配规则。
                .access("#oauth2.hasScope('all')") // 需要匹配scope
                .and().csrf().disable()
                .sessionManagement().sessionCreationPolicy(SessionCreationPolicy.STATELESS);
    }
    //配置access_token远程验证策略。
    public ResourceServerTokenServices tokenServices(){
//        DefaultTokenServices services = new DefaultTokenServices();
        RemoteTokenServices services = new RemoteTokenServices();
        services.setCheckTokenEndpointUrl("http://localhost:53020/uaa/oauth/check_token");
        services.setClientId("c1");
        services.setClientSecret("secret");
        return services;
    }
}
这里需要注意的是ResourceServerSecurityConfigurer的tokenServices()方法,设定了一个token的管理服务。其中,如果资源服务和授权服务是在同一个应用程序上,那可以使用DefaultTokenServices,这样的话,就不用考虑关于实现所有必要的接口一致性的问题。而如果资源服务器是分离的,那就必须要保证能够有匹配授权服务提供的ResourceServerTokenServices,他知道如何对令牌进行解码。
令牌解析方法:使用DefaultTokenServices在资源服务器本地配置令牌存储、解码、解析方式。使用RemoteTokenServices资源服务器通过HTTP请求来解码令牌,每次都请求授权服务器端点/oauth/check_token。这时需要授权服务将这个端点暴露出来,以便资源服务进行访问。所以这里要注意下授权服务的下面这个配置:
@Override
public void configure(AuthorizationServerSecurityConfigurer security) throws Exception {
   security.tokenKeyAccess("permitAll()")// /oauth/token_key 允许访问
   .checkTokenAccess("permitAll()") // /oauth/check_token 允许访问
}
而这个/oauth/check_token端点可以获取到access_token对应到的客户信息。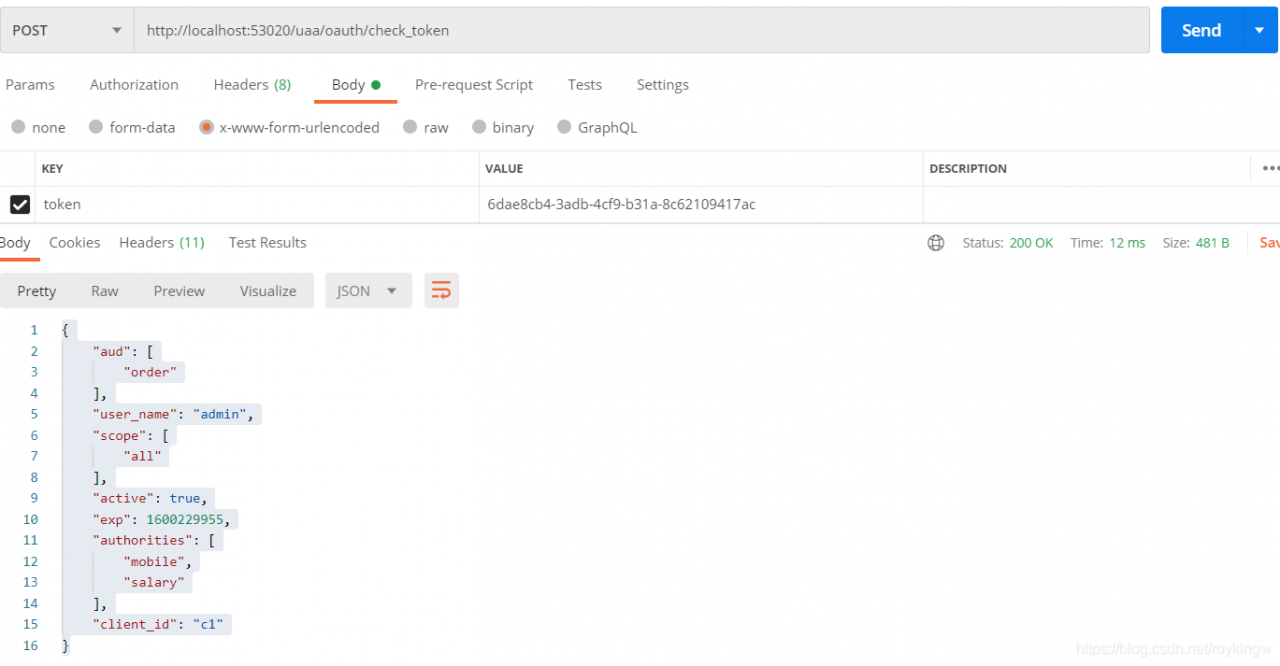
7.5.3 编写资源
然后我们编写一个简单的薪水查询接口:
package com.tuling.security.distributed.salary.controller;

import org.springframework.security.access.prepost.PreAuthorize;
import org.springframework.web.bind.annotation.GetMapping;
import org.springframework.web.bind.annotation.RequestMapping;
import org.springframework.web.bind.annotation.RestController;

@RestController
@RequestMapping("salary")
public class SalaryController {

    @GetMapping("query")
    @PreAuthorize("hasAuthority('salary')")//需要授权客户端拥有order资源才可以访问。
    public String query(){
        return "salary info";
    }
}
7.5.4 添加安全访问控制
以Spring Security的方式添加安全访问控制策略。
package com.tuling.security.distributed.salary.config;

import org.springframework.context.annotation.Configuration;
import org.springframework.security.config.annotation.method.configuration.EnableGlobalMethodSecurity;
import org.springframework.security.config.annotation.web.builders.HttpSecurity;
import org.springframework.security.config.annotation.web.configuration.WebSecurityConfigurerAdapter;

@Configuration
@EnableGlobalMethodSecurity(securedEnabled = true,prePostEnabled = true)
public class MyWebSecurityConfig extends WebSecurityConfigurerAdapter {
    @Override
    protected void configure(HttpSecurity http) throws Exception {
        http.csrf().disable()
                .authorizeRequests()
                .antMatchers("/salary/**")
//                .hasAuthority("salary") //这里采用了注解的方法级权限配置。
                .authenticated()
                .anyRequest().permitAll();
    }
}
这里使用了@EnableGlobalMethodSecurity方法打开了基于注解的方法级别的权限验证。
7.5.5 资源访问测试
到这里,我们的资源服务器就算配置完成了。 下面我们来访问资源服务器的salary接口进行测试。测试时要注意,在向资源服务器提交access_token时,需要在请求的headers上添加一个Authorization参数来提交令牌,而令牌的内容需要先加上token的类型Bearer,然后空格,再加上access_token。
首先,直接访问资源路径不带任何参数。http://localhost:53021/resource/salary/query 会返回一个错误内容:
{
    "error": "unauthorized",
    "error_description": "Full authentication is required to access this resource"
}
然后,我们随意提交一个错误的访问令牌。这里要注意的是,在向资源服务器提交access_token时,需要在请求的headers上添加一个Authorization参数来提交令牌,而令牌的内容需要先加上token的类型,是Bearer。然后空格,再加上access_token。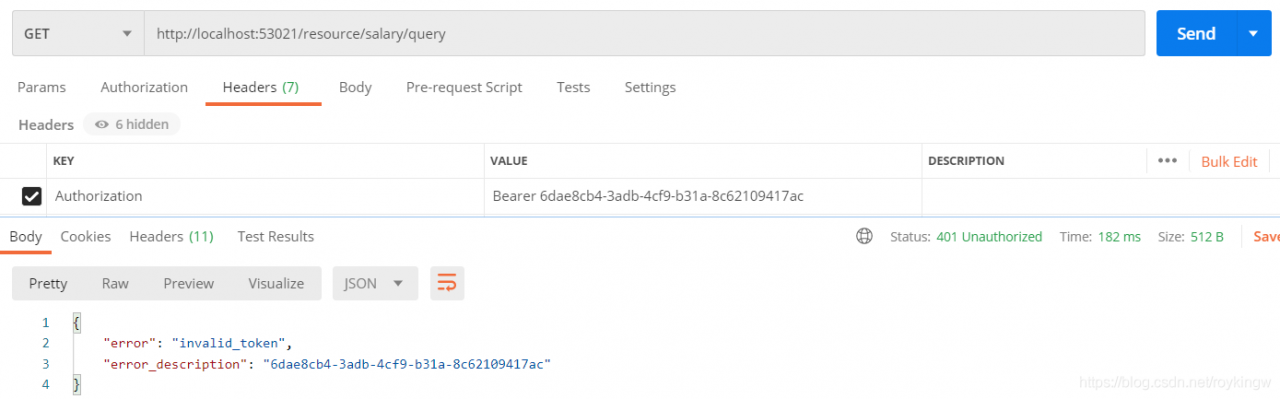
然后,我们重新申请一个正确的access_token,重新访问资源
测试到这里要注意的有两点
一是,要总结下在我们示例代码中验证的资源的要素包含了哪些,这些都是OAuth认证流程中需要注意的概念。包括 clientDetails, resourceId,scope,authorities(其实还可以有roles,只是roles是相当于ROLE_{rolename}格式的资源)。
另一点是关于TokenStore对象。到目前为止,我们在资源服务器中并没有配置TokenStore对象,也就是说,资源服务器并不知道access_token有什么意义。他需要使用RemoteTokenServices将令牌拿到授权服务器上去进行验证才会知道access_token代表的客户信息。这一点在请求量加大后,显然会加重系统的网络负担以及运行效率。而这一点,也是后面的JWT令牌需要解决的问题。
7.6 JWT令牌
7.6.1 JWT令牌介绍
7.6.1.1、什么是JWT
JWT令牌全称JSON WebToken,是一个开放的行业标准(RFC 7519),它定义了一种简单的、自包含的协议格式,用于在通信双方传递json对象,传递的信息经过数字签名,可以被验证和信任。JWT可以使用HMAC算法或使用RSA算法的公私钥来签名,方式被篡改。
在OAuth中使用JWT,那令牌本身就包含了客户的详细信息,这样资源服务不用依赖授权服务就可以完成令牌解析。
JWT官网:https://jwt.io/
RFC 7519标准:https://tools.ietf.org/html/rfc7519
JWT令牌的优点
- 基于json,非常方便解析
- 可以在令牌中自定义丰富的内容,易扩展。
- 通过非对称加密算法及数字签名技术,JWT防止篡改,安全性高。
- 资源服务使用JWT可以不依赖于认证服务,自己完成解析。
但是也有一个很大的缺点,就是JWT令牌较长,占据的存储空间比较大。
7.6.1.2、JWT令牌结构
JWT令牌由三个部分组成,每部分中间使用点 (.) 分隔,例如 Header.Payload.Signature
- Header
头部包括令牌的类型(JWT)以及使用的哈希算法(如HMAC SHA256 RSA)。例如
{
 "alg": "HS256",
 "typ": "JWT"
}
将上面的内容使用Base64URL编码,就得到了JWT令牌的第一个部分。
- Payload
第二部分是负载,内容也是一个对象,他是存放有效信息的地方,他可以存放JWT提供的现有字段,例如 iss(签发者),exp(过期时间戳),sub(面向的用户)等,也可以自定义字段。此部分不建议存放敏感信息,因为此部分可以解码还原出原始内容。
最后将这部分JSON内容使用Base64URL编码,就得到了JWT令牌的第二个部分。
- Signature
第三部分是签名,此部分用于防止JWT内容被篡改。
这个部分使用Base64url将前两部分进行编码,编码后使用点(.)连接组成字符串,最后使用header中声明的签名算法进行签名。
我们了解下JWT的基础知识,有利于使用自定义的JWT令牌。
7.6.2 配置JWT令牌服务
首先我们要在授权服务UAA中配置JWT令牌。在UAA中,只需要配置JWT令牌服务即可生成JWT格式的令牌。
1、注入JwtTokenStore
package com.tuling.security.distributed.uaa.config;

import org.springframework.context.annotation.Bean;
import org.springframework.context.annotation.Configuration;
import org.springframework.security.oauth2.provider.token.TokenStore;
import org.springframework.security.oauth2.provider.token.store.JwtAccessTokenConverter;
import org.springframework.security.oauth2.provider.token.store.JwtTokenStore;

@Configuration
public class TokenConfig {
    private static final String SIGN_KEY="uaa";
    // 使用JWT令牌。
    @Bean
    public TokenStore tokenStore(){
        return new JwtTokenStore(accessTokenConvert());
    }
    @Bean
    public JwtAccessTokenConverter accessTokenConvert(){
        JwtAccessTokenConverter converter = new JwtAccessTokenConverter();
        converter.setSigningKey(SIGN_KEY);
        return converter;
    }
}
2、在MyAuthorizationConfig中使用注入的accessTokenConvert声明tokenService
    //使用JWT令牌
    @Autowired
    private JwtAccessTokenConverter accessTokenConverter;
    ...
    public AuthorizationServerTokenServices tokenService() {
        DefaultTokenServices service = new DefaultTokenServices();
        service.setClientDetailsService(clientDetailsService); //客户端详情服务
        service.setSupportRefreshToken(true); //允许令牌自动刷新
        service.setTokenStore(tokenStore); //令牌存储策略-内存
    	//使用JWT令牌
        service.setTokenEnhancer(accessTokenConverter);
        service.setAccessTokenValiditySeconds(7200); // 令牌默认有效期2小时
        service.setRefreshTokenValiditySeconds(259200); // 刷新令牌默认有效期3天
        return service;
    }
3、然后就可以测试生成的JWT令牌。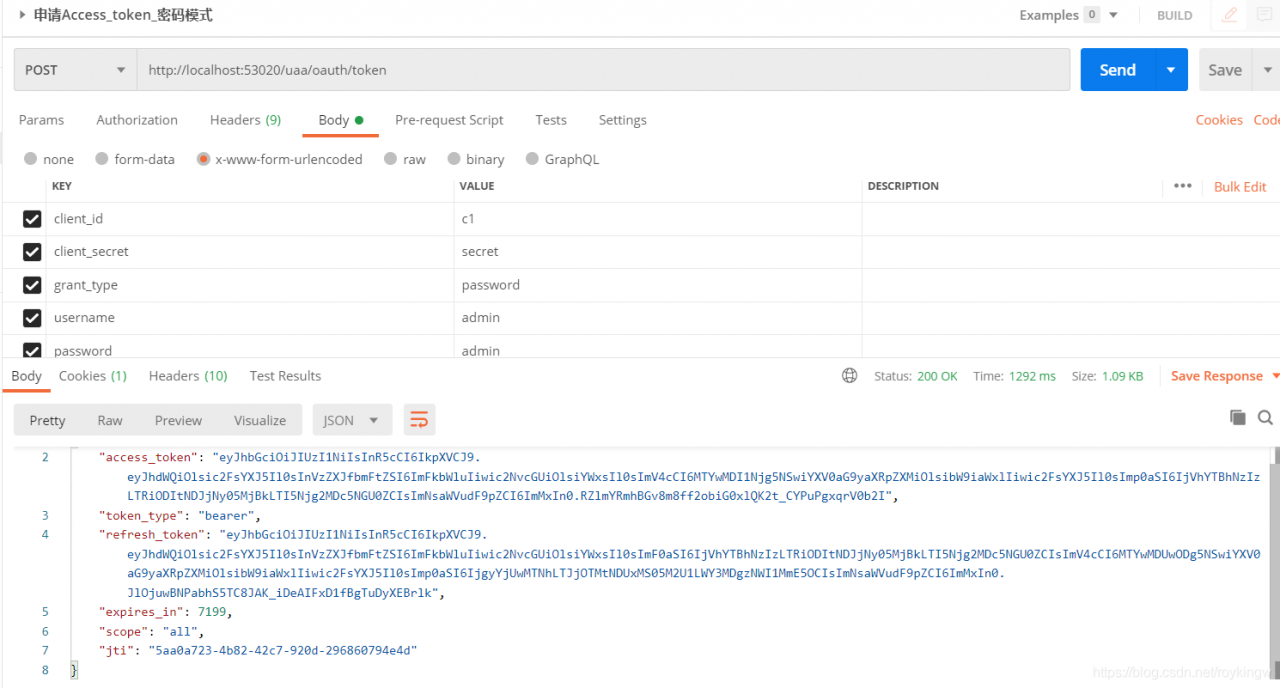
可以看到,申请到的令牌已经变成了JWT格式,比之前长了很多。
7.6.3 JWT令牌验证
然后我们到资源服务器中配置使用JWT令牌
1、将授权服务中的TokenConfig类全部拷贝到资源服务中。这也是因为资源服务需要与授权服务保持相同的Token。
2、在MyResourceServerConfig中屏蔽ResourceServerTokenServices
    //使用JWT令牌,需要引入与uaa一致的tokenStore,存储策略。
    @Autowired
    private TokenStore tokenStore;
    ...
    //    使用JWT令牌就不再需要远程解析服务了,资源服务可以在本地进行解析。
    //    public ResourceServerTokenServices tokenServices(){
        DefaultTokenServices services = new DefaultTokenServices();
//        RemoteTokenServices services = new RemoteTokenServices();
//        services.setCheckTokenEndpointUrl("http://localhost:53020/uaa/oauth/check_token");
//        services.setClientId("c1");
//        services.setClientSecret("secret");
//        return services;
//    }

    @Override
    public void configure(ResourceServerSecurityConfigurer resources) throws Exception {
        resources.resourceId(RESOURCE_SALARY) //资源ID
//                .tokenServices(tokenServices()) //使用远程服务验证令牌的服务
                //使用JWT令牌验证,就不需要调用远程服务了,用本地验证方式就可以了。
                .tokenStore(tokenStore)
                .stateless(true);
    }
3、然后这样我们就可以对资源服务器进行测试了。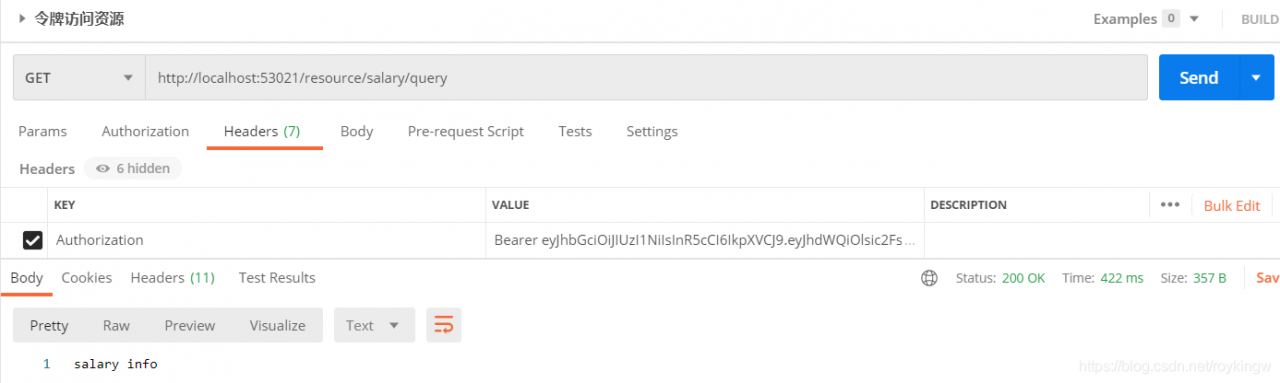
最后,关于SpringSecurity,现在Spring社区正在重写更新OAuth库,Spring security OAuth Server项目。等新版本推出后,又该有新的特性了。我们拭目以待把。
八、主线问题总结
这样,我们就完成了Spring Security OAuth2的体验之旅,现在我们回头来体验一下整个过程。有一些问题需要总结下。
1、什么是认证、授权、会话、RBAC?基于Session的方式和基于Token的方式有什么区别?
2、Spring Security的工作原理,认证流程、授权流程。中间有哪些关键组件?主体服务、密码解析器、访问安全规则、登录登出页面逻辑… 这些关键组件如何进行扩展?
3、OAuth2.0认证的四种模式,他们的大体流程。
4、Spring Security OAuth2.0如何实现OAuth2.0协议? 有哪些关键组件?
九、附录,HttpSecurity配置项
| 方法 | 说明 |
|---|---|
| openidLogin() | 用于基于 OpenId 的验证 |
| headers() | 将安全标头添加到响应 |
| cors() | 配置跨域资源共享( CORS ) |
| sessionManagement() | 允许配置会话管理 |
| portMapper() | 向到 HTTPS 或者从 HTTPS 重定向到 HTTP。默认情况下,Spring Security使用一个PortMapperImpl映射 HTTP 端口8080到 HTTPS 端口8443,HTTP 端口80到 HTTPS 端口443 |
| jee() | 配置基于容器的预认证。 在这种情况下,认证由Servlet容器管理 |
| x509() | 配置基于x509的认证 |
| rememberMe | 允许配置“记住我”的验证 |
| authorizeRequests() | 允许基于使用HttpServletRequest限制访问 |
| requestCache() | 允许配置请求缓存 |
| exceptionHandling() | 允许配置错误处理 |
| securityContext() | 在HttpServletRequests之间的SecurityContextHolder上设置SecurityContext的管理。 当使用WebSecurityConfifigurerAdapter时,这将 |
| servletApi() | 将HttpServletRequest方法与在其上找到的值集成到SecurityContext中。 当使用WebSecurityConfifigurerAdapter时,这将自动应用 |
| csrf() | 添加 CSRF 支持,使用WebSecurityConfifigurerAdapter时,默认启用 |
| logout() | 添加退出登录支持。当使用WebSecurityConfifigurerAdapter时,这将自动应用。默认情况是,访问URL”/ logout”,使HTTP Session无效来 |
| anonymous() | 允许配置匿名用户的表示方法。 当与WebSecurityConfifigurerAdapter结合使用时,这将自动应用。 默认情况下,匿名用户将使用 |
| formLogin() | 指定支持基于表单的身份验证。如果未指定FormLoginConfifigurer#loginPage(String),则将生成默认登录页面 |
| oauth2Login() | 根据外部OAuth 2.0或OpenID Connect 1.0提供程序配置身份验证 |
| requiresChannel() | 配置通道安全。为了使该配置有用,必须提供至少一个到所需信道的映射 |
| httpBasic() | 配置 Http Basic 验证 |
| addFilterAt() | 允许配置错误处理 |
| exceptionHandling() | 在指定的Filter类的位置添加过滤器 |