启动流程
我们一般都会使用如下的方式来启动spring boot
@SpringBootApplication
public class Application {

    public static void main(String[] args) {
        SpringApplication.run(Application.class, args);
    }

}
public static ConfigurableApplicationContext run(Class<?> primarySource, String... args) {
    // 这里的primarySource就是我们的Application类,args则是传入的一系列参数
	return run(new Class<?>[] { primarySource }, args);
}
public static ConfigurableApplicationContext run(Class<?>[] primarySources, String[] args) {
	return new SpringApplication(primarySources).run(args);
}
public SpringApplication(Class<?>... primarySources) {
	this(null, primarySources);
}
run方法中新建了一个SpringApplication,然后调用了其run方法
创建SpringApplication
大致流程如下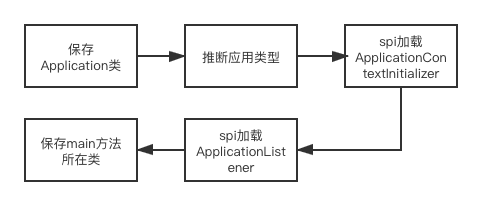
public SpringApplication(ResourceLoader resourceLoader, Class<?>... primarySources) {
	// 资源加载器
	this.resourceLoader = resourceLoader;
	Assert.notNull(primarySources, "PrimarySources must not be null");
	// 这里保存的就是启动类
	this.primarySources = new LinkedHashSet<>(Arrays.asList(primarySources));
	// 根据类路径中包含的类来推断当前的应用类型
	this.webApplicationType = WebApplicationType.deduceFromClasspath();
	// 分别通过spi的方式读取spring.factories来获取ApplicationContextInitializer和ApplicationListener的实现类的实例
	setInitializers((Collection) getSpringFactoriesInstances(ApplicationContextInitializer.class));
	setListeners((Collection) getSpringFactoriesInstances(ApplicationListener.class));
	// 通过抛出异常,遍历异常栈,找到方法名称为main的类作为mainApplication
	this.mainApplicationClass = deduceMainApplicationClass();
}
servlet应用中,initializer有如下几个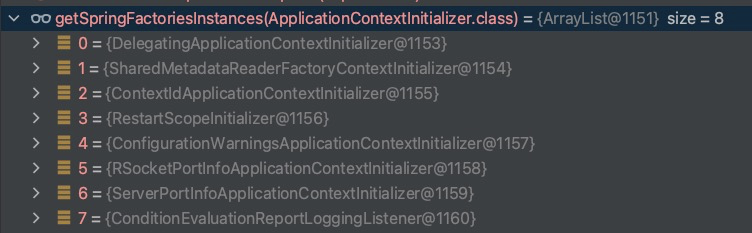
applicationListener有如下几个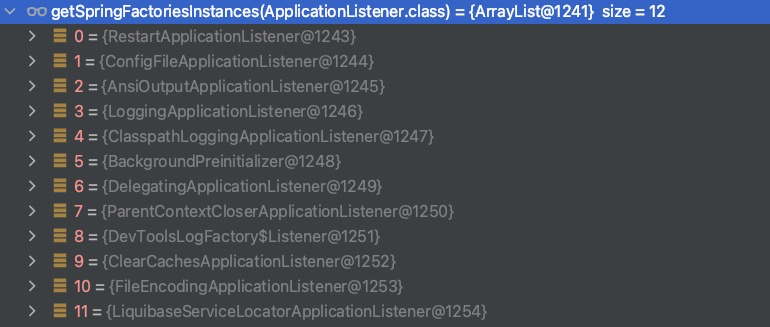
判断应用类型
static WebApplicationType deduceFromClasspath() {
    // 如果类路径中包含org.springframework.web.reactive.DispatcherHandler
    // 并且不包含org.springframework.web.servlet.DispatcherServlet和org.glassfish.jersey.servlet.ServletContainer
    // 那么会认为当前应用是一个reactive应用,最终会启动一个内嵌的reactive web server
	if (ClassUtils.isPresent(WEBFLUX_INDICATOR_CLASS, null) && !ClassUtils.isPresent(WEBMVC_INDICATOR_CLASS, null)
			&& !ClassUtils.isPresent(JERSEY_INDICATOR_CLASS, null)) {
		return WebApplicationType.REACTIVE;
	}
	// 如果没有包含"javax.servlet.Servlet",
	// "org.springframework.web.context.ConfigurableWebApplicationContext"
	// 这两个类,那么会认为当前应用的类型是none,此时不会启动内置的web server
	for (String className : SERVLET_INDICATOR_CLASSES) {
		if (!ClassUtils.isPresent(className, null)) {
			return WebApplicationType.NONE;
		}
	}
	// 其余的都会认为是一个servlet应用,此时会启动一个内置的servlet web server
	return WebApplicationType.SERVLET;
}
getSpringFactoriesInstances
private <T> Collection<T> getSpringFactoriesInstances(Class<T> type) {
	return getSpringFactoriesInstances(type, new Class<?>[] {});
}
private <T> Collection<T> getSpringFactoriesInstances(Class<T> type, Class<?>[] parameterTypes, Object... args) {
	ClassLoader classLoader = getClassLoader();
	// Use names and ensure unique to protect against duplicates
	Set<String> names = new LinkedHashSet<>(SpringFactoriesLoader.loadFactoryNames(type, classLoader));
	List<T> instances = createSpringFactoriesInstances(type, parameterTypes, classLoader, args, names);
	// 如果实现类实现了Order接口或者使用了Priority注解,那么会进行排序
	AnnotationAwareOrderComparator.sort(instances);
	return instances;
}
loadFactoryNames
首先看下SpringFactoriesLoader的loadFactoryNames方法
loadFactoryNames的主要作用就是通过类似spi的方式,首先加载META-INF/spring.factories文件,该文件包含每个接口和对应的实现类列表
然后使用入参factoryType来获取实现类列表
public static List<String> loadFactoryNames(Class<?> factoryType, @Nullable ClassLoader classLoader) {
    ClassLoader classLoaderToUse = classLoader;
    if (classLoader == null) {
        classLoaderToUse = SpringFactoriesLoader.class.getClassLoader();
    }

    String factoryTypeName = factoryType.getName();
    return (List)loadSpringFactories(classLoaderToUse).getOrDefault(factoryTypeName, Collections.emptyList());
}
private static Map<String, List<String>> loadSpringFactories(ClassLoader classLoader) {
    // 从缓存中获取当前类加载器已经解析的接口和其实现类列表
	Map<String, List<String>> result = cache.get(classLoader);
	// 如果之前已经解析过,直接返回
	if (result != null) {
		return result;
	}

	result = new HashMap<>();
	try {
	    // 获取当前类加载器下的所有META-INF/spring.factories文件
		Enumeration<URL> urls = classLoader.getResources(FACTORIES_RESOURCE_LOCATION);
		// 遍历每个文件
		while (urls.hasMoreElements()) {
		    // 加载文件的内容到properties中
			URL url = urls.nextElement();
			UrlResource resource = new UrlResource(url);
			Properties properties = PropertiesLoaderUtils.loadProperties(resource);
			// 遍历文件中的每行记录
			for (Map.Entry<?, ?> entry : properties.entrySet()) {
			    // 获取当前行的key,即接口全路径名称
				String factoryTypeName = ((String) entry.getKey()).trim();
				// 获取当前行的value,即实现了接口的实现类全路径名称,可以指定多个实现类,使用,分割
				String[] factoryImplementationNames =
						StringUtils.commaDelimitedListToStringArray((String) entry.getValue());
			    // 形成一个列表
				for (String factoryImplementationName : factoryImplementationNames) {
					result.computeIfAbsent(factoryTypeName, key -> new ArrayList<>())
							.add(factoryImplementationName.trim());
				}
			}
		}

		// Replace all lists with unmodifiable lists containing unique elements
		// a去重
		result.replaceAll((factoryType, implementations) -> implementations.stream().distinct()
				.collect(Collectors.collectingAndThen(Collectors.toList(), Collections::unmodifiableList)));
	    // 添加到缓存中
		cache.put(classLoader, result);
	}
	catch (IOException ex) {
		throw new IllegalArgumentException("Unable to load factories from location [" +
				FACTORIES_RESOURCE_LOCATION + "]", ex);
	}
	return result;
	}
createSpringFactoriesInstances
这个方法比较简单,type代表需要实现的接口,names代表从spring.factories中解析出来的type接口的所有实现类
主要的作用就是创建names包含的所有类的实例
private <T> List<T> createSpringFactoriesInstances(Class<T> type, Class<?>[] parameterTypes,
			ClassLoader classLoader, Object[] args, Set<String> names) {
	List<T> instances = new ArrayList<>(names.size());
	for (String name : names) {
		try {
			Class<?> instanceClass = ClassUtils.forName(name, classLoader);
			Assert.isAssignable(type, instanceClass);
			Constructor<?> constructor = instanceClass.getDeclaredConstructor(parameterTypes);
			T instance = (T) BeanUtils.instantiateClass(constructor, args);
			instances.add(instance);
		}
		catch (Throwable ex) {
			throw new IllegalArgumentException("Cannot instantiate " + type + " : " + name, ex);
		}
	}
	return instances;
}
deduceMainApplicationClass
这个方法的主要目的是为了获取入口Application类
实现比较有意思,首先抛出一个RuntimeException,然后从异常堆栈中来寻找main方法,然后返回该方法的类
private Class<?> deduceMainApplicationClass() {
	try {
		StackTraceElement[] stackTrace = new RuntimeException().getStackTrace();
		for (StackTraceElement stackTraceElement : stackTrace) {
			if ("main".equals(stackTraceElement.getMethodName())) {
				return Class.forName(stackTraceElement.getClassName());
			}
		}
	}
	catch (ClassNotFoundException ex) {
		// Swallow and continue
	}
	return null;
}
SpringApplication.run
大致流程如下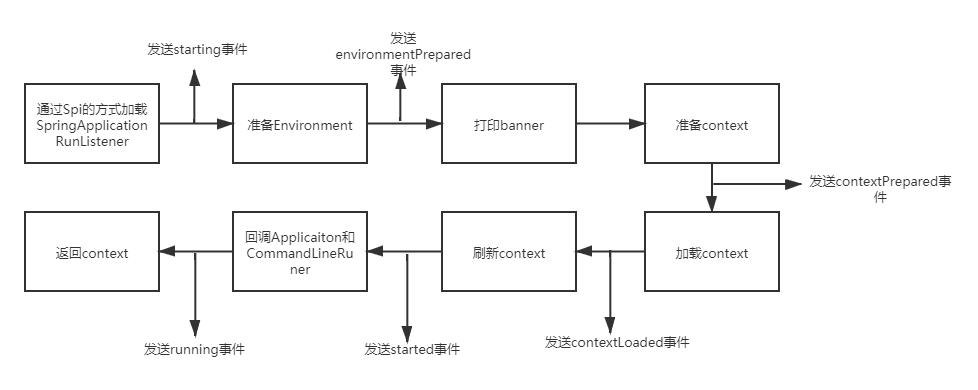
public ConfigurableApplicationContext run(String... args) {
	StopWatch stopWatch = new StopWatch();
	stopWatch.start();
	ConfigurableApplicationContext context = null;
	Collection<SpringBootExceptionReporter> exceptionReporters = new ArrayList<>();
	configureHeadlessProperty();
	// 通过spi的方式加载SpringApplicationRunListener的实现类实例,封装成SpringApplicationRunListeners
	// 默认情况下只有EventPublishingRunListener一个
	SpringApplicationRunListeners listeners = getRunListeners(args);
	// 调用所有SpringApplicationRunListener的starting方法
	listeners.starting();
	try {
		ApplicationArguments applicationArguments = new DefaultApplicationArguments(args);
		// 准备Environment
		ConfigurableEnvironment environment = prepareEnvironment(listeners, applicationArguments);
		configureIgnoreBeanInfo(environment);
		// 打印banner
		Banner printedBanner = printBanner(environment);
		// 根据应用类型创建相应的ApplicationContext
		// 根据当前应用的类型,创建对应类型的ApplicationContext
		// SERVLET AnnotationConfigServletWebServerApplicationContext
		// REACT AnnotationConfigReactiveWebServerApplicationContext
		// 默认情况下是AnnotationConfigApplicationContext
		context = createApplicationContext();
		// 通过spi加载SpringBootExceptionReporter实现类的实例
		exceptionReporters = getSpringFactoriesInstances(SpringBootExceptionReporter.class,
				new Class[] { ConfigurableApplicationContext.class }, context);
		// 准备容器
		prepareContext(context, environment, listeners, applicationArguments, printedBanner);
		// 刷新容器
		refreshContext(context);
		afterRefresh(context, applicationArguments);
		stopWatch.stop();
		if (this.logStartupInfo) {
			new StartupInfoLogger(this.mainApplicationClass).logStarted(getApplicationLog(), stopWatch);
		}
		// 发送started事件
		listeners.started(context);
		// 调用注入的ApplicationRunner和CommandLineRunner的run方法
		callRunners(context, applicationArguments);
	}
	catch (Throwable ex) {
		handleRunFailure(context, ex, exceptionReporters, listeners);
		throw new IllegalStateException(ex);
	}

	try {
		listeners.running(context);
	}
	catch (Throwable ex) {
		handleRunFailure(context, ex, exceptionReporters, null);
		throw new IllegalStateException(ex);
	}
	return context;
}
listener监听器
首先看下SpringApplicationRunListener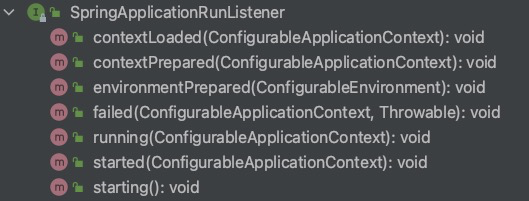
主要用来监听SpringApplication运行过程,针对不同的生命周期阶段执行不同的回调
接着再看下SpringApplicationRunListeners
class SpringApplicationRunListeners {

	private final Log log;

	private final List<SpringApplicationRunListener> listeners;

	SpringApplicationRunListeners(Log log, Collection<? extends SpringApplicationRunListener> listeners) {
		this.log = log;
		this.listeners = new ArrayList<>(listeners);
	}

	void starting() {
		for (SpringApplicationRunListener listener : this.listeners) {
			listener.starting();
		}
	}

	void environmentPrepared(ConfigurableEnvironment environment) {
		for (SpringApplicationRunListener listener : this.listeners) {
			listener.environmentPrepared(environment);
		}
	}

	void contextPrepared(ConfigurableApplicationContext context) {
		for (SpringApplicationRunListener listener : this.listeners) {
			listener.contextPrepared(context);
		}
	}

	void contextLoaded(ConfigurableApplicationContext context) {
		for (SpringApplicationRunListener listener : this.listeners) {
			listener.contextLoaded(context);
		}
	}

	void started(ConfigurableApplicationContext context) {
		for (SpringApplicationRunListener listener : this.listeners) {
			listener.started(context);
		}
	}

	void running(ConfigurableApplicationContext context) {
		for (SpringApplicationRunListener listener : this.listeners) {
			listener.running(context);
		}
	}

	void failed(ConfigurableApplicationContext context, Throwable exception) {
		for (SpringApplicationRunListener listener : this.listeners) {
			callFailedListener(listener, context, exception);
		}
	}

	private void callFailedListener(SpringApplicationRunListener listener, ConfigurableApplicationContext context,
			Throwable exception) {
		try {
			listener.failed(context, exception);
		}
		catch (Throwable ex) {
			if (exception == null) {
				ReflectionUtils.rethrowRuntimeException(ex);
			}
			if (this.log.isDebugEnabled()) {
				this.log.error("Error handling failed", ex);
			}
			else {
				String message = ex.getMessage();
				message = (message != null) ? message : "no error message";
				this.log.warn("Error handling failed (" + message + ")");
			}
		}
	}

}
从上面的源码我们可以知道:
- SpringApplicationRunListeners就是一个SpringApplicationRunListener的集合
- 当执行到SpringApplication的指定生命周期时,并不会直接调用SpringApplicationRunListener的指定生命周期回调,而是会执行SpringApplicationRunListeners的指定生命周期回调,然后调用包含的SpringApplicationRunListener的方法
EventPublishRunListener
构造函数
public EventPublishingRunListener(SpringApplication application, String[] args) {
		this.application = application;
		this.args = args;
		// 创建一个广播器
		this.initialMulticaster = new SimpleApplicationEventMulticaster();
		// 这里会将刚才介绍的application的11个listener添加到广播器中
		// 当调用当前EventPublishRunListener的事件方法时,会创建对应的事件,通过事件广播器,传递给包含的多个listener来处理
		for (ApplicationListener<?> listener : application.getListeners()) {
			this.initialMulticaster.addApplicationListener(listener);
		}
	}
prepareEnvironment
首先介绍下Environment接口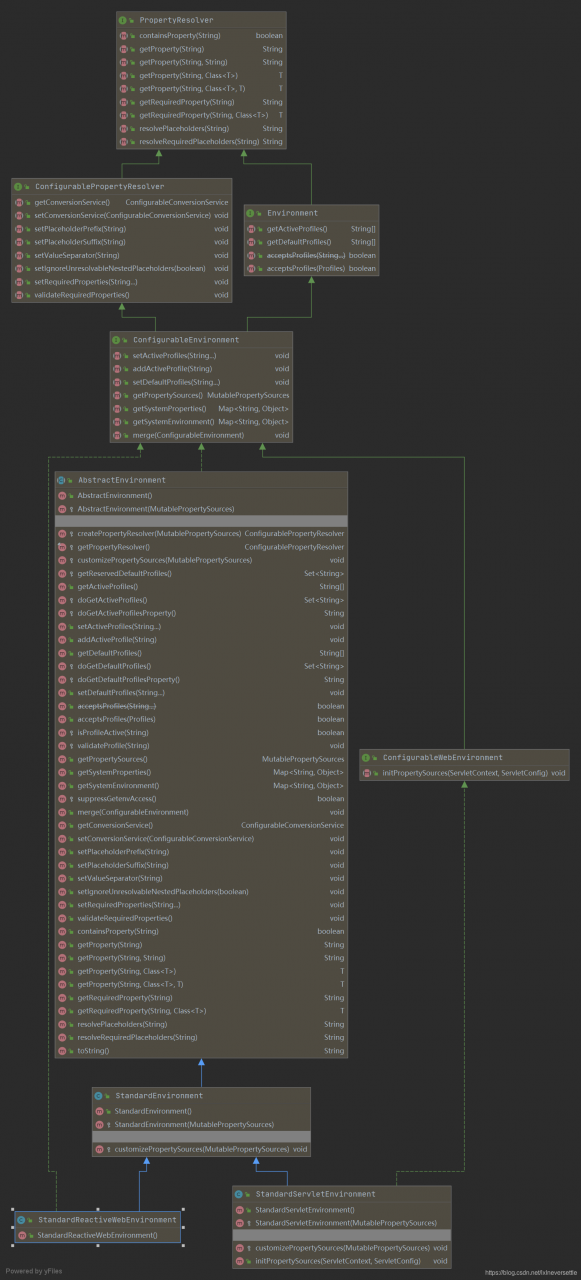
从上面的类继承结构图可以看出,
Environment一方面实现了PropertyResolver接口,因此具有了访问配置的能力,一方面自己定义了getActiveProfiles等方法,因此具有了访问当前系统运行profile的能力
ConfigurablePropertyResolver则在PropertyResolver的基础上,增加了自定义配置值类型转换的能力
ConfigurableEnviroment则提供了设置profile的能力
StandardEnvironment实现了上面所有接口的能力,并且声明了一个customizePropertySources的方法,让实现类来指定配置文件的来源
根据当前系统的类别,分别提供了StandardReactiveWebEnvironment和StandardServletEnvironment实现类
简单地介绍完Environment之后,接下来回到SpringApplication的启动过程,看下是如何准备Environment的
private ConfigurableEnvironment prepareEnvironment(SpringApplicationRunListeners listeners,
			DefaultBootstrapContext bootstrapContext, ApplicationArguments applicationArguments) {
	// Create and configure the environment
	// 这里会根据当前应用的不同返回对应类型的Environment
	// servlet StandardServletEnvironment
	// reactive StandardReactiveEnvironment
	// 默认 StandardEnvironment
	ConfigurableEnvironment environment = getOrCreateEnvironment();
	// 这里做的主有两件事:
	// 1. 将springApplication的参数作为一个配置源
	// 2. 配置profile
	configureEnvironment(environment, applicationArguments.getSourceArgs());
	// 这里会添加一个名称为configurationProperties的配置源
	// 类型为ConfigurationPropertySourcesPropertySource
	// 并且移动到所有propertySource的最前面
	ConfigurationPropertySources.attach(environment);
	// 发送environmentPrepared事件
	listeners.environmentPrepared(environment);
	// 将environment绑定到SpringApplication上
	bindToSpringApplication(environment);
	if (!this.isCustomEnvironment) {
		environment = new EnvironmentConverter(getClassLoader()).convertEnvironmentIfNecessary(environment,
				deduceEnvironmentClass());
	}
	ConfigurationPropertySources.attach(environment);
	return environment;
}
configureEnvironment
protected void configureEnvironment(ConfigurableEnvironment environment, String[] args) {
    // ConversionService提供线程安全的类型转换
	if (this.addConversionService) {
		ConversionService conversionService = ApplicationConversionService.getSharedInstance();
		environment.setConversionService((ConfigurableConversionService) conversionService);
	}
	// 代理到environment进行配置
	configurePropertySources(environment, args);
	// 配置profile
	configureProfiles(environment, args);
}
configurePropertySources
protected void configurePropertySources(ConfigurableEnvironment environment, String[] args) {
	// 使用environment来获取所有的配置来源
	MutablePropertySources sources = environment.getPropertySources();
	// 如果设置了默认的配置,将默认的配置添加到最后
	if (this.defaultProperties != null && !this.defaultProperties.isEmpty()) {
		sources.addLast(new MapPropertySource("defaultProperties", this.defaultProperties));
	}
	// 有命令行参数,将这些参数作为配置来源添加到environment,并且添加到最前面
	if (this.addCommandLineProperties && args.length > 0) {
		String name = CommandLinePropertySource.COMMAND_LINE_PROPERTY_SOURCE_NAME;
		if (sources.contains(name)) {
			PropertySource<?> source = sources.get(name);
			CompositePropertySource composite = new CompositePropertySource(name);
			composite.addPropertySource(
					new SimpleCommandLinePropertySource("springApplicationCommandLineArgs", args));
			composite.addPropertySource(source);
			sources.replace(name, composite);
		}
		else {
			sources.addFirst(new SimpleCommandLinePropertySource(args));
		}
	}
}
configureProfiles
配置profile
protected void configureProfiles(ConfigurableEnvironment environment, String[] args) {
	Set<String> profiles = new LinkedHashSet<>(this.additionalProfiles);
	profiles.addAll(Arrays.asList(environment.getActiveProfiles()));
	environment.setActiveProfiles(StringUtils.toStringArray(profiles));
}
prepareContext
private void prepareContext(DefaultBootstrapContext bootstrapContext, ConfigurableApplicationContext context,
			ConfigurableEnvironment environment, SpringApplicationRunListeners listeners,
			ApplicationArguments applicationArguments, Banner printedBanner) {
    // 将环境environment设置到applicationcontext中
	context.setEnvironment(environment);
	// 对applicationContext进行一些处理
	// 主要是对beanNameGenerator resourceLoader conversionService的处理
	postProcessApplicationContext(context);
	// 使用创建SpringApplication时,指定的多个ApplicationContextInitializer来对applicationContext进行处理
	applyInitializers(context);
	// 发送contextPrepared事件
	listeners.contextPrepared(context);
	bootstrapContext.close(context);
	if (this.logStartupInfo) {
		logStartupInfo(context.getParent() == null);
		logStartupProfileInfo(context);
	}
	// Add boot specific singleton beans
	ConfigurableListableBeanFactory beanFactory = context.getBeanFactory();
	// 分别注册springApplication的参数和banner
	beanFactory.registerSingleton("springApplicationArguments", applicationArguments);
	if (printedBanner != null) {
		beanFactory.registerSingleton("springBootBanner", printedBanner);
	}
	if (beanFactory instanceof DefaultListableBeanFactory) {
		((DefaultListableBeanFactory) beanFactory)
				.setAllowBeanDefinitionOverriding(this.allowBeanDefinitionOverriding);
	}
	// 如果开启了懒加载,那么会加入一个BeanFactoryPostProcessor
	if (this.lazyInitialization) {
		context.addBeanFactoryPostProcessor(new LazyInitializationBeanFactoryPostProcessor());
	}
	// Load the sources
	// 将启动类和通过setResouces方法添加的字符串合并成一个Set`
	Set<Object> sources = getAllSources();
	Assert.notEmpty(sources, "Sources must not be empty");
	// 解析启动类,将bean加载到applicationcontext中
	load(context, sources.toArray(new Object[0]));
	// 发布contextLoaded事件
	listeners.contextLoaded(context);
}
postProcessApplicationContext
判断是否使用了beanNameGenerator,resourceLoader,conversionService,如果使用了那么设置到applicationContext中
protected void postProcessApplicationContext(ConfigurableApplicationContext context) {
	if (this.beanNameGenerator != null) {
		context.getBeanFactory().registerSingleton(AnnotationConfigUtils.CONFIGURATION_BEAN_NAME_GENERATOR,
				this.beanNameGenerator);
	}
	if (this.resourceLoader != null) {
		if (context instanceof GenericApplicationContext) {
			((GenericApplicationContext) context).setResourceLoader(this.resourceLoader);
		}
		if (context instanceof DefaultResourceLoader) {
			((DefaultResourceLoader) context).setClassLoader(this.resourceLoader.getClassLoader());
		}
	}
	if (this.addConversionService) {
		context.getBeanFactory().setConversionService(ApplicationConversionService.getSharedInstance());
	}
}
load
这个方法的主要作用就是解析我们的启动类然后注册到applicationcontext中
protected void load(ApplicationContext context, Object[] sources) {
	if (logger.isDebugEnabled()) {
		logger.debug("Loading source " + StringUtils.arrayToCommaDelimitedString(sources));
	}
	// Bean定义的加载器,可以用来加载xml或者java类中bean的定义
	BeanDefinitionLoader loader = createBeanDefinitionLoader(getBeanDefinitionRegistry(context), sources);
	if (this.beanNameGenerator != null) {
		loader.setBeanNameGenerator(this.beanNameGenerator);
	}
	if (this.resourceLoader != null) {
		loader.setResourceLoader(this.resourceLoader);
	}
	if (this.environment != null) {
		loader.setEnvironment(this.environment);
	}
	loader.load();
}
int load() {
    int count = 0;
    // 这里就是启动类和一些手动设置的类,一般情况下只有启动类
	for (Object source : this.sources) {
		count += load(source);
	}
	return count;
}
private int load(Object source) {
	Assert.notNull(source, "Source must not be null");
	if (source instanceof Class<?>) {
		return load((Class<?>) source);
	}
	if (source instanceof Resource) {
		return load((Resource) source);
	}
	if (source instanceof Package) {
		return load((Package) source);
	}
	if (source instanceof CharSequence) {
		return load((CharSequence) source);
	}
	throw new IllegalArgumentException("Invalid source type " + source.getClass());
}
private int load(Class<?> source) {
	if (isGroovyPresent() && GroovyBeanDefinitionSource.class.isAssignableFrom(source)) {
		// Any GroovyLoaders added in beans{} DSL can contribute beans here
		GroovyBeanDefinitionSource loader = BeanUtils.instantiateClass(source, GroovyBeanDefinitionSource.class);
		load(loader);
	}
	if (isComponent(source)) {
		// 将启动类注册到容器中
		this.annotatedReader.register(source);
		return 1;
	}
	return 0;
}
private boolean isComponent(Class<?> type) {
	// This has to be a bit of a guess. The only way to be sure that this type is
	// eligible is to make a bean definition out of it and try to instantiate it.
	// 首先判断是否使用了@Component注解,使用了@Component注解的注解也算
	if (MergedAnnotations.from(type, SearchStrategy.TYPE_HIERARCHY).isPresent(Component.class)) {
		return true;
	}
	// Nested anonymous classes are not eligible for registration, nor are groovy
	// closures
	// 判断是否不是匿名类并且具有构造函数
	return !type.getName().matches(".*\\$_.*closure.*") && !type.isAnonymousClass()
			&& type.getConstructors() != null && type.getConstructors().length != 0;
}
refreshContext
refreshContext的作用是刷新容器
private void refreshContext(ConfigurableApplicationContext context) {
	if (this.registerShutdownHook) {
		try {
			context.registerShutdownHook();
		}
		catch (AccessControlException ex) {
			// Not allowed in some environments.
		}
	}
	refresh((ApplicationContext) context);
}
protected void refresh(ApplicationContext applicationContext) {
	Assert.isInstanceOf(ConfigurableApplicationContext.class, applicationContext);
	refresh((ConfigurableApplicationContext) applicationContext);
}
protected void refresh(ConfigurableApplicationContext applicationContext) {
	applicationContext.refresh();
}
这里调用了我们熟悉的refresh方法
ServletWebServerApplicationContext对这个方法进行了重写
public final void refresh() throws BeansException, IllegalStateException {
	try {
		super.refresh();
	}
	catch (RuntimeException ex) {
		stopAndReleaseWebServer();
		throw ex;
	}
}
private void stopAndReleaseWebServer() {
	// 停止web服务器
	WebServer webServer = this.webServer;
	if (webServer != null) {
		try {
			webServer.stop();
			this.webServer = null;
		}
		catch (Exception ex) {
			throw new IllegalStateException(ex);
		}
	}
}
这里需要注意,在调用refresh方法的时候,会调用onRefresh方法
ServletWebServerApplicationContext的onRefresh会创建一个webserver
protected void onRefresh() {
	super.onRefresh();
	try {
		// 创建web服务器
		createWebServer();
	}
	catch (Throwable ex) {
		throw new ApplicationContextException("Unable to start web server", ex);
	}
}