1.下载openresty源码包
cd /apps/svr
mkdir openresty-source
cd openresty-source
wget https://openresty.org/download/openresty-1.19.3.2.tar.gz
#解压
tar -zxvf  openresty-1.19.3.2.tar.gz
2.编译安装openresty
cd /apps/svr/openresty-source/openresty-1.19.3.2
#开发库安装
sudo yum install pcre-devel openssl-devel gcc curl
#配置编译项
sudo ./configure --prefix=/apps/svr/openresty --with-luajit --with-pcre --with-http_iconv_module --with-http_realip_module --with-http_sub_module --with-http_stub_status_module --with-stream --with-stream_ssl_module
#编译安装
sudo make && make install
#查看是否安装成功
sudo /apps/svr/openresty/bin/openresty -V
#显示如下则安装成功:
nginx version: openresty/1.19.3.2
built by gcc 4.8.5 20150623 (Red Hat 4.8.5-44) (GCC)
built with OpenSSL 1.0.2k-fips  26 Jan 2017
TLS SNI support enabled
configure arguments: --prefix=/apps/svr/openresty/nginx --with-cc-opt=-O2 --add-module=../ngx_devel_kit-0.3.1 --add-module=../iconv-nginx-module-0.14 --add-module=../echo-nginx-module-0.62 --add-module=../xss-nginx-module-0.06 --add-module=../ngx_coolkit-0.2 --add-module=../set-misc-nginx-module-0.32 --add-module=../form-input-nginx-module-0.12 --add-module=../encrypted-session-nginx-module-0.08 --add-module=../srcache-nginx-module-0.32 --add-module=../ngx_lua-0.10.19 --add-module=../ngx_lua_upstream-0.07 --add-module=../headers-more-nginx-module-0.33 --add-module=../array-var-nginx-module-0.05 --add-module=../memc-nginx-module-0.19 --add-module=../redis2-nginx-module-0.15 --add-module=../redis-nginx-module-0.3.7 --add-module=../rds-json-nginx-module-0.15 --add-module=../rds-csv-nginx-module-0.09 --add-module=../ngx_stream_lua-0.0.9 --with-ld-opt=-Wl,-rpath,/apps/svr/openresty/luajit/lib --with-pcre --with-http_realip_module --with-http_sub_module --with-http_stub_status_module --with-stream --with-stream_ssl_module --add-module=/apps/svr/openresty-source/nginx-module-vts --with-stream --with-stream_ssl_preread_module --with-http_ssl_module
3.下载skywalking-nginx-lua agent,并解压到/apps/svr/openrestry-source/skywalking-nginx-lua-0.5.0
4.复制原nginx的配置文件,增加配置
cd /apps/svr/openresty/nginx/conf
cp /apps/svr/tengine/conf/nginx.conf nginx.conf
mkdir conf.d
在conf.d目录下创建skywalking.conf
    lua_package_path "/apps/svr/openrestry-source/skywalking-nginx-lua-0.5.0/lib/?.lua;;";

    # Buffer represents the register inform and the queue of the finished segment
    lua_shared_dict tracing_buffer 100m;

    # Init is the timer setter and keeper
    # Setup an infinite loop timer to do register and trace report.
    init_worker_by_lua_block {
        local metadata_buffer = ngx.shared.tracing_buffer

        -- Set service name
        metadata_buffer:set('serviceName', 'srm_nginx_uat')
        -- Instance means the number of Nginx deployment, does not mean the worker instances
        metadata_buffer:set('serviceInstanceName', 'srm_nginx_uat')
        -- type 'boolean', mark the entrySpan include host/domain
        metadata_buffer:set('includeHostInEntrySpan', false)

        -- set random seed
        require("skywalking.util").set_randomseed()
        -- 替换成skywaking OAP server地址加接受上报数据http端口
        require("skywalking.client"):startBackendTimer("http://172.16.20.76:12800")

        -- If there is a bug of this `tablepool` implementation, we can
        -- disable it in this way
        -- require("skywalking.util").disable_tablepool()

        skywalking_tracer = require("skywalking.tracer")
    }
回到/apps/svr/openresty/nginx/conf目录,修改主配置文件nginx.conf
导入上面增加的配置文件
http {
    include       mime.types;
    #begin
    include conf.d/*.conf;
    #end

	省略...
}
server节点增加配置
server {
    listen 80;
    省略···
    #这一部分开始===========================
    location /test {
            rewrite_by_lua_block {

                ------------------------------------------------------
                -- NOTICE, this should be changed manually
                -- This variable represents the upstream logic address
                -- Please set them as service logic name or DNS name
                --
                -- Currently, we can not have the upstream real network address
                ------------------------------------------------------
                skywalking_tracer:start("upstream service")
                -- If you want correlation custom data to the downstream service
                -- skywalking_tracer:start("upstream service", {custom = "custom_value"})
            }
            #-- Target upstream service
            proxy_pass   http://172.16.20.141:8086;

            body_filter_by_lua_block {
                if ngx.arg[2] then
                    skywalking_tracer:finish()
                end
            }

            log_by_lua_block {
                skywalking_tracer:prepareForReport()
            }
 }
 #这一部分结束===========================
}
5.启动openresty
sudo /apps/svr/openresty/bin/openresty
6.到skywalking客户端查看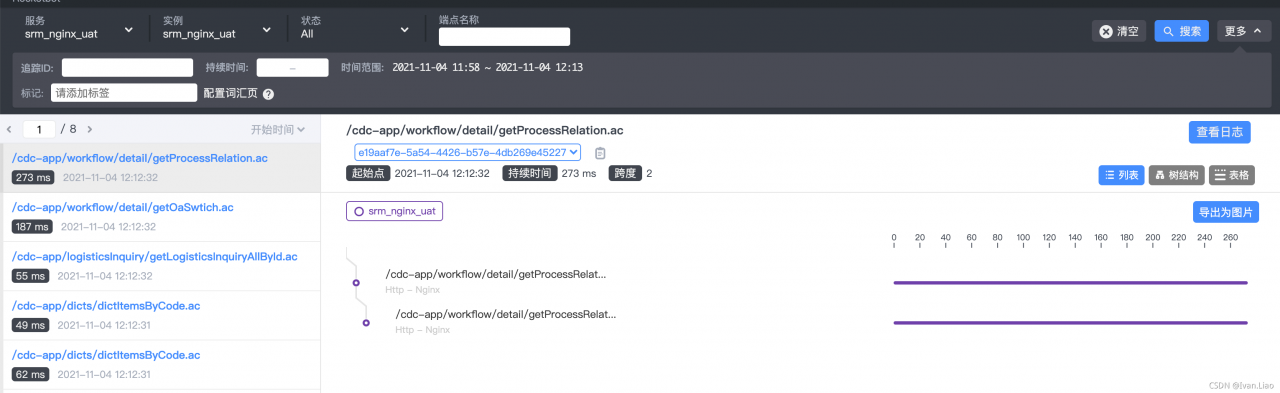
版权声明:本文为qq876868629原创文章,遵循CC 4.0 BY-SA版权协议,转载请附上原文出处链接和本声明。