目录
1、Vue快速入门
1.1、Vue的介绍
Vue是一套构建用户界面的渐进式前端框架。
只关注视图层,并且非常容易学习,还可以很方便的与其它库或已有项目整合。
通过尽可能简单的API来实现响应数据的绑定和组合的视图组件。
特点 易用:在有HTMLCSSJavaScript的基础上,快速上手。 灵活:简单小巧的核心,渐进式技术栈,足以应付任何规模的应用。 性能:20kbmin+gzip运行大小、超快虚拟DOM、最省心的优化。
1.2、Vue的快速入门
开发步骤
下载和引入vue.js文件。
编写入门程序。 视图:负责页面渲染,主要由HTML+CSS构成。 脚本:负责业务数据模型(Model)以及数据的处理逻辑。
代码实现
<!DOCTYPE html>
<html lang="en">
<head>
    <meta charset="UTF-8">
    <meta name="viewport" content="width=device-width, initial-scale=1.0">
    <title>快速入门</title>
</head>
<body>
    <!-- 视图 -->
    <div id="div">
        {{msg}}
    </div>
</body>
<script src="js/vue.js"></script>
<script>
    // 脚本
    new Vue({
        el:"#div",
        data:{
            msg:"Hello Vue"
        }
    });
</script>
</html>
1.3、Vue快速入门详解
Vue 核心对象:每一个 Vue 程序都是从一个 Vue 核心对象开始的。
let vm = new Vue({
 选项列表;
});
选项列表 el选项:用于接收获取到页面中的元素。(根据常用选择器获取)。 data选项:用于保存当前Vue对象中的数据。在视图中声明的变量需要在此处赋值。 methods选项:用于定义方法。方法可以直接通过对象名调用,this代表当前Vue对象。
数据绑定 在视图部分获取脚本部分的数据。 {{变量名}}
1.4、Vue快速入门的升级
<!DOCTYPE html>
<html lang="en">
<head>
<meta charset="UTF-8">
<meta name="viewport" content="width=device-width, initial-scale=1.0">
<title>快速入门升级</title>
</head>
<body>
<!-- 视图 -->
<div id="div">
<div>姓名:{{name}}</div>
<div>班级:{{classRoom}}</div>
<button onclick="hi()">打招呼</button>
<button onclick="update()">修改班级</button>
</div>
</body>
<script src="js/vue.js"></script>
<script>
// 脚本
let vm = new Vue({
el:"#div",
data:{
name:"张三",
classRoom:"华中科技大学"
},
methods:{
study(){
alert(this.name + "正在" + this.classRoom + "好好学习!");
}
}
});
//定义打招呼方法
function hi(){
vm.study();
}
//定义修改班级
function update(){
vm.classRoom = "软二";
}
</script>
</html>1.5、Vue小结
Vue是一套构建用户界面的渐进式前端框架。
Vue的程序包含视图和脚本两个核心部分。
脚本部分
Vue核心对象。
选项列表
el:接收获取的元素。
data:保存数据。
methods:定义方法。
视图部分
数据绑定:{{变量名}}
2、Vue 常用指令
2.1、指令介绍
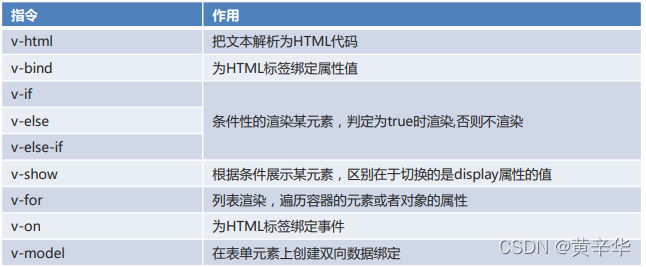
指令:是带有 v- 前缀的特殊属性,不同指令具有不同含义。例如 v-html,v-if,v-for。
使用指令时,通常编写在标签的属性上,值可以使用 JS 的表达式。
常用指令
2.2、文本插值
v-html:把文本解析为 HTML 代码。
<!DOCTYPE html>
<html lang="en">
<head>
    <meta charset="UTF-8">
    <meta name="viewport" content="width=device-width, initial-scale=1.0">
    <title>文本插值</title>
</head>
<body>
    <div id="div">
        <div>{{msg}}</div>
        <div v-html="msg"></div>
    </div>
</body>
<script src="js/vue.js"></script>
<script>
    new Vue({
        el:"#div",
        data:{
            msg:"<b>Hello Vue</b>"
        }
    });
</script>
</html>
2.3、绑定属性
v-bind:为 HTML 标签绑定属性值。
<!DOCTYPE html>
<html lang="en">
<head>
    <meta charset="UTF-8">
    <meta name="viewport" content="width=device-width, initial-scale=1.0">
    <title>绑定属性</title>
    <style>
        .my{
            border: 1px solid red;
        }
    </style>
</head>
<body>
    <div id="div">
        <a v-bind:href="url">百度一下</a>
        <br>
        <a :href="url">百度一下</a>
        <br>
        <div :class="cls">我是div</div>
    </div>
</body>
<script src="js/vue.js"></script>
<script>
    new Vue({
        el:"#div",
        data:{
            url:"https://www.baidu.com",
            cls:"my"
        }
    });
</script>
</html>
2.4、条件渲染
v-if:条件性的渲染某元素,判定为真时渲染,否则不渲染。
v-else:条件性的渲染。
v-else-if:条件性的渲染。
v-show:根据条件展示某元素,区别在于切换的是display属性的值。
<!DOCTYPE html> <html lang="en"> <head> <meta charset="UTF-8"> <meta name="viewport" content="width=device-width, initial-scale=1.0"> <title>条件渲染</title> </head> <body> <div id="div"> <!-- 判断num的值,对3取余 余数为0显示div1 余数为1显示div2 余数为2显示div3 --> <div v-if="num % 3 == 0">div1</div> <div v-else-if="num % 3 == 1">div2</div> <div v-else="num % 3 == 2">div3</div> <div v-show="flag">div4</div> </div> </body> <script src="js/vue.js"></script> <script> new Vue({ el:"#div", data:{ num:1, flag:false } }); </script> </html>
2.5、列表渲染
v-for:列表渲染,遍历容器的元素或者对象的属性。
<!DOCTYPE html>
<html lang="en">
<head>
    <meta charset="UTF-8">
    <meta name="viewport" content="width=device-width, initial-scale=1.0">
    <title>列表渲染</title>
</head>
<body>
    <div id="div">
        <ul>
            <li v-for="name in names">
                {{name}}
            </li>
            <li v-for="value in student">
                {{value}}
            </li>
        </ul>
    </div>
</body>
<script src="js/vue.js"></script>
<script>
    new Vue({
        el:"#div",
        data:{
            names:["张三","李四","王五"],
            student:{
                name:"张三",
                age:23
            }
        }
    });
</script>
</html>
2.6、事件绑定
v-on:为 HTML 标签绑定事件。
<!DOCTYPE html> <html lang="en"> <head> <meta charset="UTF-8"> <meta name="viewport" content="width=device-width, initial-scale=1.0"> <title>事件绑定</title> </head> <body> <div id="div"> <div>{{name}}</div> <button v-on:click="change()">改变div的内容</button> <button v-on:dblclick="change()">改变div的内容</button> <button @click="change()">改变div的内容</button> </div> </body> <script src="js/vue.js"></script> <script> new Vue({ el:"#div", data:{ name:"华中科技大学" }, methods:{ change(){ this.name = "软二" } } }); </script> </html>
2.7、表单绑定
表单绑定 v-model:在表单元素上创建双向数据绑定。
双向数据绑定 更新data数据,页面中的数据也会更新。 更新页面数据,data数据也会更新。
MVVM模型(ModelViewViewModel):是MVC模式的改进版 在前端页面中,JS对象表示Model,页面表示View,两者做到了最大限度的分离。 将Model和View关联起来的就是ViewModel,它是桥梁。 ViewModel负责把Model的数据同步到View显示出来,还负责把View修改的数据同步回Model。
<!DOCTYPE html>
<html lang="en">
<head>
    <meta charset="UTF-8">
    <meta name="viewport" content="width=device-width, initial-scale=1.0">
    <title>表单绑定</title>
</head>
<body>
    <div id="div">
        <form autocomplete="off">
            姓名:<input type="text" name="username" v-model="username">
            <br>
            年龄:<input type="number" name="age" v-model="age">
        </form>
    </div>
</body>
<script src="js/vue.js"></script>
<script>
    new Vue({
        el:"#div",
        data:{
            username:"张三",
            age:23
        }
    });
</script>
</html>
2.8、小结
指令:是带有v-前缀的特殊属性,不同指令具有不同含义。
文本插值 v-html:把文本解析为HTML代码。
绑定属性 v-bind:为HTML标签绑定属性值。
条件渲染 v-if:条件性的渲染某元素,判定为真时渲染,否则不渲染。 v-else:条件性的渲染。 v-else-if:条件性的渲染。 v-show:根据条件展示某元素,区别在于切换的是display属性的值。
列表渲染 v-for:列表渲染,遍历容器的元素或者对象的属性。
事件绑定 v-on:为HTML标签绑定事件。
表单绑定 v-model:在表单元素上创建双向数据绑定。
3、Vue 高级使用
3.1、自定义组件
学完了 Element 组件后,我们会发现组件其实就是自定义的标签。例如 就是对的封装。
本质上,组件是带有一个名字且可复用的 Vue 实例,我们完全可以自己定义。
定义格式
Vue.component(组件名称, {
 props:组件的属性,
 data: 组件的数据函数,
 template: 组件解析的标签模板
})
代码实现
<!DOCTYPE html> <html lang="en"> <head> <meta charset="UTF-8"> <meta name="viewport" content="width=device-width, initial-scale=1.0"> <title>自定义组件</title> <script src="vue/vue.js"></script> </head> <body> <div id="div"> <my-button>我的按钮</my-button> </div> </body> <script> Vue.component("my-button",{ // 属性 props:["style"], // 数据函数 data: function(){ return{ msg:"我的按钮" } }, //解析标签模板 template:"<button style='color:red'>{{msg}}</button>" }); new Vue({ el:"#div" }); </script> </html>
3.2、Vue的生命周期
生命周期
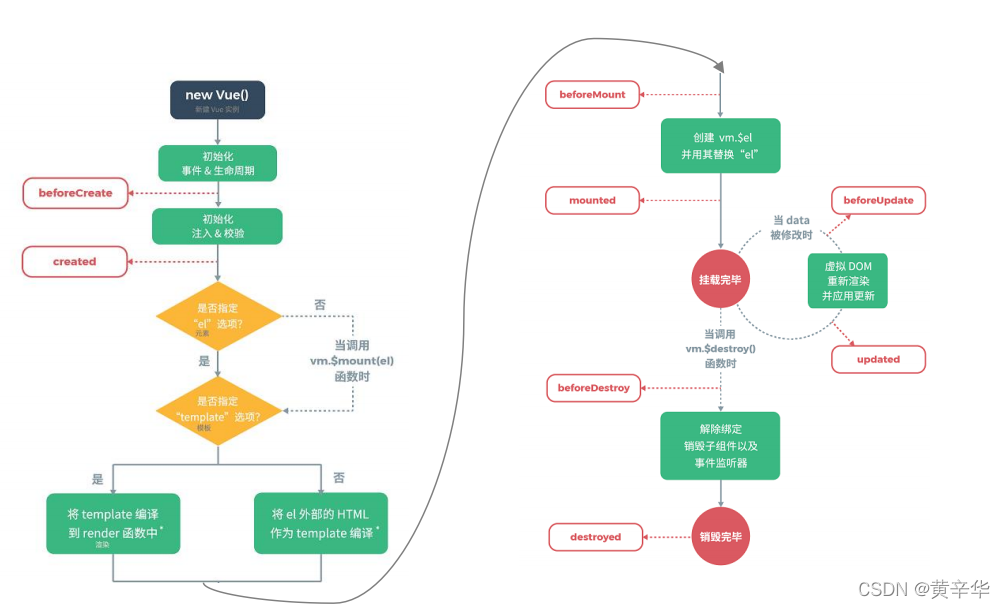
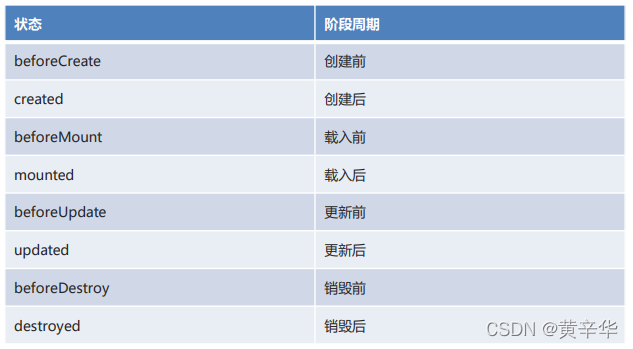
生命周期的八个阶段
代码实现
<!DOCTYPE html> <html lang="en"> <head> <meta charset="UTF-8"> <meta name="viewport" content="width=device-width, initial-scale=1.0"> <title>生命周期</title> <script src="vue/vue.js"></script> </head> <body> <div id="app"> {{message}} </div> </body> <script> let vm = new Vue({ el: '#app', data: { message: 'Vue的生命周期' }, beforeCreate: function() { console.group('------beforeCreate创建前状态------'); console.log("%c%s", "color:red", "el : " + this.$el); //undefined console.log("%c%s", "color:red", "data : " + this.$data); //undefined console.log("%c%s", "color:red", "message: " + this.message);//undefined }, created: function() { console.group('------created创建完毕状态------'); console.log("%c%s", "color:red", "el : " + this.$el); //undefined console.log("%c%s", "color:red", "data : " + this.$data); //已被初始化 console.log("%c%s", "color:red", "message: " + this.message); //已被初始化 }, beforeMount: function() { console.group('------beforeMount挂载前状态------'); console.log("%c%s", "color:red", "el : " + (this.$el)); //已被初始化 console.log(this.$el); console.log("%c%s", "color:red", "data : " + this.$data); //已被初始化 console.log("%c%s", "color:red", "message: " + this.message); //已被初始化 }, mounted: function() { console.group('------mounted 挂载结束状态------'); console.log("%c%s", "color:red", "el : " + this.$el); //已被初始化 console.log(this.$el); console.log("%c%s", "color:red", "data : " + this.$data); //已被初始化 console.log("%c%s", "color:red", "message: " + this.message); //已被初始化 }, beforeUpdate: function() { console.group('beforeUpdate 更新前状态===============》'); let dom = document.getElementById("app").innerHTML; console.log(dom); console.log("%c%s", "color:red", "el : " + this.$el); console.log(this.$el); console.log("%c%s", "color:red", "data : " + this.$data); console.log("%c%s", "color:red", "message: " + this.message); }, updated: function() { console.group('updated 更新完成状态===============》'); let dom = document.getElementById("app").innerHTML; console.log(dom); console.log("%c%s", "color:red", "el : " + this.$el); console.log(this.$el); console.log("%c%s", "color:red", "data : " + this.$data); console.log("%c%s", "color:red", "message: " + this.message); }, beforeDestroy: function() { console.group('beforeDestroy 销毁前状态===============》'); console.log("%c%s", "color:red", "el : " + this.$el); console.log(this.$el); console.log("%c%s", "color:red", "data : " + this.$data); console.log("%c%s", "color:red", "message: " + this.message); }, destroyed: function() { console.group('destroyed 销毁完成状态===============》'); console.log("%c%s", "color:red", "el : " + this.$el); console.log(this.$el); console.log("%c%s", "color:red", "data : " + this.$data); console.log("%c%s", "color:red", "message: " + this.message); } }); // 销毁Vue对象 //vm.$destroy(); //vm.message = "hehe"; // 销毁后 Vue 实例会解绑所有内容 // 设置data中message数据值 vm.message = "good..."; </script> </html>
3.3、Vue异步操作
在Vue中发送异步请求,本质上还是AJAX。我们可以使用axios这个插件来简化操作!
使用步骤 1.引入axios核心js文件。 2.调用axios对象的方法来发起异步请求。 3.调用axios对象的方法来处理响应的数据。
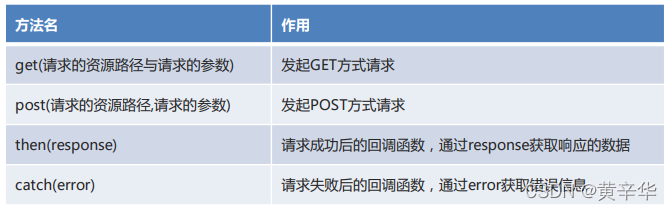
axios常用方法

代码实现
html代码
<!DOCTYPE html> <html lang="en"> <head> <meta charset="UTF-8"> <title>异步操作</title> <script src="js/vue.js"></script> <script src="js/axios-0.18.0.js"></script> </head> <body> <div id="div"> {{name}} <button @click="send()">发起请求</button> </div> </body> <script> new Vue({ el:"#div", data:{ name:"张三" }, methods:{ send(){ // GET方式请求 // axios.get("testServlet?name=" + this.name) // .then(resp => { // alert(resp.data); // }) // .catch(error => { // alert(error); // }) // POST方式请求 axios.post("testServlet","name="+this.name) .then(resp => { alert(resp.data); }) .catch(error => { alert(error); }) } } }); </script> </html>java代码
package com.huangxinhua; import javax.servlet.ServletException; import javax.servlet.annotation.WebServlet; import javax.servlet.http.HttpServlet; import javax.servlet.http.HttpServletRequest; import javax.servlet.http.HttpServletResponse; import java.io.IOException; @WebServlet("/testServlet") public class TestServlet extends HttpServlet { @Override protected void doGet(HttpServletRequest req, HttpServletResponse resp) throws ServletException, IOException { //设置请求和响应的编码 req.setCharacterEncoding("UTF-8"); resp.setContentType("text/html;charset=UTF-8"); //获取请求参数 String name = req.getParameter("name"); System.out.println(name); //响应客户端 resp.getWriter().write("请求成功"); } @Override protected void doPost(HttpServletRequest req, HttpServletResponse resp) throws ServletException, IOException { this.doGet(req,resp); } }
3.4、小结
自定义组件:本质上,组件是带有一个名字且可复用的 Vue 实例,我们可以自己来定义。
Vue.component(组件名称, {
 props:组件的属性,
 data: 组件的数据函数,
 template: 组件解析的标签模板
})
生命周期:核心八个阶段
beforeCreate:创建前
created:创建后
beforeMount:载入前
mounted:载入后
beforeUpdate:更新前
updated:更新后
beforeDestroy:销毁前
destroyed:销毁后
异步操作:通过 axios 插件来实现。