定义自己的starter
- SpringBoot入门到精通-Spring的注解编程(一)
- SpringBoot入门到精通-SpringBoot入门(二)
- SpringBoot入门到精通-Spring的基本使用(三)
- SpringBoot入门到精通-SpringBoot集成SSM(四)
- SpringBoot入门到精通-SpringBoot自动配置原理(五)
- SpringBoot入门到精通-SpringBoot自定义starter(六)
1.认识spring-boot-starter
SpringBoot可以很容易就可以整合其他的组件,比如对于SpringMVC而言,我们只需要导入spring-boot-starter-web就可以直接编写Controller。这个包可不仅仅是导入了一个jar,它把集成SpringMVC所需要的所有的jar都导入了进来

对于不同的组件的集成都有对应的start,比如: spring-boot-starter-redis 就是用来整合Redis,它把Redis所需要的jar都导入进来了。在starter中不仅包含了集成某个组件所需要的所有jar, 还包括集成该组件的配置类。总结如下
- 它整合了这个模块需要的依赖库;
- 提供对模块的配置项给使用者;
- 提供自动配置类对模块内的Bean进行自动装配;
下面我们来开发一个自己的starter
2.定义自己的starter
我们来定义一个自动装配 redis 的 starter,当某个项目导入该starter之后就可以根据默认配置自动去连接redis服务器。如何才能做到这样的效果呢?或许你应该想到了,仿照SpringBoot的自动配置流程,封装一个自己的jar包。那么我们需要做什么事情
- 创建一个maven工厂,导入操作redis所需要的jar包,我这里会使用 jedis 来演示
- 定义一个Properties类,用来加载yml配置的redis配置项
- 新建自动装配类,使用@Configuration和@Bean来进行自动装配
- 创建 MET-INF/spring.factories文件,把自动配置类配置进去,让SpringBoot可以自动去加载;
2.1.创建工程,导入依赖
我的项目名为:springboot-starter-redis , 需要导入SpringBoot基础依赖,以及jedis基础依赖。
<packaging>jar</packaging>

<parent>
    <groupId>org.springframework.boot</groupId>
    <artifactId>spring-boot-starters</artifactId>
    <version>2.2.5.RELEASE</version>
</parent>

<dependencies>
    <!-- SpringBoot自动配置基础依赖 -->
    <dependency>
        <groupId>org.springframework.boot</groupId>
        <artifactId>spring-boot-configuration-processor</artifactId>
        <optional>true</optional>
    </dependency>
    <!-- SpringBoot核心基础依赖 -->
    <dependency>
        <groupId>org.springframework.boot</groupId>
        <artifactId>spring-boot-starter</artifactId>
        <version>2.2.5.RELEASE</version>
        <scope>compile</scope>
    </dependency>
    <!-- 使用jedis操作Redis -->
    <dependency>
        <groupId>redis.clients</groupId>
        <artifactId>jedis</artifactId>
        <version>3.1.0</version>
    </dependency>
    <dependency>
        <groupId>commons-pool</groupId>
        <artifactId>commons-pool</artifactId>
        <version>1.6</version>
    </dependency>
</dependencies>
2.2.定义Redis自动配置
第一步,先创建一个RedisProperties来,用来读取yaml的配置
//@ConfigurationProperties: 把 "spring.redis" 前缀下的配置同名绑定到该对象的字段上
@ConfigurationProperties(prefix = "spring.redis")
public class RedisProperties {
    //redis主机
    private String host ="127.0.0.1";
    //redis密码
    private String password;
    //redis端口
    private int port = 6379;
    //超时时间,1秒超时
    private int timeout = 1000;
    //最大空闲
    private int maxIdle = 8;
    //最大链接
    private int maxTotal = 8;
    //最大等待超时
    private long maxWaitMillis = -1;
    //开启测试
    private boolean testOnBorrow = false;
    ...省略get,set...
}
第二步:创建Redis自动配置类 , 注册 JedisPool 连接池对象
@Configuration
//如果有Jedis.class这个类就创建Bean
@ConditionalOnClass({Jedis.class,JedisPoolConfig.class})
//如果还没有创建Jedis,就创建
@ConditionalOnMissingBean(Jedis.class)
//@EnableConfigurationProperties : 启用RedisProperties
@EnableConfigurationProperties(RedisProperties.class)
public class RedisAutoConfiguration {

    @Bean
    public JedisPool jedisPool(RedisProperties redisProperties){
        JedisPoolConfig config = new JedisPoolConfig();
        //最大空闲连接数
        config.setMaxIdle(redisProperties.getMaxIdle());
        //最大链接对象数
        config.setMaxTotal(redisProperties.getMaxTotal());
        //链接超时时间
        config.setMaxWaitMillis(redisProperties.getMaxWaitMillis());
        //获取连接是测试连接是否畅通
        config.setTestOnBorrow(redisProperties.isTestOnBorrow());
        //参数:配置对象,redis主机地址 ,超时时间,密码
        return new JedisPool(config,redisProperties.getHost(),redisProperties.getPort(),redisProperties.getTimeout(),redisProperties.getPassword());
    }

    @Bean
    public RedisTemplate redisTemplate(JedisPool jedisPool){
        return new RedisTemplate(jedisPool);
    }
}
2.3.创建RedisTemplate
创建RedisTemplate , 该类是是用来操作Redis的工具类,代码如下
public class RedisTemplate {

    //连接池
    private JedisPool jedisPool;

    public RedisTemplate(JedisPool jedisPool){
        this.jedisPool = jedisPool;
    }
    public RedisTemplate(){}


    public Jedis getJedis(){
        return jedisPool.getResource();
    }
    //保存字符串
    public String set(String key ,String value){
        Jedis jedis = getJedis();
        String result = jedis.set(key  , value);
        jedis.close();
        return result;
    }
    //获取字符串
    public String get(String key){
        Jedis jedis = getJedis();
        String result = jedis.get(key);
        jedis.close();
        return result;
    }

}
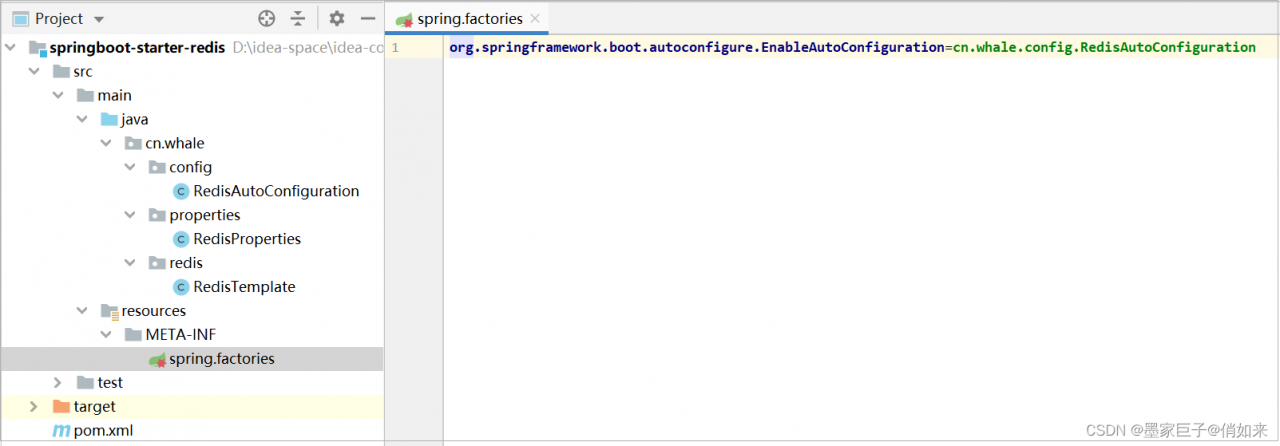
2.4.创建spring.factories
创建 resources\META-INF\spring.factories 文件,把配置类的名字加进去
org.springframework.boot.autoconfigure.EnableAutoConfiguration=cn.whale.config.RedisAutoConfiguration
2.5.打包start
使用terminal,执行 : mvn install ,把工厂打包到本地仓库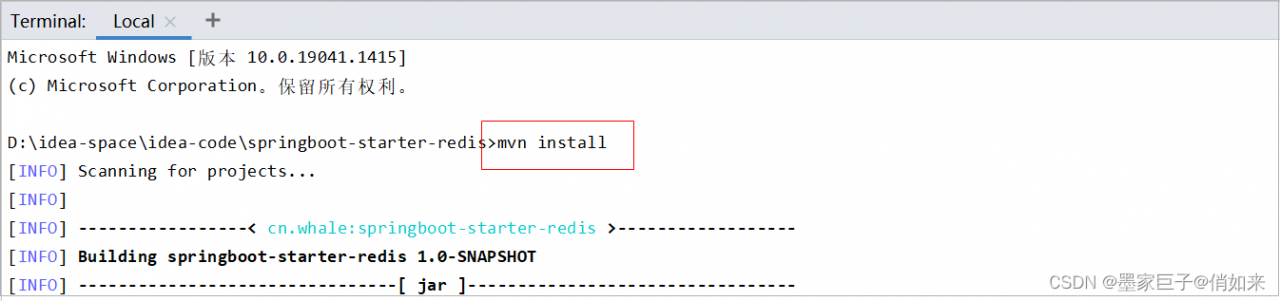
到这里,start开发完毕。接下来就是在项目pom.xml中去引入该start(springboot-starter-redis),当项目启动,SpringBoot自动配置流程会加载 springboot-startr-redis/MATE-INF/spring.factories 中的 RedisAutoConfiguration ,然后其中的JedisPool 和 RedisTemplate都会被注册到Spring容器中。 剩下就是在项目中注入 RedisTemplate 使用接口。
项目结构如下
3.使用Starter
3.1.pom导入依赖
这里会找到我们上面install的starter项目
<dependency>
    <groupId>cn.whale</groupId>
    <artifactId>springboot-starter-redis</artifactId>
    <version>1.0-SNAPSHOT</version>
</dependency>
3.2.配置Redis
这个配置项目对应了springboot-starter-redis 中的 RedisProperties ,如果不配置会使用默认的值
spring:
  redis:
    password: 123456
    host: 127.0.0.1
    port: 6379
3.3.编写controller
在controller注入 RedisTemplate,进行set,get方法演示
@RestController
public class UserController {

    @Autowired
    private RedisTemplate redisTemplate;

    @RequestMapping("/redis/set/{key}/{value}")
    public String redisSet(@PathVariable("key")String key , @PathVariable("value")String value){
        return redisTemplate.set(key,value);
    }
    @RequestMapping("/redis/get/{key}")
    public String redisGet(@PathVariable("key")String key){
        return redisTemplate.get(key);
    }

}
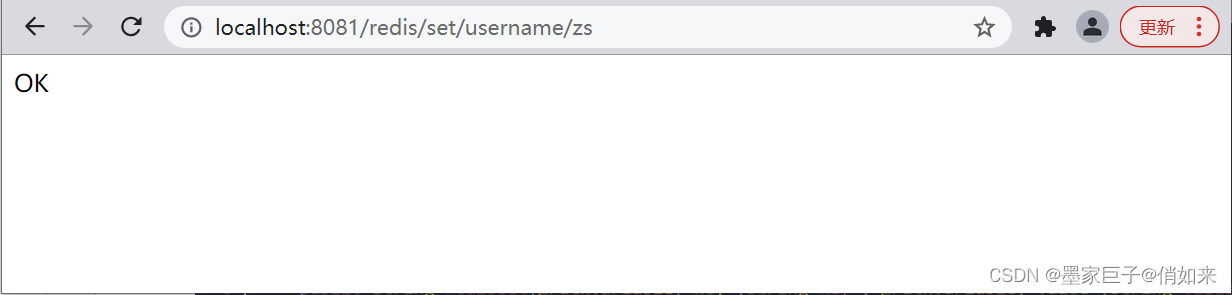
3.4.启动测试
启动项目,访问该路径进行测试,效果如下
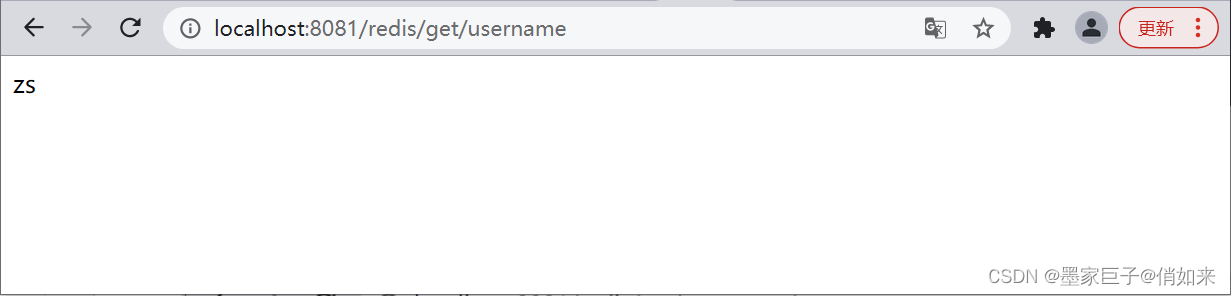
测试 get
下面是Redis中的效果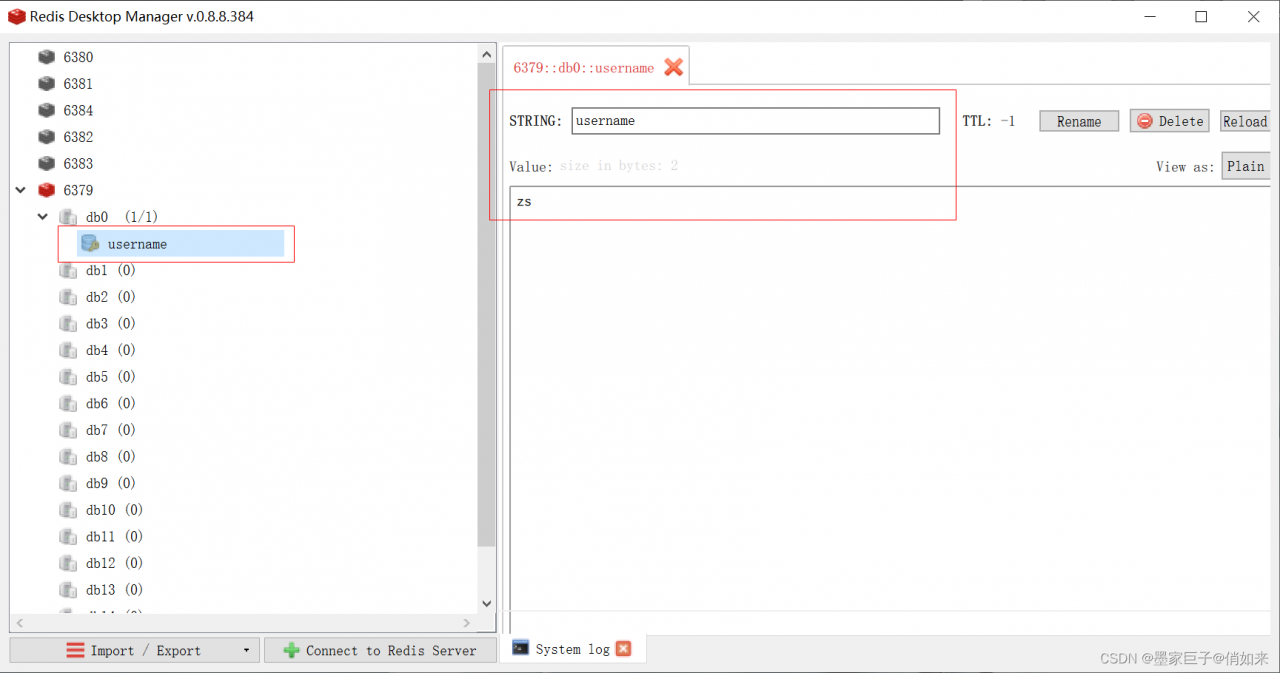
你可能会问定义starter有什么用?其实是比较有用的,比如我们要开发一个通用的组件,封装一个jar,这个组件需要被依赖到多个项目中,那么我们怎么样才能在程序启动的时候做一些初始化配置呢?定义starter就是一种很好的方式。
文章结束啦,如果文章对你有所帮助,请一定给个好评哦,请一定给个好评哦,请一定给个好评哦