邮件发送 Response(狂神JavaWeb笔记)
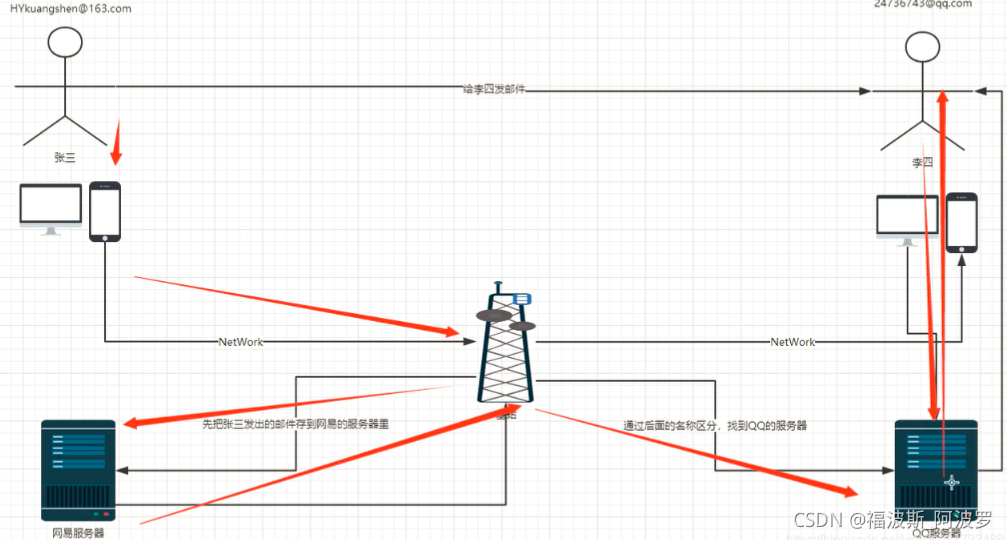
1、原理图
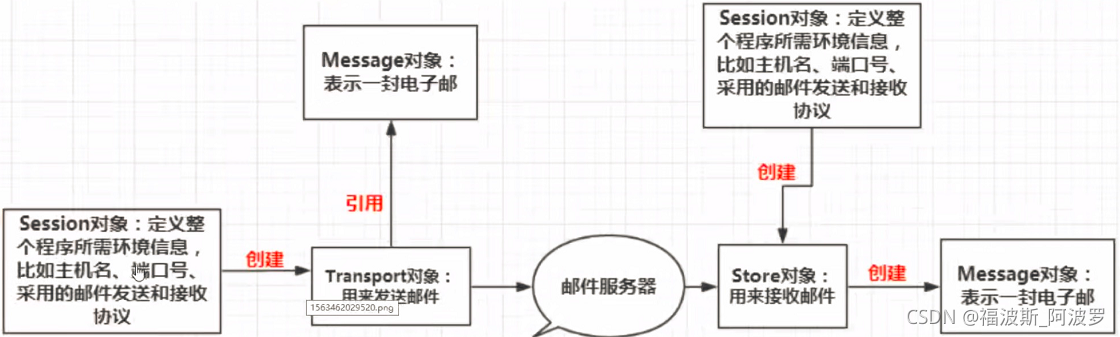
2、核心四个类库
3、jar包支持
activation-1.1.1.jar
mail-1.4.7.jar
4、简单实现(QQ邮箱)
(1)在idea中新建空的Java项目并将jar包导入到lib库中。
(2)登录QQ邮箱在设置中开启以下协议并生成授权码(授权码要记住)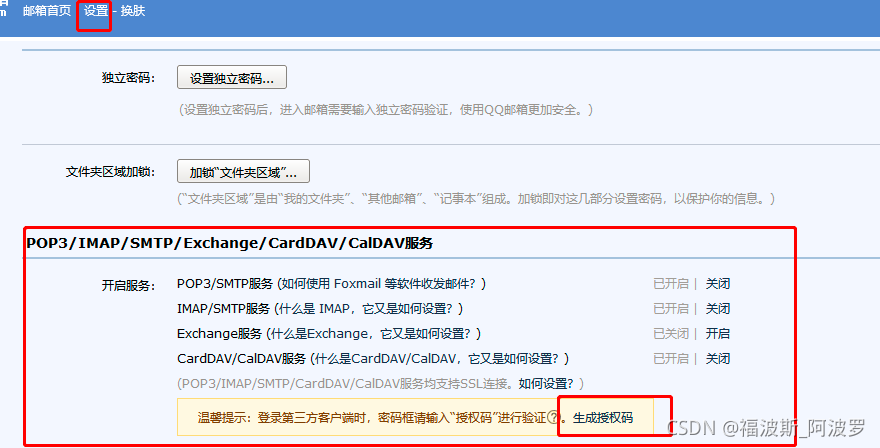 (3)分析步骤
a.创建session对
b.创建Transport对象
c.使用邮箱的用户名和授权码连上邮件服务器
d.创建一个Message对象(需要传递session)
message需要指明发件人、收件人以及文件内容
e.发送邮件
f.关闭连接
(4)代码实现
import com.sun.mail.util.MailSSLSocketFactory;

import javax.mail.*;
import javax.mail.internet.InternetAddress;
import javax.mail.internet.MimeMessage;
import java.util.Properties;

//发送一封简单的邮件(纯文本)
public class Test {
    public static void main(String[] args) throws Exception {
        Properties prop = new Properties();
        prop.setProperty("mail.host", "smtp.qq.com"); //设置QQ邮件服务器
        prop.setProperty("mail.transport.protocol", "smtp"); //邮件发送协议
        prop.setProperty("mail.smtp.auth", "true");  //需要验证用户名、密码

        //关于QQ邮箱,需要设置SSL加密,加上以下代码即可(大厂)
        MailSSLSocketFactory sf = new MailSSLSocketFactory();
        sf.setTrustAllHosts(true);
        prop.put("mail.smtp.enable", "true");
        prop.put("mail.smtp.ssl.socketFactory", sf);

        //5个步骤
        //1、创建定义整个应用程序所需的环境信息的Session信息
        //下面这个QQ才有!!
        Session session = Session.getDefaultInstance(prop, new Authenticator() {
            @Override
            protected PasswordAuthentication getPasswordAuthentication() {
                return new PasswordAuthentication("2414348659@qq.com", "授权码");
            }
        });

        //开启Session的debug模式,可以看到程序发送Email的运行状态(可以开启也可以不开启)
        session.setDebug(true);

        //2、通过Session得到transport对象
        Transport ts = session.getTransport();

        //3、使用邮箱的用户名和授权码  连接邮件服务器
        ts.connect("smtp.qq.com", "2414348659@qq.com", "授权码");

        //4、创建邮件:写邮件(需要传递Session)
        MimeMessage message = new MimeMessage(session);
        //发件人
        message.setFrom(new InternetAddress("2414348659@qq.com"));
        //收件人
        message.setRecipient(Message.RecipientType.TO, new InternetAddress("zhuyihao139@163.com"));
        //邮件主题
        message.setSubject("只包含文本的简单邮件");
        //邮件内容
        message.setContent("只包含文本的简单邮件(本质这一段是Html文本,可以更改样式)", "text/html;charset=UTF-8");

        //5、发送邮件
        ts.sendMessage(message, message.getAllRecipients());

        //关闭
        ts.close();
    }
}
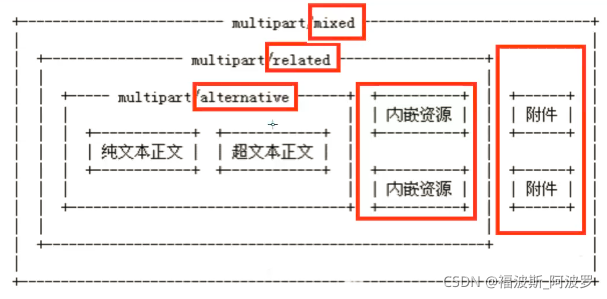
5、带附件的发送(QQ邮箱)
 Java代码实现
import com.sun.mail.util.MailSSLSocketFactory;

import javax.activation.DataHandler;
import javax.activation.FileDataSource;
import javax.mail.*;
import javax.mail.internet.InternetAddress;
import javax.mail.internet.MimeBodyPart;
import javax.mail.internet.MimeMessage;
import javax.mail.internet.MimeMultipart;
import java.util.Properties;

//发送一封简单的邮件(纯文本)
public class SendMail {
    public static void main(String[] args) throws Exception {
        Properties prop = new Properties();
        prop.setProperty("mail.host", "smtp.qq.com"); //设置QQ邮件服务器
        prop.setProperty("mail.transport.protocol", "smtp"); //邮件发送协议
        prop.setProperty("mail.smtp.auth", "true");  //需要验证用户名、密码

        //关于QQ邮箱,需要设置SSL加密,加上以下代码即可(大厂)
        MailSSLSocketFactory sf = new MailSSLSocketFactory();
        sf.setTrustAllHosts(true);
        prop.put("mail.smtp.enable", "true");
        prop.put("mail.smtp.ssl.socketFactory", sf);

        //5个步骤
        //1、创建定义整个应用程序所需的环境信息的Session信息
        //下面这个QQ才有!!
        Session session = Session.getDefaultInstance(prop, new Authenticator() {
            @Override
            protected PasswordAuthentication getPasswordAuthentication() {
                return new PasswordAuthentication("2414348659@qq.com", "授权码");
            }
        });

        //开启Session的debug模式,可以看到程序发送Email的运行状态(可以开启也可以不开启)
        session.setDebug(true);

        //2、通过Session得到transport对象
        Transport ts = session.getTransport();

        //3、使用邮箱的用户名和授权码  连接邮件服务器
        ts.connect("smtp.qq.com", "2414348659@qq.com", "授权码");

        //4、创建邮件:写邮件(需要传递Session)
        MimeMessage message = new MimeMessage(session);
        //发件人
        message.setFrom(new InternetAddress("2414348659@qq.com"));
        //收件人
        message.setRecipient(Message.RecipientType.TO, new InternetAddress("zhuyihao139@163.com"));
        //邮件主题
        message.setSubject("复杂邮件内容");


        //===============复杂邮件内容============
        //图片数据
        MimeBodyPart image = new MimeBodyPart();
        //图片需要经过数据处理...  DataHandler:数据处理
        DataHandler dh = new DataHandler(new FileDataSource("图片路径"));
        image.setDataHandler(dh);  //在我们的Body主题中放入这个处理的图片数据
        image.setContentID("1.jpg");  //给图片设置一个ID,我们在后面可以使用!

        //准备正文数据
        MimeBodyPart text = new MimeBodyPart();
        //cid:通过cid:引用图片
        text.setContent("这是一封正文带图片<img src='cid:1.jpg'>的邮件", "text/html;charset=UTF-8");

        //准备附件
        MimeBodyPart body3 = new MimeBodyPart();
        body3.setDataHandler(new DataHandler(new FileDataSource("文件路径")));
        body3.setFileName("file1.docx");  //设置附件名字

        //描述数据关系(拼装数据)
        MimeMultipart mm = new MimeMultipart();
        mm.addBodyPart(text);
        mm.addBodyPart(image);
        mm.addBodyPart(body3);
        mm.setSubType("mixed");

        //设置到消息中,保存修改
        message.setContent(mm);  //把最后编辑好的邮件放到消息中
        message.saveChanges();   //保存修改

        //===============复杂邮件内容============

        //5、发送邮件
        ts.sendMessage(message, message.getAllRecipients());

        //关闭
        ts.close();
    }
}
JavaWeb实现
(1)添加maven框架支持
(2)配置idea中内置的tomcat
(3)index.jsp
<%--
Created by IntelliJ IDEA.
User: 24143
Date: 2021/10/31
Time: 21:46
To change this template use File | Settings | File Templates.
--%>
<%--index.jsp--%>
<%@ page contentType="text/html;charset=UTF-8" language="java" %>
<html>
<head>
<title>注册</title>
</head>
<body>
<%--通过表单上传文件
get:上传文件大小有限制
post:无限制
--%>
<form action="${pageContext.request.contextPath}/RegisterServlet.do" method="post">
用户名:<input type="text" name="username"><br/>
密 码:<input type="password" name="password"><br/>
邮 箱:<input type=email name="email"><br/>
<input type="submit" value="注册">
</form>
</body>
</html>
(4)web.xml
<?xml version="1.0" encoding="UTF-8"?>
<web-app xmlns="http://xmlns.jcp.org/xml/ns/javaee"
         xmlns:xsi="http://www.w3.org/2001/XMLSchema-instance"
         xsi:schemaLocation="http://xmlns.jcp.org/xml/ns/javaee http://xmlns.jcp.org/xml/ns/javaee/web-app_4_0.xsd"
         version="4.0">

    <servlet>
        <servlet-name>RegisterServlet</servlet-name>
        <servlet-class>servlet.RegisterServlet</servlet-class>
    </servlet>
    <servlet-mapping>
        <servlet-name>RegisterServlet</servlet-name>
        <url-pattern>/RegisterServlet.do</url-pattern>
    </servlet-mapping>

</web-app>
(5)pom.xml
<?xml version="1.0" encoding="UTF-8"?>

<project xmlns="http://maven.apache.org/POM/4.0.0" xmlns:xsi="http://www.w3.org/2001/XMLSchema-instance"
  xsi:schemaLocation="http://maven.apache.org/POM/4.0.0 http://maven.apache.org/xsd/maven-4.0.0.xsd">
  <modelVersion>4.0.0</modelVersion>

  <groupId>org.example</groupId>
  <artifactId>JavaSendMail</artifactId>
  <version>1.0-SNAPSHOT</version>
  <packaging>war</packaging>

  <name>JavaSendMail Maven Webapp</name>
  <!-- FIXME change it to the project's website -->
  <url>http://www.example.com</url>

  <properties>
    <project.build.sourceEncoding>UTF-8</project.build.sourceEncoding>
    <maven.compiler.source>1.7</maven.compiler.source>
    <maven.compiler.target>1.7</maven.compiler.target>
  </properties>

  <dependencies>
    <dependency>
      <groupId>junit</groupId>
      <artifactId>junit</artifactId>
      <version>4.11</version>
      <scope>test</scope>
    </dependency>
      <dependency>
          <groupId>javax.servlet</groupId>
          <artifactId>javax.servlet-api</artifactId>
          <version>4.0.1</version>
          <scope>compile</scope>
      </dependency>
  </dependencies>

  <build>
    <finalName>JavaSendMail</finalName>
    <pluginManagement><!-- lock down plugins versions to avoid using Maven defaults (may be moved to parent pom) -->
      <plugins>
        <plugin>
          <artifactId>maven-clean-plugin</artifactId>
          <version>3.1.0</version>
        </plugin>
        <!-- see http://maven.apache.org/ref/current/maven-core/default-bindings.html#Plugin_bindings_for_war_packaging -->
        <plugin>
          <artifactId>maven-resources-plugin</artifactId>
          <version>3.0.2</version>
        </plugin>
        <plugin>
          <artifactId>maven-compiler-plugin</artifactId>
          <version>3.8.0</version>
        </plugin>
        <plugin>
          <artifactId>maven-surefire-plugin</artifactId>
          <version>2.22.1</version>
        </plugin>
        <plugin>
          <artifactId>maven-war-plugin</artifactId>
          <version>3.2.2</version>
        </plugin>
        <plugin>
          <artifactId>maven-install-plugin</artifactId>
          <version>2.5.2</version>
        </plugin>
        <plugin>
          <artifactId>maven-deploy-plugin</artifactId>
          <version>2.8.2</version>
        </plugin>
      </plugins>
    </pluginManagement>
  </build>
</project>
(6)info.jsp
<%--
  Created by IntelliJ IDEA.
  User: 24143
  Date: 2021/11/1
  Time: 11:21
  To change this template use File | Settings | File Templates.
--%>
<%--info.jsp--%>
<%@ page contentType="text/html;charset=UTF-8" language="java" %>
<html>
<head>
    <title>Success</title>
</head>
<body>

<h1>xxx网站温馨提示</h1>
${message}

</body>
</html>
(7)实体类User
package pojo;

import java.io.Serializable;

//User实体类
public class User implements Serializable {

    private String username;
    private String password;
    private String email;

    public User() {
    }

    public User(String username, String password, String email) {
        this.username = username;
        this.password = password;
        this.email = email;
    }

    public String getUsername() {
        return username;
    }

    public void setUsername(String username) {
        this.username = username;
    }

    public String getPassword() {
        return password;
    }

    public void setPassword(String password) {
        this.password = password;
    }

    public String getEmail() {
        return email;
    }

    public void setEmail(String email) {
        this.email = email;
    }

    @Override
    public String toString() {
        return "User{" +
                "username='" + username + '\'' +
                ", password='" + password + '\'' +
                ", email='" + email + '\'' +
                '}';
    }
}
(8)工具类 util
package util;
import com.sun.mail.util.MailSSLSocketFactory;
import pojo.User;
import javax.mail.*;
import javax.mail.internet.InternetAddress;
import javax.mail.internet.MimeMessage;
import java.util.Properties;
//工具类
//多线程实现用户体验!异步处理
public class SendMail extends Thread {
private String from="2414348659@qq.com"; //发件人
private String username="2414348659@qq.com"; //用户名
private String password="授权码"; //邮箱的密码
private String host="smtp.qq.com"; //发送邮件的服务器地址
private User user;
public SendMail(User user){
this.user=user;
}
//重写run方法,在其中发送邮件给指定用户
@Override
public void run() {
try{
Properties prop = new Properties();
prop.setProperty("mail.host", "smtp.qq.com"); //何止QQ邮件服务器
prop.setProperty("mail.transport.protocol", "smtp"); //邮件发送协议
prop.setProperty("mail.smtp.auth", "true"); //需要验证用户名、密码
//关于QQ邮箱,需要设置SSL加密,加上以下代码即可(大厂)
MailSSLSocketFactory sf = new MailSSLSocketFactory();
sf.setTrustAllHosts(true);
prop.put("mail.smtp.enable", "true");
prop.put("mail.smtp.ssl.socketFactory", sf);
//1、创建定义整个应用程序所需的环境信息的Session信息
//下面这个QQ才有!!
Session session = Session.getDefaultInstance(prop, new Authenticator() {
@Override
protected PasswordAuthentication getPasswordAuthentication() {
return new PasswordAuthentication("2414348659@qq.com", "授权码");
}
});
//开启Session的debug模式,可以看到程序发送Email的运行状态
session.setDebug(true);
//2、通过Session得到transport对象
Transport ts = session.getTransport();
//3、使用邮箱的用户名和授权码 连接邮件服务器
ts.connect("smtp.qq.com", "2414348659@qq.com", "授权码");
//4、创建邮件:写邮件(需要传递Session)
MimeMessage message = new MimeMessage(session);
message.setFrom(new InternetAddress("2414348659@qq.com")); //发件人
message.setRecipient(Message.RecipientType.TO, new InternetAddress(user.getEmail())); //收件人
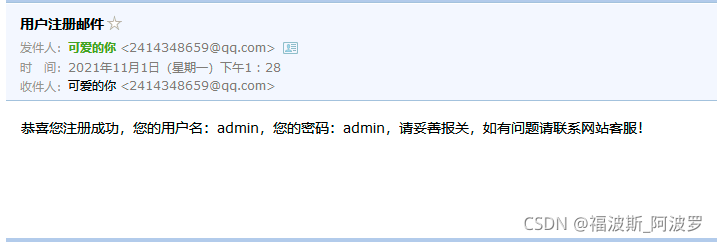
message.setSubject("用户注册邮件"); //邮件主题
String info="恭喜您注册成功,您的用户名:"+user.getUsername()+",您的密码:"+user.getPassword()+",请妥善报关,如有问题请联系网站客服!";
message.setContent(info,"text/html;charset=UTF-8");
message.saveChanges();
//5、发送邮件
ts.sendMessage(message, message.getAllRecipients());
//关闭
ts.close();
} catch (Exception e) {
e.printStackTrace();
}
}
}
(9)servlet
package servlet;

import pojo.User;
import util.SendMail;

import javax.servlet.ServletException;
import javax.servlet.http.HttpServlet;
import javax.servlet.http.HttpServletRequest;
import javax.servlet.http.HttpServletResponse;
import java.io.IOException;

public class RegisterServlet extends HttpServlet {
    @Override
    protected void doPost(HttpServletRequest req, HttpServletResponse resp) throws ServletException, IOException {
        //接收用户请求,封装成对象
        String username = req.getParameter("username");
        String password = req.getParameter("password");
        String email = req.getParameter("email");

        User user = new User(username, password, email);

        //用户注册成功之后,给用户发一封邮件
        //使用线程来专门发送邮件,防止出现耗时,和网站注册人数较多的情况
        SendMail send = new SendMail(user);
        //启动线程,执行run方法发送邮件
        send.start();
        //这里写run()的话,得等邮件发送完了才跳转,用户体验贼差!!


        //注册用户
        req.setAttribute("message", "注册成功,我们已经发了一封带了注册信息的电子邮件,请查收!如网络不稳定,可能过会儿才能收到!");
        req.getRequestDispatcher("info.jsp").forward(req, resp);
    }

    @Override
    protected void doGet(HttpServletRequest req, HttpServletResponse resp) throws ServletException, IOException {

    }
}
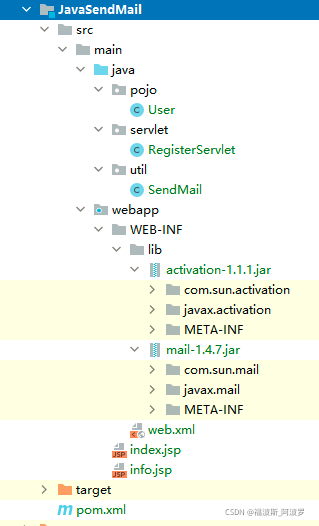
idea中项目目录结构
6、测试
运行tomcat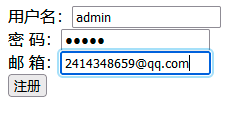


版权声明:本文为qq_43003203原创文章,遵循CC 4.0 BY-SA版权协议,转载请附上原文出处链接和本声明。