一、配置文件
SpringBoot使用一个全局的配置文件 , 配置文件名称是固定的
application.properties
- 语法结构 :key=value
application.yml
- 语法结构 :key:空格 value
配置文件的作用 :修改SpringBoot自动配置的默认值,因为SpringBoot在底层都给我们自动配置好了
yaml:这种语言以数据作为中心,而不是以标记语言为重点!
基础语法:
1、空格不能省略
2、以缩进来控制层级关系,只要是左边对齐的一列数据都是同一个层级的。
3、属性和值的大小写都是十分敏感的。
字面量:普通的值 [ 数字,布尔值,字符串 ]
k: v
修改SpringBoot的默认端口号
配置文件中添加,端口号的参数,就可以切换端口
server:
  port: 8082
二、加载指定的配置文件
@PropertySource :加载指定的配置文件;
@configurationProperties:默认从全局配置文件中获取值;
新建一个person.properties文件
name=shy
然后在我们的代码中指定加载person.properties文件
@PropertySource(value = "classpath:person.properties")
	@Value("${name}")
测试
我们上面采用的yaml方法都是最简单的方式,开发中最常用的;也是springboot所推荐的!
配置文件还可以编写占位符生成随机数
person:
  name: shy${random.uuid} # 随机uuid
  age: ${random.int}  # 随机int
【注意】properties配置文件在写中文的时候,会有乱码 , 我们需要去IDEA中设置编码格式为UTF-8settings–>editor–>FileEncodings
结论:
配置yml和配置properties都可以获取到值 , 强烈推荐 yml;
如果我们在某个业务中,只需要获取配置文件中的某个值,可以使用一下 @value;
如果说,我们专门编写了一个JavaBean来和配置文件进行一一映射,就直接@configurationProperties,不要犹豫!
三、自定义starter
命名归约:
官方命名:
前缀:spring-boot-starter-xxx
比如:spring-boot-starter-web…
自定义命名:
xxx-spring-boot-starter
比如:mybatis-spring-boot-starter
1、SpringBoot starter机制
SpringBoot中的starter是一种非常重要的机制,能够抛弃以前繁杂的配置,将其统一集成进starter,应用者只需要在maven中引入starter依赖,SpringBoot就能自动扫描到要加载的信息并启动相应的默认配置。starter让我们摆脱了各种依赖库的处理,需要配置各种信息的困扰。SpringBoot会自动通过classpath路径下的类发现需要的Bean,并注册进IOC容器。SpringBoot提供了针对日常企业应用研发各种场景的spring-boot-starter依赖模块。所有这些依赖模块都遵循着约定成俗的默认配置,并允许我们调整这些配置,即遵循“约定大于配置”的理念。
2、为什么要自定义starter
在我们的日常开发工作中,经常会有一些独立于业务之外的配置模块,我们经常将其放到一个特定的包下,然后如果另一个工程需要复用这块功能的时候,需要将代码硬拷贝到另一个工程,重新集成一遍,麻烦至极。如果我们将这些可独立于业务代码之外的功配置模块封装成一个个starter,复用的时候只需要将其在pom中引用依赖即可,SpringBoot为我们完成自动装配,简直不要太爽。
来吧开整’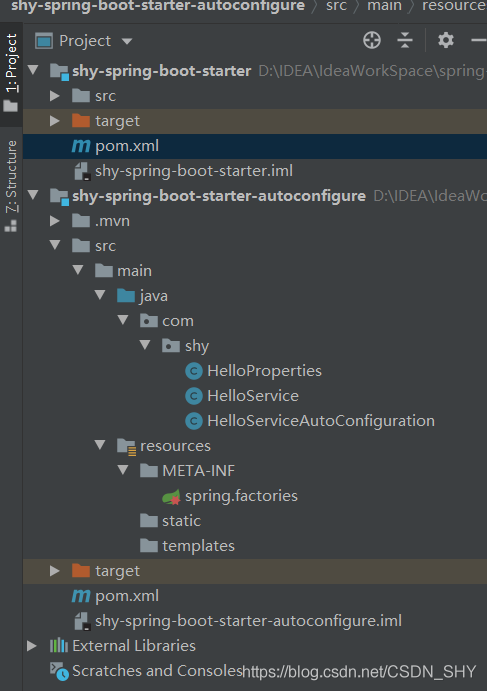
1、在IDEA中新建一个空项目 spring-boot-starter-diy
2、新建一个普通Maven模块:shy-spring-boot-starter
3、新建一个Springboot模块:shy-spring-boot-starter-autoconfigure
4、在我们的 shy-spring-boot-starter的pom 中 导入 shy-spring-boot-starter-autoconfigure 的依赖!
<!-- 启动器 -->
    <dependencies>
        <!--  引入自动配置模块 -->
        <dependency>
            <groupId>com.shy</groupId>
            <artifactId>shy-spring-boot-starter-autoconfigure</artifactId>
            <version>0.0.1-SNAPSHOT</version>
        </dependency>
    </dependencies>
5、编写一个自己的服务HelloService
package com.shy;
public class HelloService {
    HelloProperties helloProperties;
    public HelloProperties getHelloProperties() {
        return helloProperties;
    }
    public void setHelloProperties(HelloProperties helloProperties) {
        this.helloProperties = helloProperties;
    }
    public String sayHello(String name){
        return helloProperties.getPrefix() + name + helloProperties.getSuffix();
    }
}
6、编写HelloProperties 配置类
package com.shy;
import org.springframework.boot.context.properties.ConfigurationProperties;
@ConfigurationProperties(prefix = "shy.hello")
public class HelloProperties {
    private String prefix;
    private String suffix;
    public String getPrefix() {
        return prefix;
    }
    public void setPrefix(String prefix) {
        this.prefix = prefix;
    }
    public String getSuffix() {
        return suffix;
    }
    public void setSuffix(String suffix) {
        this.suffix = suffix;
    }
}
7、编写自动配置类并注入bean
package com.shy;
import org.springframework.beans.factory.annotation.Autowired;
import org.springframework.boot.autoconfigure.condition.ConditionalOnWebApplication;
import org.springframework.boot.context.properties.EnableConfigurationProperties;
import org.springframework.context.annotation.Bean;
import org.springframework.context.annotation.Configuration;
@Configuration
@ConditionalOnWebApplication //web应用生效
@EnableConfigurationProperties(HelloProperties.class)
public class HelloServiceAutoConfiguration {
    @Autowired
    HelloProperties helloProperties;

    @Bean
    public HelloService helloService(){
        HelloService service = new HelloService();
        service.setHelloProperties(helloProperties);
        return service;
    }
}
8、在resources编写一个自己的 META-INF\spring.factories
# Auto Configure
org.springframework.boot.autoconfigure.EnableAutoConfiguration=\
com.shy.HelloServiceAutoConfiguration
9.编写完成后,点击maven–>install 注意顺序:先autoconfigure后starter
10.新建一个springboot项目测试
导入自己写的启动器
		<dependency>
            <groupId>org.example</groupId>
            <artifactId>shy-spring-boot-starter</artifactId>
            <version>1.0-SNAPSHOT</version>
        </dependency>
注意:你安装jar包的路径,我的是

下的,所以和我的org.example对应,不对应的话会报一个无法解析的错~
11、编写一个 HelloController 进行测试我们自己的写的接口!
package com.shy.controller;
import com.shy.HelloService;
import org.springframework.beans.factory.annotation.Autowired;
import org.springframework.web.bind.annotation.RequestMapping;
import org.springframework.web.bind.annotation.RestController;
@RestController
public class HelloController {
    @Autowired
    HelloService helloService;
    @RequestMapping("/hello")
    public String hello(){
        return helloService.sayHello("shy");
    }
}
12、编写配置文件 application.properties
shy.hello.prefix="ppp"
shy.hello.suffix="sss"
13.启动SpringStarterTestApplication 测试~
四、Web开发静态资源处理
SpringBoot最大的特点就是自动装配
addResourceHandlers 添加资源处理
Webjars本质就是以jar包的方式引入我们的静态资源 , 我们以前要导入一个静态资源文件,直接导入即可。
要使用jQuery,我们只要要引入jQuery对应版本的pom依赖即可!
<dependency>
    <groupId>org.webjars</groupId>
    <artifactId>jquery</artifactId>
    <version>3.4.1</version>
</dependency>
刷新~启动项目,访问http://localhost:8080/webjars/jquery/3.4.1/jquery.js
自定义静态资源路径
application.properties中配置
spring.resources.static-locations=classpath:/coding/,classpath:/shy/
关闭SpringBoot默认图标
#关闭默认图标
spring.mvc.favicon.enabled=false
自己放一个图标在静态资源目录下
清除浏览器缓存!刷新网页,发现图标已经变成自己的了!
五、Thymeleaf模板引擎
引入Thymeleaf
<!--thymeleaf-->
<dependency>
    <groupId>org.springframework.boot</groupId>
    <artifactId>spring-boot-starter-thymeleaf</artifactId>
</dependency>
测试:
1.编写TestController
package com.shy.controller;
import org.springframework.stereotype.Controller;
import org.springframework.web.bind.annotation.RequestMapping;
@Controller
public class TestController {
    @RequestMapping("/t1")
    public String test1(){
        //classpath:/templates/test.html
        return "test";
    }
}
2.在resources–>templates–>创建一个test.html
启动项目测试~
Thymeleaf 官网:https://www.thymeleaf.org/
3.修改测试请求,增加数据传输
package com.shy.controller;
import org.springframework.stereotype.Controller;
import org.springframework.ui.Model;
import org.springframework.web.bind.annotation.RequestMapping;
@Controller
public class TestController {
    @RequestMapping("/t1")
    public String test1(Model model){
        model.addAttribute("msg","Hello,Thymeleaf");
        return "test";
    }
}
4.我们要使用thymeleaf,需要在html文件中导入命名空间的约束,方便提示。
xmlns:th="http://www.thymeleaf.org"
5.修改前端页面
<!DOCTYPE html>
<html lang="en" xmlns:th="http://www.thymeleaf.org">
<head>
    <meta charset="UTF-8">
    <title>test</title>
</head>
<body>
<h1>测试</h1>
<div th:text="${msg}"></div>
</body>
</html>
6.启动项目测试
练习:
1.TestController添加
@RequestMapping("/t2")
    public String test2(Map<String,Object> map){
        map.put("msg","<h1>Hello</h1>");
        map.put("users", Arrays.asList("shy","ccc"));
        ArrayList<String> dogs = new ArrayList<>();
        dogs.add("dog1");
        dogs.add("dog2");
        map.put("dogs", dogs);
        return "test";
    }
2.修改test.html
<!DOCTYPE html>
<html lang="en" xmlns:th="http://www.thymeleaf.org">
<head>
    <meta charset="UTF-8">
    <title>test</title>
</head>
<body>
<h1>测试</h1>
<div th:text="${msg}"></div>
<!--不转义-->
<div th:utext="${msg}"></div>

<!--遍历数据-->
<!--th:each每次遍历都会生成当前这个标签:官网#9-->
<h4 th:each="user :${users}" th:text="${user}"></h4>

<h4>
    <!--行内写法:官网#12-->
    <span th:each="dog:${dogs}">[[${dog}]]</span>
</h4>
</body>
</html>