本文目录:
1、pytest简介
2、pytest框架安装
3、pytest框架规范
4、实例演示
assert常用断言
主函数运行和命令行运行两种运行方式
运行时的常用参数
5、pytest的ini配置文件
6、pytest实现前后置
setup和teardown方法
fixture装饰器
7、使用prams实现参数化
8、使用parametrize装饰器实现数据驱动
pytest简介
pytest是Python的第三方单元测试框架,比自带的unittest更简洁高效
支持315种以上的插件,同时兼容unittest框架
在unittest框架迁移到pytest框架时,不需要重写代码
特点
1.支持简单的单元测试和复杂的功能测试
2.执行测试过程中可以将某些测试跳过,或者对某些预期失败的 case标记成失败
3.支持重复执行失败的 case
4.支持运行由 nose、unittest 编写的测试 case
5.方便的和持续集成工具集成
6.支持参数化(数据驱动)
一、Pytest框架环境搭建
安装pytest,直接使用pip安装即可
pip install pytest
二、Pytest框架约束(规范)
1.文件必须以test_开头或_test结尾
2.测试类必须以Test开头,且不能有__init__方法
3.测试方法必须以test_开头
4.断言使用assert
在执行pytest命令时,会自动从当前目录及子目录中寻找符合上述规范1,2,3条的测试函数,按顺序执行。
assert后边跟布尔表达式,当布尔表达式为真时,则结果符合预期,为假时则返回断言异常-AssertionError
三、实例演示
assert常用断言
assert xx 判断xx为真
assert not xx 判断xx不为真
assert a in b 判断b包含a
assert a == b 判断a等于b
assert a != b 判断a不等于b
import pytest
def fun1(a):#定义一个函数,用来测试
if a<5:
return True
else:
return False
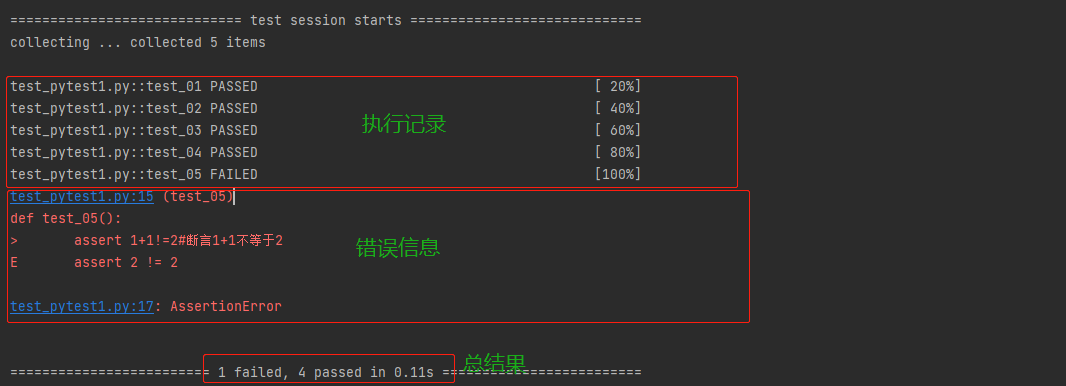
def test_01():
assert fun1(3)#断言fun1(3)为真
def test_02():
assert not fun1(8)#断言fun1(8)为假
def test_03():
list=['a', 'b', 'c']
assert 'a' in list#断言‘a’在列表中
def test_04():
assert 1+1==2#断言1+1等于2
def test_05():
assert 1+1!=2#断言1+1不等于2
if __name__ == '__main__':
pytest.main(['test_pytest1.py'])
#用pytest运行文件,pytest.main(['文件名'])
运行结果
pytest有主函数运行和命令行运行两种运行方式
#主函数运行
pytest.main(['test_pytest1.py'])
#命令行运行
pytest test_pytest1.py
pytest运行时还可以加一些参数,下面介绍一些常用的
'-s':显示打印内容
#主函数运行
pytest.main(['test_pytest1.py'],'-s')
#命令行运行
pytest test_pytest1.py -s
2.'::'两个冒号,指定测试用例运行
#主函数运行
pytest.main(['test_pytest1.py::类名::函数名','-s'])
#命令行运行
pytest test_pytest1.py::类名::函数名 -s
3.–html=路径/report.html:生成xml/html格式测试报告(需要先在本地安装pytest-html)
#主函数运行
pytest.main(['test_pytest1.py::类名::函数名','-s',’–html=./report.html’])
#命令行运行
pytest test_pytest1.py::类名::函数名 -s --html=./report.html
下篇文章会介绍allure库,生成更美观的测试报告,html了解即可
4.–maxfail=n:出现n个失败就终止测试
#主函数运行
pytest.main(['test_pytest1.py::类名::函数名','-s','–maxfail=5'])
#命令行运行
pytest test_pytest1.py::类名::函数名 -s --maxfail=5
5.-n=x:多进程运行(需要先在本地安装pytest-xdist)
这个参数我们写点代码试下效果
#test_pytest1.py
import pytest
import time
def test_01():
    time.sleep(2)#等待2秒
    print('\n正在执行第一条测试用例',end='')
    assert 1 == 1
def test_03():
    time.sleep(2)#等待2秒
    print('\n正在执行第二条测试用例', end='')
    assert 2 ==2
在命令行不加-n参数运行一下
>>>pytest test_pytest1.py -s

加上-n参数再运行试试
>>>pytest test_pytest1.py -s -n=2

由此可见,当执行大量测试用例时,一个简单的-n参数就可以大幅提高执行效率。
5.pytest.main([]),main方法中是传入的一个list格式,list中可以传入多个参数,大家可以根据需要自行了解更多参数的用法。
四、pytest的ini配置文件
pytest.ini文件是pytest的主配置文件,可以改变pytest的默认行为
位置:一般放在项目工程的根目录(即当前项目的顶级文件夹下)
作用:在cmd输入pytest后,会读取pytest.ini中的配置信息,按指定的方式去运行
pytest.ini示例
#pytest.ini
[pytest]
addopts = -s -n=2#可添加多个命令行参数,用空格分隔
testpaths = …/test_pytest1.py#测试用例文件夹,可自己配置
python_files = test*.py
python_classes = Test*
python_funtions = test*
##后三行是pytest运行时搜索文件/类/方法的名称规则,与pytest的命名规范相对应。
在当前项目的根目录配置好pytest.ini文件后 ,我们在命令行输入‘pytest’ 直接运行
>>>pytest

可以看到,pytest确实会按照pytest.ini内的配置去运行。
五、pytest的前后置
pytest框架实现一些前后置的处理,有两种常用的方法
1.通过setup/teardown实现
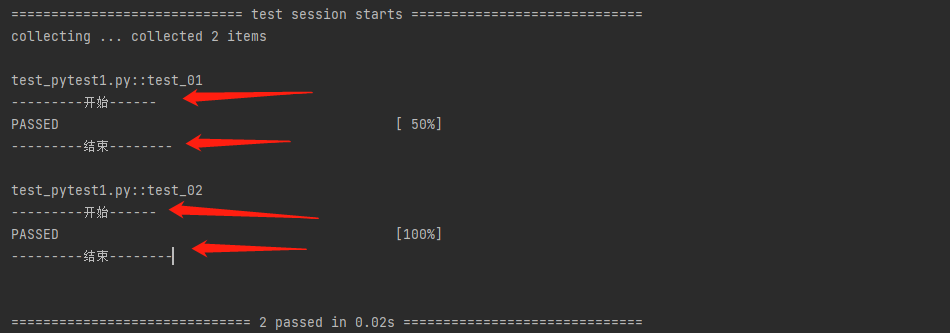
添加setup和teardown方法,作用于每个方法执行前后
我们试一下
import pytest
def setup():
    print('\n---------开始------')
def teardown():
    print('\n---------结束--------')
def test_01():
    assert 1 == 1
def test_02():
    assert 2 ==2
if __name__ == '__main__':
    pytest.main(['test_pytest1.py','-s'])
运行结果
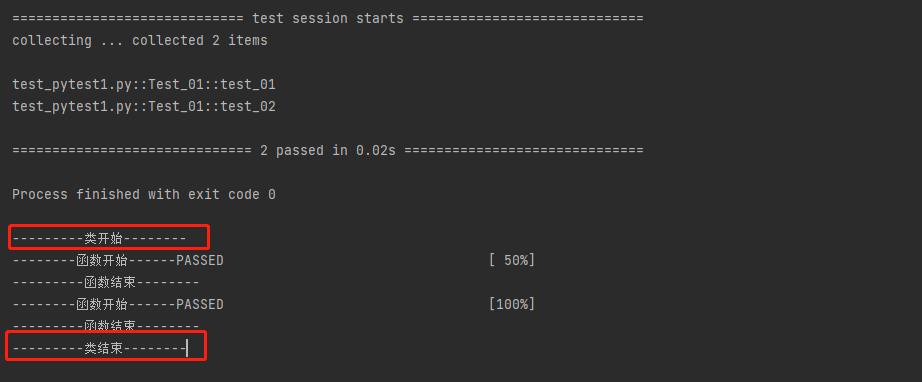
添加setup_class/teardown_class,作用于每个类执行前后
import pytest

class Test_01:
    def setup(self):#方法前置
        print('\n--------函数开始------',end='')
    def teardown(self):#方法后置
        print('\n---------函数结束--------',end='')
    def setup_class(self):#类前置
        print('\n---------类开始--------',end='')
    def teardown_class(self):#类后置
        print('\n---------类结束--------',end='')
    def test_01(self):
        assert 1 == 1
    def test_02(self):
        assert 2 ==2
if __name__ == '__main__':
    pytest.main(['test_pytest1.py','-s'])
运行结果
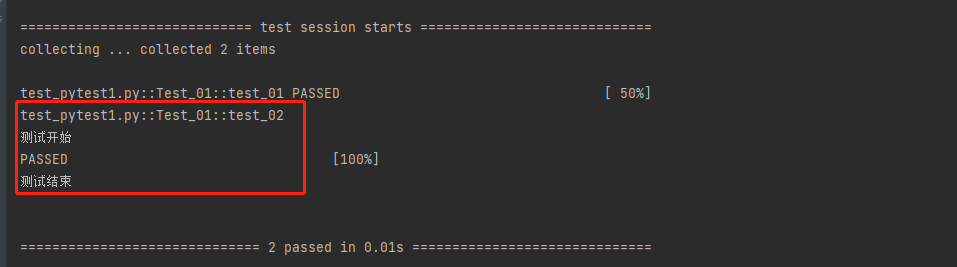
2.使用fixture装饰器实现
用法:
@pytest.fixture(scope=' ',params='',autouse='',ids='',name='')
scope:表示被@pytest.fixture标记的级别(function,缺省值),类(class),模块(module)或包(package/session)
参数解释
params:参数化(支持列表[ ], 元组(),字典列表[{},{}],字典元组({},{},{}))
autouse=True:自动使用,默认值为False
ids:当使用params参数化时,给每个值设置一个变量名
name:表示给被@pytest.fixture标记的函数名取一个别名
示例
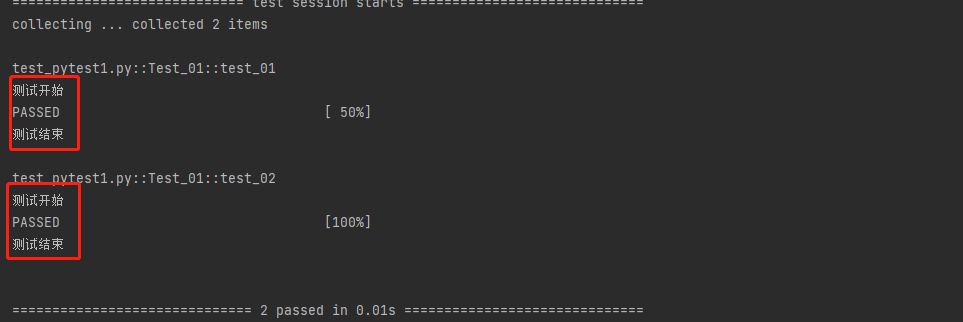
基础用法
import pytest
@pytest.fixture(scope='function',autouse=True)
#声明以下函数是setup函数,作用于方法,并自动使用
def fun():
    print('\n测试开始')
    yield #表示以下代码是teardown的用法
    print('\n测试结束')
class Test_01:
    def test_01(self):
        assert 1 == 1
    def test_02(self):
        assert 2 ==2
if __name__ == '__main__':
    pytest.main(['test_pytest1.py','-s'])
运行结果
如果想指定前后置作用于某个方法,则去掉autouse=True,并在指定方法中传入前后置函数
import pytest
@pytest.fixture(scope='function')
#声明以下函数是setup函数,作用于方法,不自动使用
def fun():
    print('\n测试开始')
    yield #表示以下代码是teardown的用法
    print('\n测试结束')
class Test_01:
    def test_01(self):
        assert 1 == 1
    def test_02(self,fun):
        assert 2 ==2
if __name__ == '__main__':
    pytest.main(['test_pytest1.py','-s'])
运行结果
结果和预期一致,前后置只作用于了指定方法test_02
前后置方法作用于类的话,直接改scope参数的值即可
import pytest
@pytest.fixture(scope='class',autouse=True)
#声明以下函数是setup函数,作用于类,并自动使用
def fun():
    print('\n测试开始')
    yield #表示以下代码是teardown的用法
    print('\n测试结束')
class Test_01:
    def test_01(self):
        assert 1 == 1
    def test_02(self):
        assert 2 == 2
class Test_02:
    def test_03(self):
        assert 3 == 3
if __name__ == '__main__':
    pytest.main(['test_pytest1.py','-s'])
运行结果
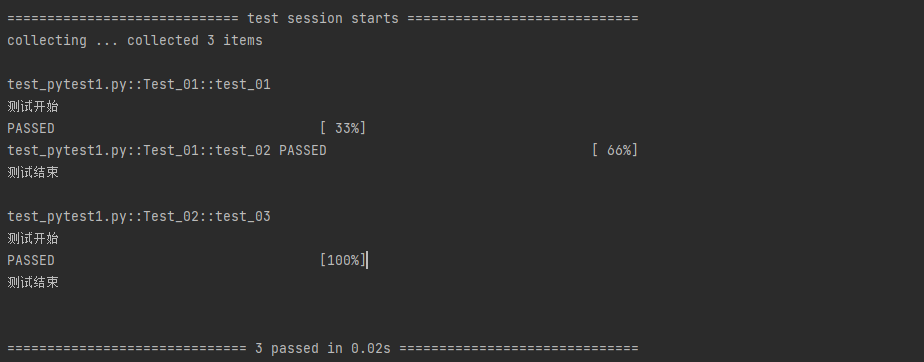
结果和预期一致,前后置作用于了每个类
六、使用prams实现参数化
当 fixture 的 params 参数为 list 时,会执行 ‘list参数长度’ 次测试
import pytest
@pytest.fixture(scope='function',params=[1,2])
#声明以下函数是setup函数,作用于方法
def my_fixture(request):
    return request.param
    #返回params内的值,注意!这的param没有s

class Test_01:
    def test_01(self,my_fixture):)
    #依次传参my_fixture函数的返回值
        assert int(my_fixture) == 1
if __name__ == '__main__':
    pytest.main(['test_pytest1.py','-s'])

可以看到,pytest一共执行了2次测试
第一次传进来的值是1,所以断言通过
第二次传进来的值是2,断言不通过
七、使用parametrize装饰器实现数据驱动
@pytest.mark.parametrize(args_name,args_value)
第一个参数args_name以字符串的形式存在,作为参数来接收测试数据,如果测试数据有多个值,则参数也需要有多个,以逗号分隔
第二个参数,args_value用于保存测试数据。如果只有一组数据,以列表/元组的形式存在,如果有多组数据,以列表嵌套元组(例如:[(1,1), (2,2)])的形式存在
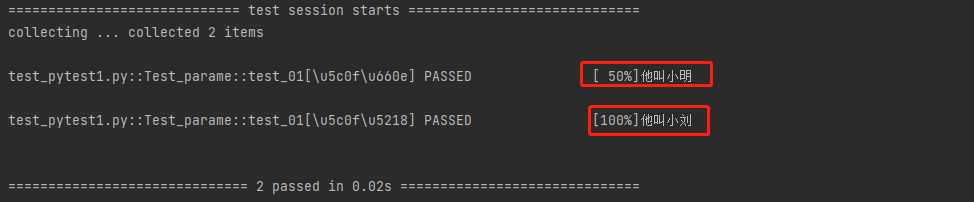
示例1--单数据
import pytest
class Test_parame:
    list = ['小明','小刘']
    @pytest.mark.parametrize('name',list)
    #把list里的值依次传给name
    def test_01(self,name):
        print(f'他叫{name}')

if __name__ == '__main__':
    pytest.main(['test_pytest1.py','-s'])
运行结果
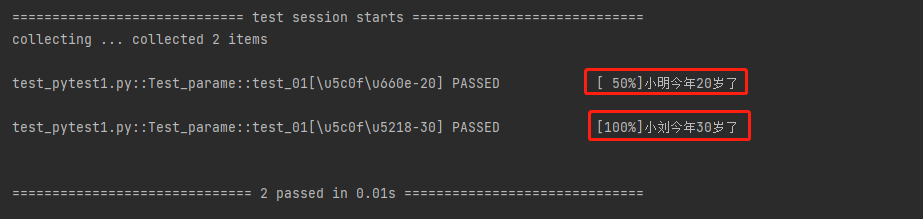
示例2--多数据
import pytest
class Test_parame:
    list = [('小明',20),('小刘',30)]
    @pytest.mark.parametrize('name,age',list)
    #把list里的值依次传给name、age
    def test_01(self,name,age):
        print(f'{name}今年{str(age)}岁了')

if __name__ == '__main__':
    pytest.main(['test_pytest1.py','-s'])
运行结果
下篇预告:pytest配合allure库,生成美观的测试报告。

扫码关注公众号
一起变强