文章目录
场景说明
Tekton实现Webhook的过程和相关对象
为了实现Tekton Webhook需要先在OpenShift运行环境中EventListener。EventListener运行在Pod中,其Service对应的Route地址就是Github中使用的Webhook URL地址。EventListener会将回调参数通过TriggerBinding传给TriggerTemplate,TriggerTemplate再使用自己定义的Pipeline运行CI/CD过程。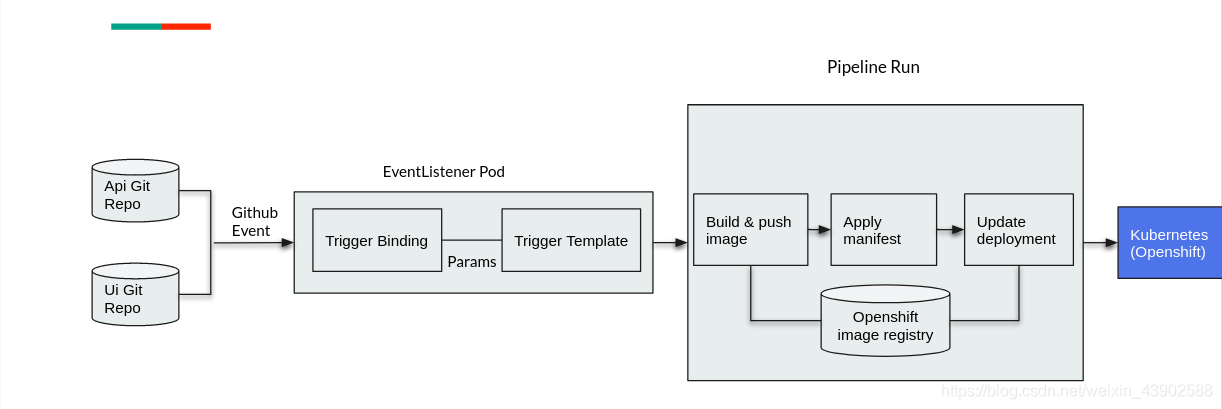
本文的Pipeline场景说明
我们在《OpenShift 4 Tekton (1) - OpenShit Pipeline入门》中的Tekton Pipeline运行需要一次性提供4个Resource,Pipeline会同时并行运行两个Cluster类型的Task(build-api和build-ui),它们分别用来构建应用后端vote-api和应用前端vote-ui。
由于Vote应用分为前端和后端两部分,为了能针对性运行build过程,本文将上文中同时包括前端和后端的Pipeline拆分为两个Pipeline,这样当应用前端代码变化后只会通过Webhook重新build前端vote-ui,后而应用端代码变化后只会通过Webhook重新build后端vote-aip。又由于拆分后的两个Pipeline执行过程都一样,因此我们可以用一个通用的Pipeline代表这一过程,而在执行Pipeline的时候向其传递不同的参数即可。
场景实现
复制Github项目
由于本文需要在Github的Repo中配置Webhook,并且要修改Github中的应用代码(为了查看修改代码后重新部署的应用),然后再通过commit操作才能触发Webhook的事件,因此需要将在《OpenShift 4 Tekton (1) - OpenShit Pipeline入门》中使用到的以下Github Repo资源Clone到自己的Github账号中。
- https://github.com/liuxiaoyu-git/vote-api
- https://github.com/liuxiaoyu-git/vote-ui
对pipelines-tutorial项目的操作
如果以前没有根据《OpenShift 4 Tekton (1) - OpenShit Pipeline入门》一文操作过,那么需要新建pipelines-tutorial项目。
$ oc new-project pipelines-tutorial
如果以前已经完成了《OpenShift 4 Tekton (1) - OpenShit Pipeline入门》,那么需执行该文中“清除环境”一节的命令,以便清除pipelines-tutorial项目中的所有对象。
创建Pipeline,然后直接运行Pipeline
- 执行命令,分别创建Pipeline对象、Task对象。
$ oc create -f https://raw.githubusercontent.com/liuxiaoyu-git/pipelines-tutorial/master/01_pipeline/01_apply_manifest_task.yaml
$ oc create -f https://raw.githubusercontent.com/liuxiaoyu-git/pipelines-tutorial/master/01_pipeline/02_update_deployment_task.yaml
$ oc create -f https://raw.githubusercontent.com/liuxiaoyu-git/pipelines-tutorial/master/01_pipeline/04_pipeline.yaml
$ oc create -f https://raw.githubusercontent.com/liuxiaoyu-git/pipelines-tutorial/master/01_pipeline/03_resources.yaml
- 由于原有03_resources.yaml文件中定义两个Git类型PipelineResource使用的是本人的Github,因此可以先删除它们,然后再手动创建者两个Git类型的PipelineResource。
$ tkn resource delete api-repo
$ tkn resource delete ui-repo

$ tkn resource create
? Enter a name for a pipeline resource : api-repo
? Select a resource type to create : git
? Enter a value for url :  http://github.com/<YOUR-GIT>/vote-api.git
? Enter a value for revision :

? Enter a name for a pipeline resource : ui-repo
? Select a resource type to create : git
? Enter a value for url :  http://github.com/<YOUR-GIT>/vote-ui.git
? Enter a value for revision :

$ tkn resource list
NAME        TYPE    DETAILS
api-repo    git     url: http://github.com/<YOUR-GIT>/vote-api.git
ui-repo     git     url: http://github.com/<YOUR-GIT>/vote-ui.git
api-image   image   url: image-registry.openshift-image-registry.svc:5000/pipelines-tutorial/vote-api:latest
ui-image    image   url: image-registry.openshift-image-registry.svc:5000/pipelines-tutorial/vote-ui:latest
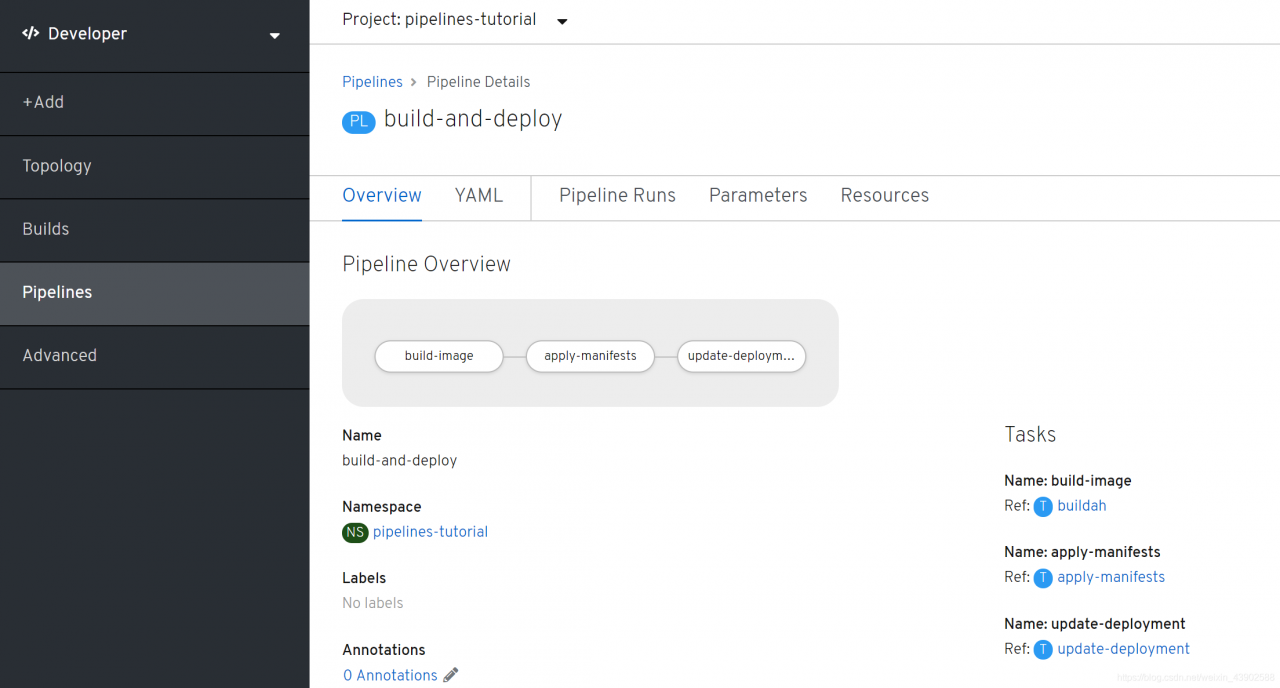
- 在OpenShift Console的Developer视图中查看名为build-and-deploy的通用Pipeline。
- 执行命令,运行Pipeline分别构建并部署vote-api和vote-ui。
$ tkn pipeline start build-and-deploy \
    -r git-repo=api-repo \
    -r image=api-image \
    -p deployment-name=vote-api
$ tkn pipeline start build-and-deploy \
    -r git-repo=ui-repo \
    -r image=ui-image \
    -p deployment-name=vote-ui

$ tkn pipelinerun list
NAME                         STARTED          DURATION   STATUS
build-and-deploy-run-drwxr   23 seconds ago   ---        Running
build-and-deploy-run-6rqvf   1 minute ago     ---        Running
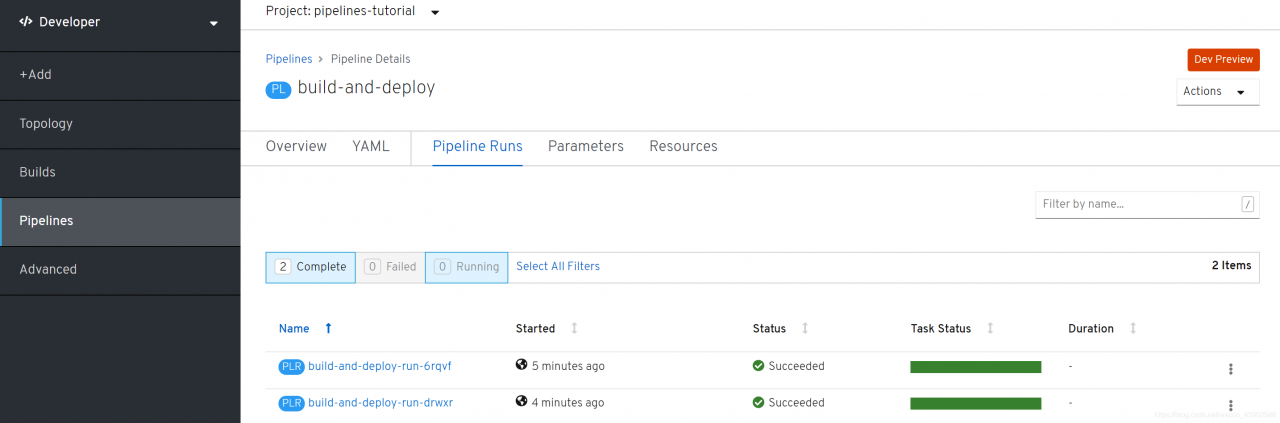
- 可以OpenShift Console的Developer视图中查看两个build-and-deploy的PipelineRun运行情况。
- 执行命令,为vote-ui创建Route,然后用浏览器访问Route地址可以看到Vote应用界面。
$ oc expose svc vote-ui
$ oc get route vote-ui
NAME      HOST/PORT                                                                               PATH   SERVICES   PORT       TERMINATION   WILDCARD
vote-ui   vote-ui-pipelines-tutorial.apps.cluster-beijing-e9fd.beijing-e9fd.example.opentlc.com          vote-ui    8080-tcp                 None
配置Webhook,然后通过Webhook运行Pipeline
- 执行命令依次创建Webhook需要的TriggerTemplate、TriggerBinding、EventListener对象。
$ oc create -f https://raw.githubusercontent.com/liuxiaoyu-git/pipelines-tutorial/master/03_triggers/02_template.yaml
$ oc create -f https://raw.githubusercontent.com/liuxiaoyu-git/pipelines-tutorial/master/03_triggers/01_binding.yaml
$ oc create -f https://raw.githubusercontent.com/liuxiaoyu-git/pipelines-tutorial/master/03_triggers/03_event_listener.yaml
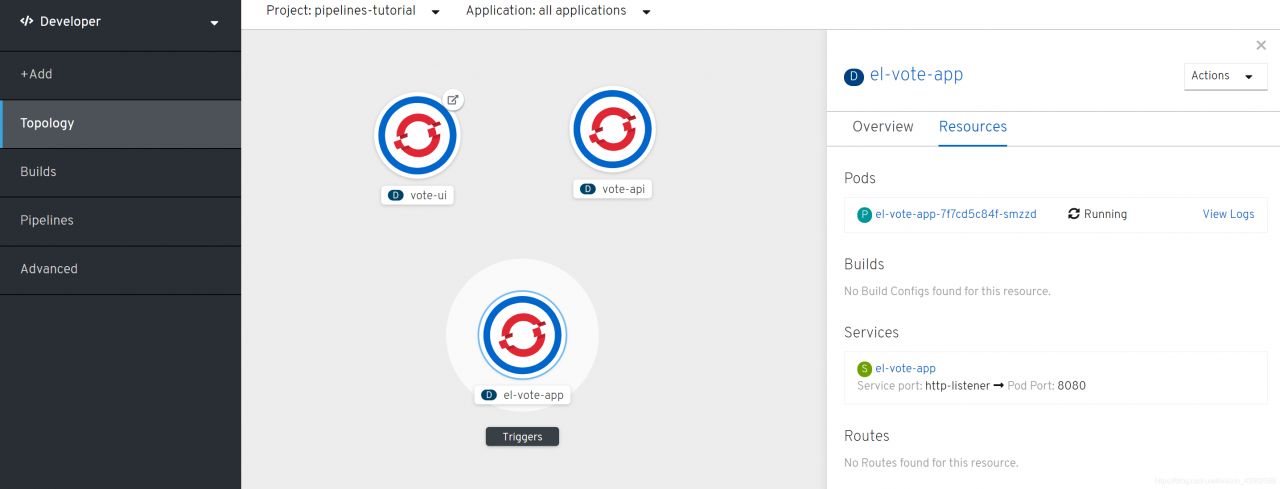
- 可以OpenShift Console的Developer视图中的Topology中看到名为el-vote-app的Deployment就是EventListener对象的体现。
- 根据名为的el-vote-app的Service创建Route,然后查看Route的访问地址。
$ oc expose svc el-vote-app
$ oc  get route el-vote-app
NAME          HOST/PORT                                                                                   PATH   SERVICES      PORT            TERMINATION   WILDCARD
el-vote-app   el-vote-app-pipelines-tutorial.apps.cluster-beijing-e9fd.beijing-e9fd.example.opentlc.com          el-vote-app   http-listener                 None
- 分别进入自己的Github账号中的以下两个Repo。
https://github.com/<YOUR-GIT>/vote-ui.git
https://github.com/<YOUR-GIT>/vote-api.git
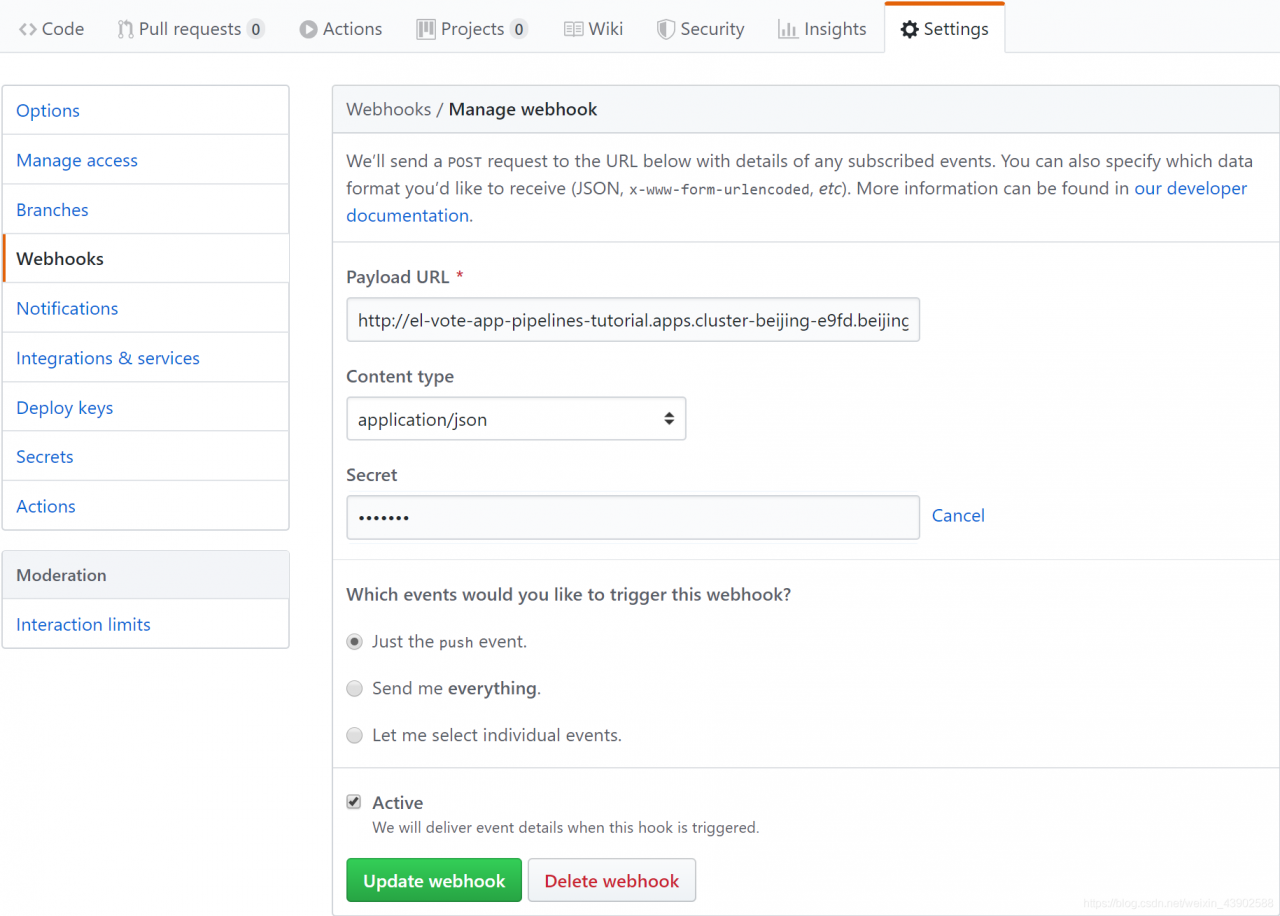
在每个Repo中的Setting中的Webhooks中各自创用以下配置建一个webhook。
Payload URL:(3)步获得的Route地址
Content Type:application/json
Scret:1234567
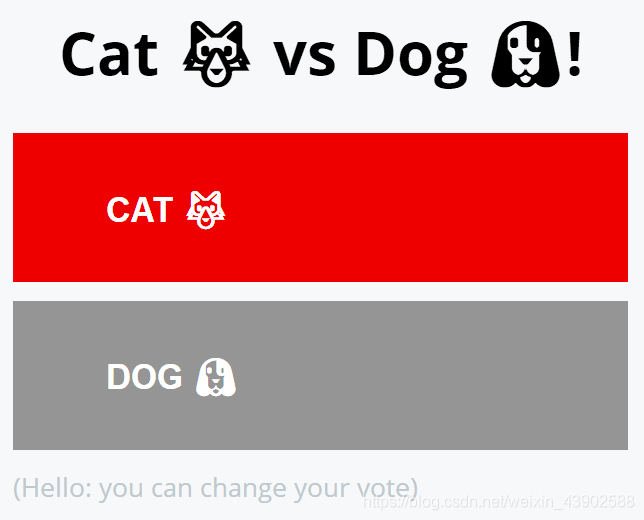
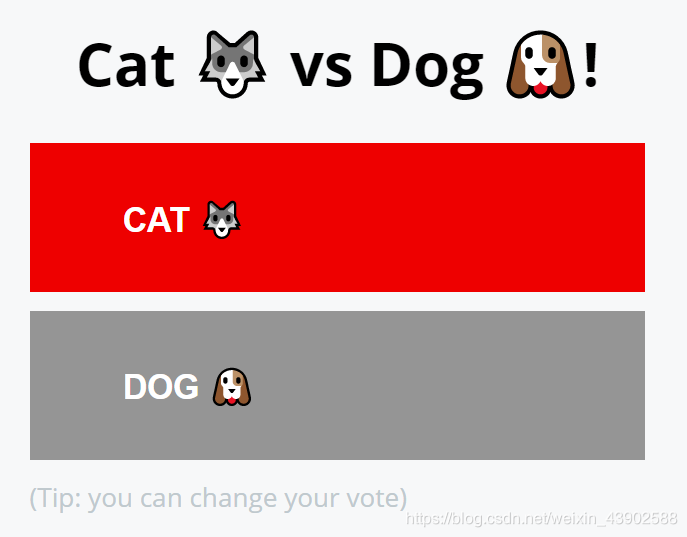
5. 修改https://github.com//vote-ui/blob/master/templates/index.html文件中以下部分中的“(Tip: you can change your vote)”,将之改为“(Hello: you can change your vote)”。然后提交修改。
        <div id="tip">
          (Tip: you can change your vote)
        </div>
        <div id="result">
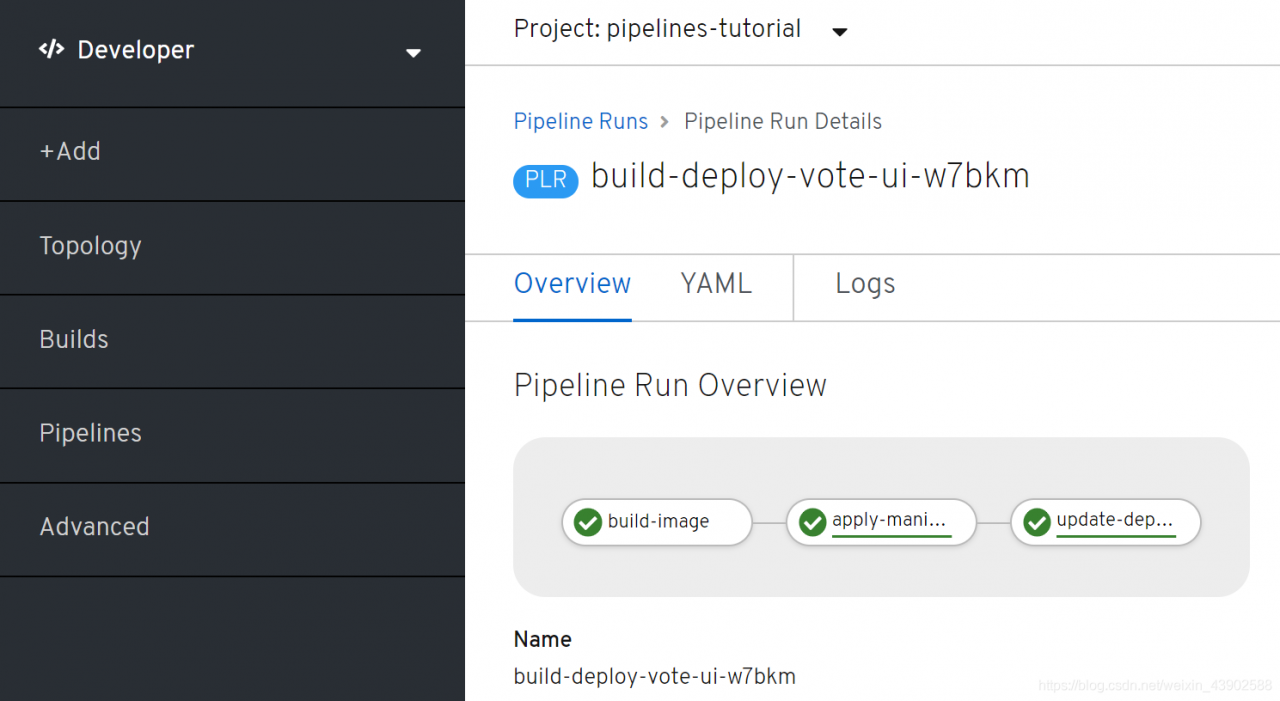
- 在OpenShift Console的Developer视图中查看build-deploy-vote-ui的PipelineRun,以及相关日志。
- 在PipelineRun完成运行后,再次访问Vote应用Route,确认Vote应用界面已经更新了(变为“Hello: you can change your vote”)。