环境准备
Python版本控制-3.7.5
此处采用pyenv来创建MindSpore环境,首先查看是否有3.7.5版本:
pyenv versions
CUDA-10.1
尝试过直接使用CUDA10.2,但是在运行from mindspore import Tensor时会出现ImportError: libcudart.so.10.1: cannot open shared object file: No such file or directory。所以还是要安装CUDA10.1。
首先进入官网根据系统版本进行选择:https://developer.nvidia.com/cuda-10.1-download-archive-update2?target_os=Linux&target_arch=x86_64&target_distro=Ubuntu&target_version=1804&target_type=runfilelocal,
因为是非管理员账户,所以要下载update2的,否则无法自定义目录
wget https://developer.download.nvidia.com/compute/cuda/10.1/Prod/local_installers/cuda_10.1.243_418.87.00_linux.run
运行文件:
sh cuda_10.1.243_418.87.00_linux.run
接受协议:

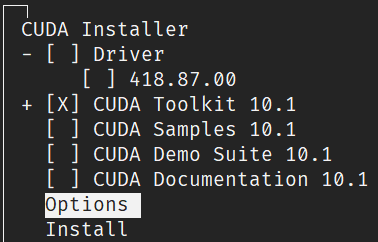
安装选项暂时只选Toolkit:
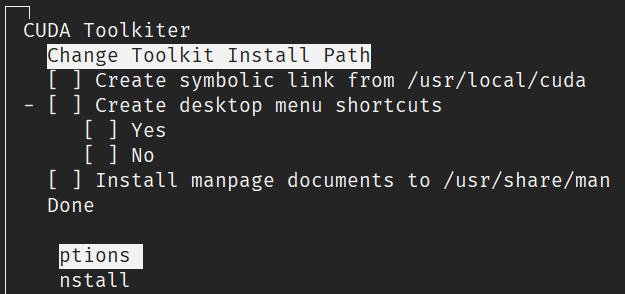
然后进入Options进行,更改安装路径:
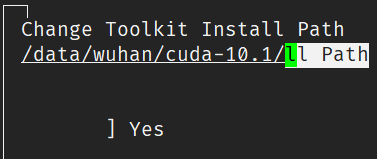
改为事先建立好的CUDA目录:
然后Done,回到Option选项下选择Library install path的设置:
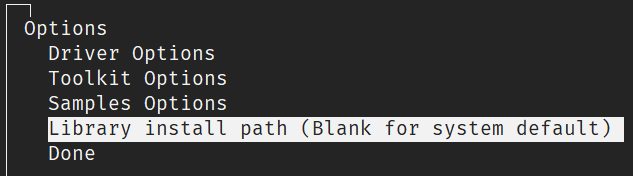
更改为事先创建好的路径:

然后Done-Install进行安装。
安装完成,会看到如下提示,将路径添加到用户的环境变量中:

vim ~/.bash_profile
更改如下两行:
export PATH="/data/wuhan/cuda-10.1/bin:$PATH"
export LD_LIBRARY_PATH="/data/wuhan/cuda-10.1/lib64:/data/wuhan/cuda-10.1/mylib/lib64:$LD_LIBRARY_PATH"
更新配置文件使生效:
source ~/.bash_profile
然后测试安装结果,运行
nvcc -V
nvcc: NVIDIA ® Cuda compiler driver
Copyright © 2005-2019 NVIDIA Corporation
Built on Sun_Jul_28_19:07:16_PDT_2019
Cuda compilation tools, release 10.1, V10.1.243
看到如上版本号中是10.1,则说明安装成功。
GCC-7.3.0
此项目前用7.5.0没有出现问题,暂且为非必须项。
cnDNN-7.6.X
从官网下载安装包:https://developer.nvidia.com/rdp/cudnn-archive
上传到服务器上,运行如下命令进行解压:
tar -zxvf cudnn-10.1-linux-x64-v7.6.5.32.tgz
进入目录:
cd cuda
将头文件及lib库复制到cuda目录下,并赋予所有用户读的权限:
cp ./include/cudnn.h ../cuda-10.1/include
cp ./lib64/libcudnn* ../cuda-10.1/lib
chmod a+r ../cuda-10.1/include/cudnn.h ../cuda-10.1/lib64/libcudnn*
查看cuDNN版本进行验证:
cat ../cuda-10.1/include/cudnn.h | grep CUDNN_MAJOR -A 2
#define CUDNN_MAJOR 7
#define CUDNN_MINOR 6
#define CUDNN_PATCHLEVEL 5
可以看到已经安装了7.6.5版本的cuDNN。
gmp-6.1.2
The GNU Multiple Precision Arithmetic Library. 多精度的算法库,目前来看应该是用于计算加速的。
通过源码安装在执行./configure时,出现了m4未安装的错误,所以首先安装m4。
m4:非管理员还是通过源码进行安装,首先下载安装包并解压:
wget http://mirrors.kernel.org/gnu/m4/m4-1.4.18.tar.gz && tar -xzvf m4-1.4.18.tar.gz
cd m4-1.4.18/
./configure --prefix=/data/wuhan/install/m4-1.4.18/
make
make install
更新用户配置文件:
vim ~/.bash_profile
在打开的文件中添加如下:
export PATH="/data/wuhan/install/m4-1.4.18/bin:$PATH"
使配置文件生效:
source ~/.bash_profile
gmp:重新进行gmp的安装,进入gmp源码目录,运行配置命令:
./configure --prefix=/data/wuhan/install/gmp-6.1.2/
编译安装:
make
make install
将路径添加到配置文件中,方法参考上述源码安装软件包的流程,在此不做赘述。
其他
关于OpenMPI和NCCL和多卡训练相关的暂时未安装,后续补充。
安装
根据系统配置选择安装命令:
pip install https://ms-release.obs.cn-north-4.myhuaweicloud.com/1.0.1/MindSpore/gpu/ubuntu_x86/cuda-10.1/mindspore_gpu-1.0.1-cp37-cp37m-linux_x86_64.whl --trusted-host ms-release.obs.cn-north-4.myhuaweicloud.com -i https://pypi.tuna.tsinghua.edu.cn/simple
测试
import numpy as np
from mindspore import Tensor
import mindspore.ops as ops
import mindspore.context as context

context.set_context(device_target="GPU")
x = Tensor(np.ones([1,3,3,4]).astype(np.float32))
y = Tensor(np.ones([1,3,3,4]).astype(np.float32))
print(ops.tensor_add(x, y))
# 打印出如下结果,说明安装成功(不过不知道为什么输出这个结果没有想象中快)
[[[[2. 2. 2. 2.]
   [2. 2. 2. 2.]
   [2. 2. 2. 2.]]

  [[2. 2. 2. 2.]
   [2. 2. 2. 2.]
   [2. 2. 2. 2.]]

  [[2. 2. 2. 2.]
   [2. 2. 2. 2.]
   [2. 2. 2. 2.]]]]
Reference
https://www.mindspore.cn/install