Hive
hive部署
hive安装
解压
tar -zxvf apache-hive-1.2.1-bin.tar.gz -C /opt/Module/
重命名
mv /opt/Module/apache-hive-1.2.1-bin/ /opt/Module/hive
配置环境变量
vim /etc/profile

export HIVE_HOME=/opt/Module/hive3.1.2
export PATH=$PATH:$HIVE_HOME/bin
生效环境变量: source /etc/profile
解决日志 Jar 包冲突
mv /lib/log4j-slf4j-impl2.10.0.jar /lib/log4j-slf4j-impl-2.10.0.bak
修改hive/conf 目录下的 hive-env.sh.template 名称为 hive-env.sh,并配置
cp hive-env.sh.template ./hive-env.sh

(a)配置 HADOOP_HOME 路径
	HADOOP_HOME=/opt/Module/hadoop-3.1.3
(b)配置 HIVE_CONF_DIR 路径
	export HIVE_CONF_DIR=/opt/Module/hive/conf
Hadoop 集群配置
必须启动 hdfs 和 yarn
sbin/start-dfs.sh
sbin/start-yarn.sh
Hive 基本操作
(0)初始化元数据库
bin/schematool -dbType derby -initSchema
(1)启动 hive
bin/hive
(2)查看数据库
hive> show databases;
(3)打开默认数据库
hive> use default;
(4)显示 default 数据库中的表
hive> show tables;
(5)创建一张表
hive> create table student(id int, name string);
(6)显示数据库中有几张表
hive> show tables;
(7)查看表的结构
hive> desc student;
(8)向表中插入数据
hive> insert into student values(1000,"ss");
(9)查询表中数据
hive> select * from student;
(10)退出 hive
hive> quit;
此时hive已经可以单节点使用了,但不能再开启再多的hive服务了,原因在于Hive默认使用的元数据库为derby,开启Hive之后就会占用元数据库,且不与
其他客户端共享数据,所以我们需要将 Hive 的元数据地址改为 MySQL。
单客户端使用Hive
hive的元数据默认存储在 HDFS上的/user/hive/warehouse
 启动并使用 Hive

 1)启动 Hive
[atguigu@hadoop102 hive]$ bin/hive
2)使用 Hive
hive> show databases;
hive> show tables;
hive> create table test(id int);
hive> insert into test values(1);
hive> select * from test;
在Xshell窗口中开启另一个窗口开启 Hive,报错。
原因在于 Hive 默认使用的元数据库为 derby,开启 Hive 之后就会占用元数据库,且不与其他客户端共享数据,所以我们需要将Hive的元数据地址改为 MySQL。
监控hive.log文件
在Xshell窗口中开启另一个窗口开启Hive,在/tmp/atguigu 目录下监控 hive.log 文件
mysql安装
(1)检查当前系统是否安装过 MySQL
rpm -qa|grep mariadb
//如果存在通过如下命令卸载
rpm -e --nodeps mariadb-libs
(2)将 MySQL 安装包拷贝到指定的安装目录下
cp mysql-5.7.35-1.el7.x86_64.rpm-bundle.tar /opt/Module/MySQL/
(3)解压 MySQL 安装包
tar -xf mysql-5.7.35-1.el7.x86_64.rpm-bundle.tar
(4)在安装目录下执行 rpm 安装
rpm -ivh mysql-community-common-5.7.28-1.el7.x86_64.rpm
rpm -ivh mysql-community-libs-5.7.28-1.el7.x86_64.rpm
rpm -ivh mysql-community-libs-compat-5.7.28-1.el7.x86_64.rpm
rpm -ivh mysql-community-client-5.7.28-1.el7.x86_64.rpm
rpm -ivh mysql-community-server-5.7.28-1.el7.x86_64.rpm
注意:按照顺序依次执行
如果 Linux 是最小化安装的,在安装 mysql-community-server-5.7.28-1.el7.x86_64.rpm 时可能会出现如下错误:
		[atguigu@hadoop102 software]$ sudo rpm -ivh mysql-community-server5.7.28-1.el7.x86_64.rpm
		警告:mysql-community-server-5.7.28-1.el7.x86_64.rpm: 头 V3 DSA/SHA1Signature, 密钥 ID 5072e1f5: NOKEY
		错误:依赖检测失败:
			 libaio.so.1()(64bit) 被 mysql-community-server-5.7.28-1.el7.x86_64需要
			 libaio.so.1(LIBAIO_0.1)(64bit) 被 mysql-community-server-5.7.28-1.el7.x86_64 需要
			 libaio.so.1(LIBAIO_0.4)(64bit) 被 mysql-community-server-5.7.28-1.el7.x86_64 需要
			 解决方案: 通过 yum 安装缺少的依赖,然后重新安装 mysql-community-server-5.7.28-1.el7.x86_64 即可
			 yum install -y libaio
(5)删除/etc/my.cnf 文件中 datadir 指向的目录下的所有内容,如果有内容的情况下:
vim /etc/my.cnf 查得: datadir=/var/lib/mysql
删除/var/lib/mysql 目录下的所有内容:
cd /var/lib/mysql
rm -rf ./*
(6)初始化数据库
mysqld --initialize --user=mysql
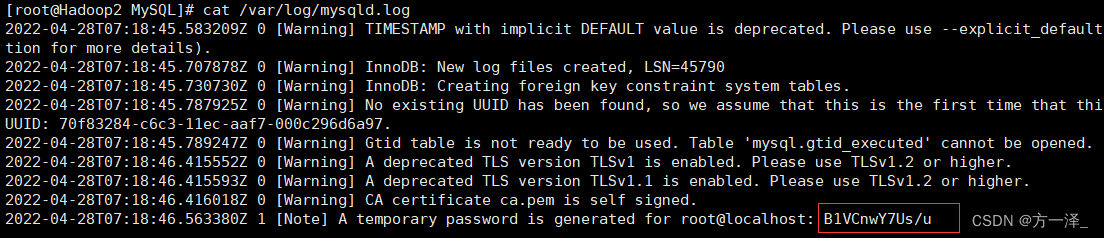
(7)查看临时生成的 root 用户的密码
cat /var/log/mysqld.log
(8)启动 MySQL 服务
systemctl start mysqld
(9)登录 MySQL 数据库
mysql -uroot -p
Enter password: 输入临时生成的密码
(10)必须先修改 root 用户的密码,否则执行其他的操作会报错
mysql> set password = password("新密码");
(11)修改 mysql 库下的 user 表中的 root 用户允许任意 ip 连接
mysql> update mysql.user set host='%' where user='root';
mysql> flush privileges;
将hive元数据配置到MySQL
(1) 拷贝驱动
将MySQL的JDBC驱动拷贝到Hive的lib目录下
cp mysql-connector-java-5.1.7-bin.jar /opt/Module/hive3.1.2/lib/
(2) 在$HIVE_HOME/conf 目录下新建 hive-site.xml 文件
vim $HIVE_HOME/conf/hive-site.xml
添加如下内容
<?xml version="1.0"?>
<?xml-stylesheet type="text/xsl" href="configuration.xsl"?>
<configuration>
 <!-- jdbc 连接的 URL -->
 <property>
 <name>javax.jdo.option.ConnectionURL</name>
 <value>jdbc:mysql://Hadoop2:3306/metastore?useSSL=false</value>
</property>
 <!-- jdbc 连接的 Driver-->
 <property>
 <name>javax.jdo.option.ConnectionDriverName</name>
 <value>com.mysql.jdbc.Driver</value>
</property>
<!-- jdbc 连接的 username-->
 <property>
 <name>javax.jdo.option.ConnectionUserName</name>
 <value>root</value>
 </property>
 <!-- jdbc 连接的 password -->
 <property>
 <name>javax.jdo.option.ConnectionPassword</name>
 <value>021216</value>
</property>
 <!-- Hive 元数据存储版本的验证 -->
 <property>
 <name>hive.metastore.schema.verification</name>
 <value>false</value>
</property>
 <!--元数据存储授权-->
 <property>
 <name>hive.metastore.event.db.notification.api.auth</name>
 <value>false</value>
 </property>
 <!-- Hive 默认在 HDFS 的工作目录 -->
 <property>
 <name>hive.metastore.warehouse.dir</name>
 <value>/user/hive/warehouse</value>
 </property>
</configuration>
(3) 登陆MySQL
mysql -uroot -p123456
(4) 新建Hive元数据库
mysql> create database metastore;
mysql> quit;
(5) 初始化Hive元数据库
schematool -initSchema -dbType mysql -verbose
再次启动 Hive
(1) 启动 Hive
[atguigu@hadoop102 hive]$ bin/hive
(2)使用 Hive
hive> show databases;
hive> show tables;
hive> create table test (id int);
hive> insert into test values(1);
hive> select * from test;
(3) 在 Xshell 窗口中开启另一个窗口开启 Hive
hive> show databases;
hive> show tables;
hive> select * from aa;
多客户端使用hive
在Hadoop2上操作hive
show databases;
create database hive_db ;
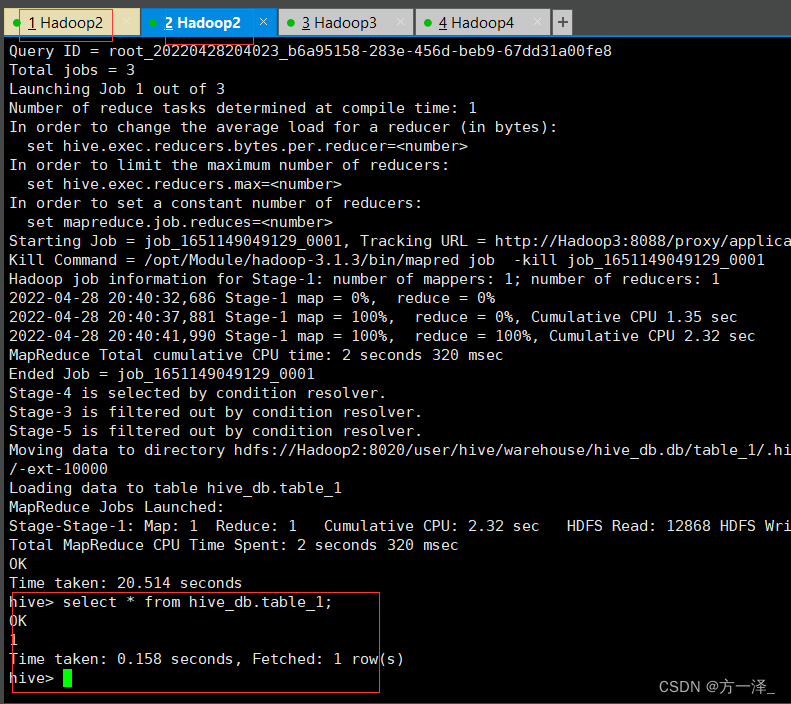
再通过Xshell开启另一个窗口连接Hadoop2,开启hive,执行以下操作
use hive_db;
create table table_1(id int);
insert into table_1 values (1);
select * from hive_db.table_1;
开启元数据服务的方式访问Hive
配置了此方式后,可在第三方工具如idea等,通过配置的端口号访问hive。
(1)在 hive-site.xml 文件中添加如下配置信息
<!-- 指定存储元数据要连接的地址 -->
 <property>
 <name>hive.metastore.uris</name>
 <value>thrift://hadoop102:9083</value>
 </property>
(2)启动 metastore (元数据服务)
[atguigu@hadoop202 hive]$ hive --service metastore
效果: 2020-04-24 16:58:08: Starting Hive Metastore Server
注意: 启动后窗口不能再操作,需打开一个新的 shell 窗口做别的操作
前台启动的方式导致需要打开多个shell窗口,可以使用如下方式后台方式启动:
        nohup hive --service metastore 2>&1 &
nohup: 放在命令开头,表示不挂起,也就是关闭终端进程也继续保持运行状态
2>&1 : 表示将错误重定向到标准输出上
&: 放在命令结尾,表示后台运行
(3)启动 hive
[atguigu@hadoop202 hive]$ bin/hive
注意点
一旦配置了元数据服务的连接端口号,就必须先开启元数据服务才能访问hive, 否则报错:
hive> show databases;
效果: FAILED: HiveException java.lang.RuntimeException: Unable to instantiate org.apache.hadoop.hive.ql.metadata.SessionHiveMetaStoreClient
使用 JDBC 方式访问Hive
(1)在 hive-site.xml 文件中添加如下配置信息
<!-- 指定hiveserver2连接的host(主人)-->
 <property>
 <name>hive.server2.thrift.bind.host</name>
 <value>Hadoop2</value>
 </property>
 <!-- 指定hiveserver2连接的端口号-->
 <property>
 <name>hive.server2.thrift.port</name>
 <value>10000</value>
 </property>
(2)启动 hiveserver2服务 (启动后需要多等待一会)
启动方式一:
bin/hiveserver2
启动方式二:
bin/hive --service hiveserver2

查看hiveservice2(10000)是否被占用,以判断服务是否起来
netstat -anop|grep 10000
杀死命令: kill -9 端口号
(3)启动 beeline 客户端
bin/beeline -u jdbc:hive2://hadoop102:10000 -n atguigu
(4)看到如下界面,成功
Connecting to jdbc:hive2://hadoop102:10000
Connected to: Apache Hive (version 3.1.2)
Driver: Hive JDBC (version 3.1.2)
Transaction isolation: TRANSACTION_REPEATABLE_READ
Beeline version 3.1.2 by Apache Hive
0: jdbc:hive2://hadoop102:10000>
注意点
hiveserver2是依赖于metatore(元数据服务)的,所以要先启动metatore服务。
Hive 常用交互命令
bin/hive -help

“-e”不进入 hive 的交互窗口执行 sql 语句
    bin/hive -e "select id from student;"
“-f”执行脚本中sql语句
	(1)在/opt/module/hive/下创建datas目录并在datas目录下创建hivef.sql 文件
		touch hivef.sql
	(2)文件中写入正确的 sql 语句
		select *from student;
	(3)执行文件中的sql语句
		 bin/hive -f /opt/module/hive/datas/hivef.sql
		执行文件中的sql语句并将结果写入文件中
		 bin/hive -f /opt/module/hive/datas/hivef.sql >/opt/module/datas/hive_result.txt

在hive cli 命令窗口中如何查看hdfs文件系统
  hive(default)>dfs -ls /;

查看在 hive 中输入的所有历史命令
  ①进入到 “/root” 目录下或者"/home/user(你的用户名)"目录下
  ②执行 “cat .hivehistory” 命令
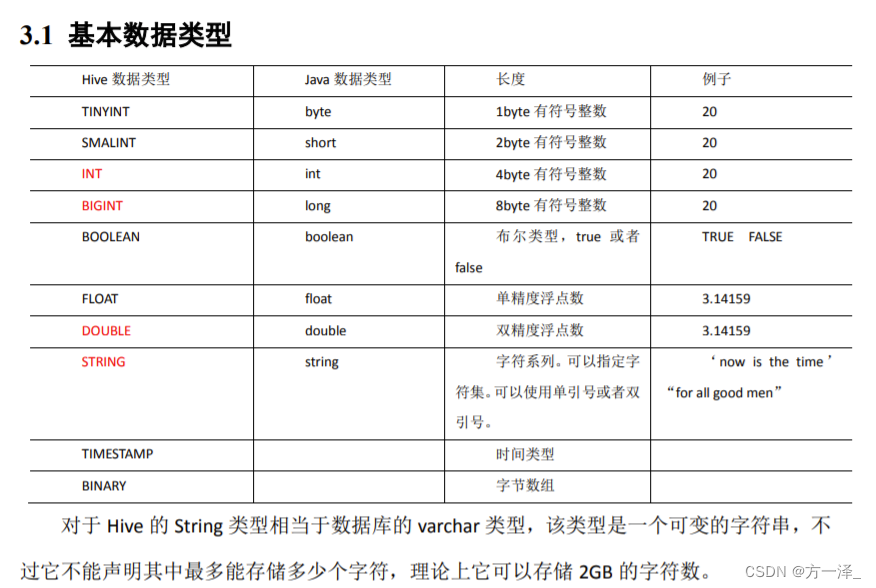
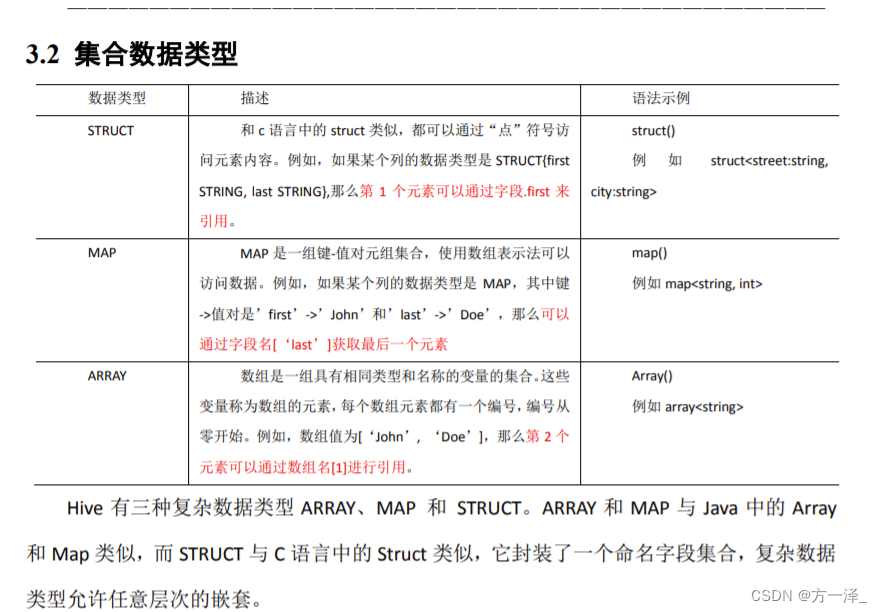
Hive 数据类型
操作实例
创建一张表,用JSON格式来表示其数据结构为:
{
 "name": "songsong",
 "friends": ["bingbing" , "lili"] , //列表 Array,
 "children": { //键值 Map,
 "xiao song": 18 ,
 "xiaoxiao song": 19
 }
 "address": { //结构 Struct,
 "street": "hui long guan",
 "city": "beijing"
 }
}
hiv语句:
hive (hive_db)> create table JOSN_table001(name string,friends array<string>,children map<string,int>,address struct<street:string,city:string>)
              > row format delimited fields terminated by ','
              > collection items terminated by '_'
              > map keys terminated by ':'
              > lines terminated by '\n';
直接从hdfs中put数据:
现有文件 JSON.text:
songsong,bingbing_lili,xiao song:18_xiaoxiao song:19,hui long guan_beijing
yangyang,caicai_susu,xiao yang:18_xiaoxiao yang:19,chao yang_beijing
hdfs语句:
[root@Hadoop2 datas]# hadoop fs -put ./JSON.text /user/hive/warehouse/hive_db.db/josn_table001
hive语句:
select name,friends[1],children['xiao yang'],address.city from josn_table001 where name like 'songsong' ;

字段解释:
row format delimited fields terminated by ','  列分隔符
collection items terminated by '_'  MAP、STRUCT、ARRAY的分隔符(数据分割符号)
map keys terminated by ':'     	    MAP中的key与value的分隔符
lines terminated by '\n';		    行分隔符

select * from hive_db.josn_table001;
josn_table001.name	josn_table001.friends	josn_table001.children	josn_table001.address
songsong	["bingbing","lili"]	{"xiao song":18,"xiaoxiao song":19}	{"street":"hui long guan","city":"beijing"}
yangyang	["caicai","susu"]	{"xiao yang":18,"xiaoxiao yang":19}	{"street":"chao yang","city":"beijing"}
DDL 数据定义
创建数据库
创建数据库,指定数据库在 HDFS 上存放的位置
create database if not exists hive5 location '/hive5';
显示数据库
show databases like 'h*';
显示数据库详细信息
desc database extended hive_db;
修改数据库
alter database hive3 set dbproperties('createtime'='20170201');
强制删除数据库
drop database hive3 cascade;
创建表
EXTERNAL external外部表
create external table emp3(id string);
删除内部表,元数据和数据一起删除,外部表只删除元数据,不删除数据。

管理表与外部表互转
alter table emp3 set tblproperties('EXTERNAL'='FALSE');
alter table emp3 set tblproperties('EXTERNAL'='TRUE');

查看表详细结构信息
desc formatted emp3;

创建分区表
create external table bb (name string,count1 string,count2 string) partitioned by(day string) row format delimited fields terminated by '\t';

传入数据
load data local inpath '/opt/Module/sqlData/user2.txt' into table bb partition(day='1');

查看分区数据
select * from bb where day='2' or day='1';
select * from bb where day='2' union select * from bb where day='1';

增加分区
alter table bb add partition (day='4') partition (day='5') ;

删除分区
alter table bb drop partition (day='4'), partition (day='5');

查看分区表有多少分区
show partitions bb;

创建二级分区表
create external table dd (name string,count1 string,count2 string) partitioned by (month string,day string) row format delimited fields terminated by '\t';

增加二级分区
alter table dd add partition (month='2022-05',day='02');

加载数据到二级分区表
load data local inpath '/opt/Module/sqlData/user2.txt' into table dd partition(month='2020-05',day='02');

或hadoop fs -put ./user2.txt /user/hive/warehouse/hive_db.db/dd/month=2020-05/day=02

分区表和数据产生关联的三种方式
方式一:上传数据后修复
	dfs -mkdir -p /user/hive/warehouse/mydb.db/dept_partition2/day=20200401/hour=13;
	dfs -put /opt/module/datas/dept_20200401.log /user/hive/warehouse/mydb.db/dept_partition2/day=20200401/hour=13;
	查询数据(查询不到刚上传的数据)
	select * from dept_partition2 where day='20200401' and hour='13';
	执行修复命令
	msck repair table dept_partition2;
方式二:上传数据后添加分区
	 dfs -mkdir -p /user/hive/warehouse/mydb.db/dept_partition2/day=20200401/hour=14;
	 dfs -put /opt/module/hive/datas/dept_20200401.log /user/hive/warehouse/mydb.db/dept_partition2/day=20200401/hour=14;
	 执行添加分区
	 alter table dept_partition2 add partition(day='201709',hour='14');
方式三:创建文件夹后load数据到分区
	  dfs -mkdir -p /user/hive/warehouse/mydb.db/dept_partition2/day=20200401/hour=15;
	  load data local inpath '/opt/module/hive/datas/dept_20200401.log' into table dept_partition2 partition(day='20200401',hour='15');


重命名表
alter table emp3 rename to emp1;

增加列
alter table ee add columns(name string);

更改列的类型
alter table ee change column name old int;

覆盖所有列
alter table ee replace columns (emp_id string,name string);
DML 数据操作
数据导入

向表中装载数据(Load)
load data local inpath '/opt/Module/sqlData/id_data.txt' into table ff;
load data local inpath '/opt/Module/sqlData/id_data.txt' overwrite into table ff;
语法解读:
	load data [local] inpath '数据的path' [overwrite] into table student [partition (partcol1=val1,…)];
	load data:表示加载数据
	ocal:表示从本地加载数据到hive表:否则从HDFS加载数据到hive表
	inpath:表示加载数据的路径
	overwrite:表示覆盖表中已有数据,否则表示追加
	into table:表示加载到哪张表
	student:表示具体的表

通过查询语句向表中插入数据(Insert)
	insert into:以追加数据的方式插入到表或分区,原有数据不会删除
	insert overwrite:会覆盖表中已存在的数据
hive (hive_db)> insert into table ff
              > select * from ff;

查询语句中创建表并加载数据(As Select)
create table gg as select name from bb;
数据导出
导到Linux
insert overwrite local directory '/opt/Module/sqlData/tmp/a1' row format delimited fields terminated by '\t' select * from bb ;

导到HDFS
insert overwrite directory '/' row format delimited fields terminated by '\t' select * from bb ;

P29 (导出数据)
Linux常用命令
下载命令
yum install unzip -y
zip格式文件解压命令
unzip mysql-libs.zip -d /opt/Module/
遇到的报错
启动hive时
Exception in thread "main" java.lang.ExceptionInInitializerError
	at org.apache.hadoop.hive.common.LogUtils.initHiveLog4j(LogUtils.java:58)
	at org.apache.hadoop.hive.cli.CliDriver.run(CliDriver.java:637)
	at org.apache.hadoop.hive.cli.CliDriver.main(CliDriver.java:621)
	at sun.reflect.NativeMethodAccessorImpl.invoke0(Native Method)
	at sun.reflect.NativeMethodAccessorImpl.invoke(NativeMethodAccessorImpl.java:62)
	at sun.reflect.DelegatingMethodAccessorImpl.invoke(DelegatingMethodAccessorImpl.java:43)
	at java.lang.reflect.Method.invoke(Method.java:498)
	at org.apache.hadoop.util.RunJar.run(RunJar.java:318)
	at org.apache.hadoop.util.RunJar.main(RunJar.java:232)
Caused by: java.lang.IllegalArgumentException: Unrecognized Hadoop major version number: 3.1.3
	at org.apache.hadoop.hive.shims.ShimLoader.getMajorVersion(ShimLoader.java:174)
	at org.apache.hadoop.hive.shims.ShimLoader.loadShims(ShimLoader.java:139)
	at org.apache.hadoop.hive.shims.ShimLoader.getHadoopShims(ShimLoader.java:100)
	at org.apache.hadoop.hive.conf.HiveConf$ConfVars.<clinit>(HiveConf.java:368)
	... 9 more
解决方案:
(a) hive版本与Hadoop版本不兼容,无法识别,选择降低一方版本或者升高一方版本。
(b) 将mysql-connector-java-5.1.6-bin.jar包导入到$HIVE_HOME/lib目录下
将hive升级到3版本,初始化元数据时报错
Error: FUNCTION 'NUCLEUS_ASCII' already exists. (state=X0Y68,code=30000)
org.apache.hadoop.hive.metastore.HiveMetaException: Schema initialization FAILED! Metastore state would be inconsistent !!
Underlying cause: java.io.IOException : Schema script failed, errorcode 2
Use --verbose for detailed stacktrace.
*** schemaTool failed ***
原因: 运行过hive1版本
解决方案:
删除 hive3.1.2/metastore_db
	hive3.1.2/derby.log
连接不上 mysql 数据库
Metastore connection URL:	 jdbc:mysql://192.168.187.130:3306/metastore?useSSL=false
Metastore Connection Driver :	 com.mysql.jdbc.Driver
Metastore connection User:	 root
org.apache.hadoop.hive.metastore.HiveMetaException: Failed to load driver
Underlying cause: java.lang.ClassNotFoundException : com.mysql.jdbc.Driver
org.apache.hadoop.hive.metastore.HiveMetaException: Failed to load driver
	at org.apache.hadoop.hive.metastore.tools.HiveSchemaHelper.getConnectionToMetastore(HiveSchemaHelper.java:97)
	at org.apache.hive.beeline.HiveSchemaTool.getConnectionToMetastore(HiveSchemaTool.java:169)
	at org.apache.hive.beeline.HiveSchemaTool.testConnectionToMetastore(HiveSchemaTool.java:475)
	at org.apache.hive.beeline.HiveSchemaTool.doInit(HiveSchemaTool.java:581)
	at org.apache.hive.beeline.HiveSchemaTool.doInit(HiveSchemaTool.java:567)
	at org.apache.hive.beeline.HiveSchemaTool.main(HiveSchemaTool.java:1517)
	at sun.reflect.NativeMethodAccessorImpl.invoke0(Native Method)
	at sun.reflect.NativeMethodAccessorImpl.invoke(NativeMethodAccessorImpl.java:62)
	at sun.reflect.DelegatingMethodAccessorImpl.invoke(DelegatingMethodAccessorImpl.java:43)
	at java.lang.reflect.Method.invoke(Method.java:498)
	at org.apache.hadoop.util.RunJar.run(RunJar.java:318)
	at org.apache.hadoop.util.RunJar.main(RunJar.java:232)
Caused by: java.lang.ClassNotFoundException: com.mysql.jdbc.Driver
	at java.net.URLClassLoader.findClass(URLClassLoader.java:382)
	at java.lang.ClassLoader.loadClass(ClassLoader.java:424)
	at sun.misc.Launcher$AppClassLoader.loadClass(Launcher.java:349)
	at java.lang.ClassLoader.loadClass(ClassLoader.java:357)
	at java.lang.Class.forName0(Native Method)
	at java.lang.Class.forName(Class.java:264)
	at org.apache.hadoop.hive.metastore.tools.HiveSchemaHelper.getConnectionToMetastore(HiveSchemaHelper.java:85)
	... 11 more
*** schemaTool failed ***
解决方案:
(1)导错驱动包,应该把 mysql-connector-java-5.1.27-bin.jar 导入/opt/module/hive/lib 。错把 mysql-connector-java-5.1.27.tar.gz 导入 hive/lib 包下。
(2)修改 user 表中的主机名称没有都修改为%,而是修改为 localhost
jdbc方式连接不上hive
22/04/29 10:20:38 [main]: WARN jdbc.HiveConnection: Failed to connect to Hadoop2:10000
Error: Could not open client transport with JDBC Uri: jdbc:hive2://Hadoop2:10000/hive_db: Failed to open new session: Database hive_db does not exist (state=08S01,code=0)
Beeline version 3.1.2 by Apache Hive
解决方案: 未解决?
jdbc方式连接不上hive,新的报错
22/04/29 09:51:37 [main]: WARN jdbc.HiveConnection: Failed to connect to Hadoop2:10000
Could not open connection to the HS2 server. Please check the server URI and if the URI is correct, then ask the administrator to check the server status.
Error: Could not open client transport with JDBC Uri: jdbc:hive2://Hadoop2:10000/metastore: java.net.ConnectException: 拒绝连接 (Connection refused) (state=08S01,code=0)
Beeline version 3.1.2 by Apache Hive
解决方案:
此报错是因为hivserver2服务没起来.等它起来。