在spring+springmvc+mybatis框架集成中,配置文件往往是最基本且繁琐的部分,但完全掌握了配置文件,就等于了解SSM集成框架的原理,接下来我将对SSM框架的配置文件及对应功能做一些总结。
1.pom.xml
该文件是maven项目的核心配置文件,主要用于从maven中央仓库引入依赖,不再过多赘述,但需要注意的是该文件中要引入加载xml文件的配置:
    <!--加载xml文件-->
    <build>
        <resources>
            <resource>
                <directory>src/main/java/</directory>
                <includes>
                    <include>**/*.xml</include>
                </includes>
            </resource>
        </resources>
    </build>
2.spring与springmvc的父子容器
为了方便管理,在框架集成时一般情况下我们会使用不同的配置文件来配置spring和springmvc,因此我们的应用中会存在至少2个ApplicationContext实例,由于是在web应用中,因此最终实例化的是ApplicationContext的子接口WebApplicationContext。(图片来自网络)
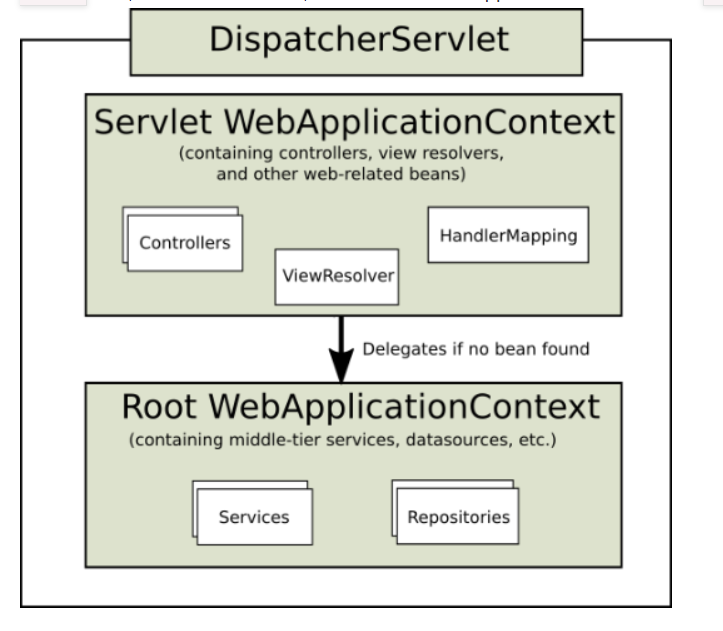
父子容器维护的内容有限制,的父容器:用于管理mapper/service;子容器用于管理controller子容器可以获得父容器里面所有的内容, 而父容器不能获得子容器里面的组成内容。
2.1父容器配置spring-config.xml
该配置保存在在resources路径下,其功能为:
1.配置包扫描
扫描类中的spring注解,将对象交给容器动态管理
2.配置数据源
与数据库相关的配置,数据库账号密码等,属于dao层的配置。
3.配置SqlSessionFactoryBean
与集成mybatis有关的配置,用来映射接口对应的sql配置文件(xml文件)在基本的 mybatis 中,session工厂可以使用 SqlSessionFactoryBuilder 来创建。而在mybatis中,则使用 SqlSessionFactoryBean 来替代。
4.配置mapper接口扫描
用于扫描mybatis代理开发的mapper接口
5.事务管理器
数据库事务管理的开启
6.开启事务注解驱动
spring-config.xml具体配置如下:
<?xml version="1.0" encoding="UTF-8"?>
<beans xmlns="http://www.springframework.org/schema/beans"
       xmlns:xsi="http://www.w3.org/2001/XMLSchema-instance"
       xmlns:context="http://www.springframework.org/schema/context" xmlns:tx="http://www.springframework.org/schema/tx"
       xsi:schemaLocation="http://www.springframework.org/schema/beans http://www.springframework.org/schema/beans/spring-beans.xsd http://www.springframework.org/schema/context https://www.springframework.org/schema/context/spring-context.xsd http://www.springframework.org/schema/tx http://www.springframework.org/schema/tx/spring-tx.xsd">

    <!--1.配置包扫描-->
    <context:component-scan base-package="com.Gavin.service"/>

    <!--2.配置数据源-->
    <context:property-placeholder location="classpath:druid.properties"/>
    <bean class="com.alibaba.druid.pool.DruidDataSource" id="dataSource">
        <property name="username" value="${druid.username}"/>
        <property name="password" value="${druid.password}"/>
        <property name="url" value="${druid.url}"/>
        <property name="driverClassName" value="${druid.driver}"/>
    </bean>

    <!--3.配置SqlSessionFactoryBean-->
    <bean class="org.mybatis.spring.SqlSessionFactoryBean" id="sessionFactory">
        <property name="dataSource" ref="dataSource"/>
        <property name="typeAliasesPackage" value="com.Gavin.bean"/>
        <property name="configuration">
            <bean class="org.apache.ibatis.session.Configuration">
                <property name="mapUnderscoreToCamelCase" value="true"/>    <!--去掉下划线-->
                <property name="logImpl" value="org.apache.ibatis.logging.log4j.Log4jImpl"/>
            </bean>
        </property>
    </bean>

    <!--4.配置mapper接口扫描-->
    <bean class="org.mybatis.spring.mapper.MapperScannerConfigurer">
        <property name="sqlSessionFactoryBeanName" value="sessionFactory"/>
        <property name="basePackage" value="com.Gavin.mapper"/>
    </bean>

    <!--5.事务管理器-->
    <bean class="org.springframework.jdbc.datasource.DataSourceTransactionManager" id="transactionManager">
        <property name="dataSource" ref="dataSource"/>
    </bean>
    <!--6.开启事务注解驱动-->
    <tx:annotation-driven/>

</beans>
2.2子容器配置mvc-config.xml
如果说父容器配置文件是用来配置dao层和service层,那么子容器配置文件顾名思义就是用来配置controller的,主要功能如下:
1.开启包扫描
2.开启mvc注解驱动
3.视图解析器
视图解析器的主要作用就是将逻辑视图转换成用户可以看到的物理视图
4.静态资源访问
5.文件上传(非必须)
6.类型转换器(非必须)
7.拦截器(非必须)
8.跨域(非必须,仅在前后端分离时使用)
mvc-config.xml具体配置如下:
<?xml version="1.0" encoding="UTF-8"?>
<beans xmlns="http://www.springframework.org/schema/beans"
       xmlns:xsi="http://www.w3.org/2001/XMLSchema-instance"
       xmlns:context="http://www.springframework.org/schema/context"
       xmlns:mvc="http://www.springframework.org/schema/mvc"
       xsi:schemaLocation="http://www.springframework.org/schema/beans http://www.springframework.org/schema/beans/spring-beans.xsd http://www.springframework.org/schema/context https://www.springframework.org/schema/context/spring-context.xsd http://www.springframework.org/schema/mvc https://www.springframework.org/schema/mvc/spring-mvc.xsd">
    <!--开启包扫描-->
    <context:component-scan base-package="com.Gavin.controller"/>

    <!--2.开启mvc注解驱动-->
    <mvc:annotation-driven/>
    <!--3.视图解析器-->
    <bean class="org.springframework.web.servlet.view.InternalResourceViewResolver">
        <property name="prefix" value="/WEB-INF/page/"/>
        <property name="suffix" value=".html"/>
    </bean>
    <!--4.静态资源访问-->
    <mvc:default-servlet-handler/>
    <!--5.文件上传-->
<!--    <bean class="org.springframework.web.multipart.commons.CommonsMultipartResolver" id="multipartResolver">
        <property name="defaultEncoding" value="UTF-8"/>
    </bean>-->
    <!--6.类型转换器-->  <!--服务于日期-->
    <!--7.拦截器-->
    <!--8.跨域-->
    <mvc:cors>
        <mvc:mapping path="/**" allowed-methods="*" allow-credentials="true" exposed-headers="*"/>
    </mvc:cors>
</beans>
3.web.xml
web.xml配置内容如下:
1.配置spring监听
由于框架集成,我们的应用中会存在至少2个ApplicationContext实例,而每次的请求都会重新加载Spring applicationContext.xml的配置信息,这样十分繁琐;我们在web.xml中配置ContextLoaderListener,这样启动Web容器时,就可以自动装配Spring applicationContext.xml的配置信息。
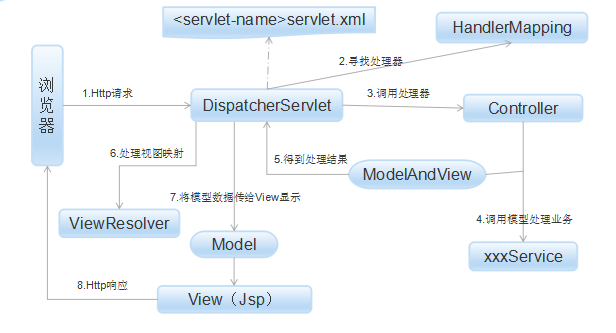
2.配置mvc的前端控制器dispatcherServlet
dispatcherServlet是mvc中及为重要的一环,我们可以看mvc的运行原理:
3.配置编码过滤器
web.xml具体配置如下:
<?xml version="1.0" encoding="UTF-8"?>
<web-app xmlns="http://xmlns.jcp.org/xml/ns/javaee"
         xmlns:xsi="http://www.w3.org/2001/XMLSchema-instance"
         xsi:schemaLocation="http://xmlns.jcp.org/xml/ns/javaee http://xmlns.jcp.org/xml/ns/javaee/web-app_4_0.xsd"
         version="4.0">

    <!--1.配置spring监听-->
    <context-param> <!--确定父子容器 Linster加载的哪个文件,那个文件就是父容器-->
        <param-name>contextConfigLocation</param-name>
        <param-value>classpath:spring-config.xml</param-value>
    </context-param>
    <listener>
        <listener-class>org.springframework.web.context.ContextLoaderListener</listener-class>
    </listener>

    <!--2.配置MVC的前端控制器-->
    <servlet>
        <servlet-name>dispatcherServlet</servlet-name>
        <servlet-class>org.springframework.web.servlet.DispatcherServlet</servlet-class>
        <init-param>
            <param-name>contextConfigLocation</param-name>
            <param-value>classpath:mvc-config.xml</param-value>
        </init-param>
        <load-on-startup>1</load-on-startup>
    </servlet>

    <servlet-mapping>
        <servlet-name>dispatcherServlet</servlet-name>
        <url-pattern>/</url-pattern>
    </servlet-mapping>

    <!--3.编码过滤器-->
    <filter>
        <filter-name>encodingFilter</filter-name>
        <filter-class>org.springframework.web.filter.CharacterEncodingFilter</filter-class>
    </filter>
    <filter-mapping>
        <filter-name>encodingFilter</filter-name>
        <url-pattern>/*</url-pattern>
    </filter-mapping>
</web-app>