httpd
httpd简介
httpd是Apache超文本传输协议(HTTP)服务器的主程序。被设计为一个独立运行的后台进程,它会建立一个处理请求的子进程或线程的池。
通常,httpd不应该被直接调用,而应该在类Unix系统中由apachectl调用,在Windows中作为服务运行。
httpd常用版本
- httpd-2.2:https://centos.pkgs.org/6/centos-i386/httpd-2.2.15-69.el6.centos.i686.rpm.html
- httpd-2.4:https://centos.pkgs.org/8/centos-appstream-aarch64/httpd-2.4.37-21.module_el8.2.0+382+15b0afa8.aarch64.rpm.html
长连接和短连接
- 长连接和短连接的定义
- 长连接:可以省去较多的TCP建立和关闭的操作,减少浪费,节约时间。对于频繁请求资源的客户来说,较适用长连接。不过这里存在一个问题,存活功能的探测周期太长,还有就是它只是探测TCP连接的存活,属于比较斯文的做法,遇到恶意的连接时,保活功能就不够使了。在长连接的应用场景下,client端一般不会主动关闭它们之间的连接,Client与server之间的连接如果一直不关闭的话,会存在一个问题,随着客户端连接越来越多,server早晚有扛不住的时候,这时候server端需要采取一些策略,如关闭一些长时间没有读写事件发生的连接,这样可以避免一些恶意连接导致server端服务受损;如果条件再允许就可以以客户端机器为颗粒度,限制每个客户端的最大长连接数,这样可以完全避免某个客户端连累后端服务
- 短链接:将数据一点点进行传输短连接对于服务器来说管理较为简单,存在的连接都是有用的连接,不需要额外的控制手段。但如果客户请求频繁,将在TCP的建立和关闭操作上浪费时间和带宽。
长连接短连接操作过程
- 短连接的操作步骤是:
建立连接——数据传输——关闭连接…建立连接——数据传输——关闭连接 - 长连接的操作步骤是:
建立连接——数据传输…(保持连接)…数据传输——关闭连接
httpd特性
- 2.2版本
事先创建进程
按需维持适当的进程模块化设计,核心比较小,各种功能通过模块添加(包括PHP),支持运行时配置,支持单独编译模块
支持多种方式的虚拟主机配置,如基于ip的虚拟主机,基于端口的虚拟主机,基于域名的虚拟主机等
支持https协议(通过mod_ssl模块实现)
支持用户认证
支持基于IP或域名的ACL访问控制机制
支持每目录的访问控制(用户访问默认主页时不需要提供用户名和密码,但是用户访问某特定目录时需要提供用户名和密码)
支持URL重写
支持MPM(Multi Path Modules,多处理模块)。用于定义httpd的工作模型(单进程、单进程多线程、多进程、多进程单线程、多进程多线程)
- 2.4版本新特性
- MPM支持运行DSO机制(Dynamic Share Object,模块的动态装/卸载机制),以模块形式按需加载
- 支持event MPM,eventMPM模块生产环境可用
- 支持异步读写
- 支持每个模块及每个目录分别使用各自的日志级别
- 每个请求相关的专业配置,使用来配置
- 增强版的表达式分析器
- 支持毫秒级的keepalive timeout
- 基于FQDN的虚拟主机不再需要NameVirtualHost指令
- 支持用户自定义变量
- 支持新的指令(AllowOverrideList)
- 降低对内存的消耗
httpd的工作模式
| 工作模式 | 模式内容 |
|---|---|
| prefork | 多进程模式,预先生成进程,一个请求用一个进程响应 |
| worker | 基于线程工作,一个请求用一个线程响应(启动多个京城,每个进程生成多个线程) |
| event | 基于时间的驱动,一个进程处理多个请求 |
httpd工作模块更改
- 编辑模块配置文件
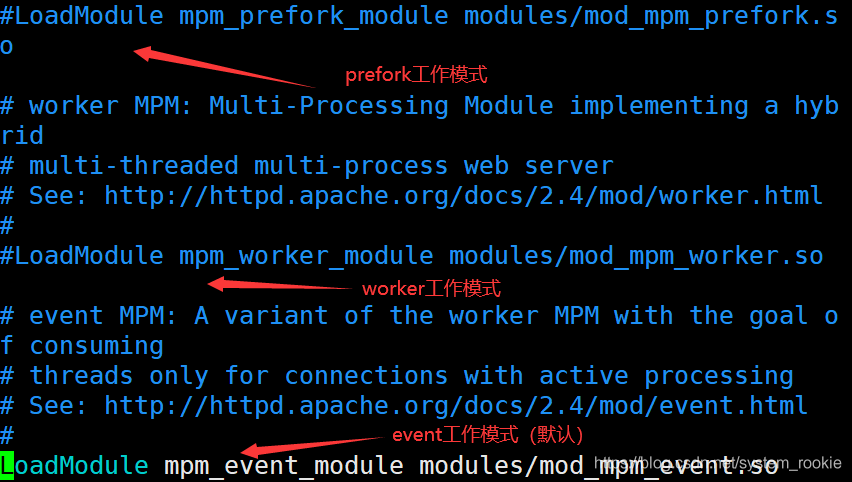
[root@Yukino ~]# vim /etc/httpd/conf.modules.d/00-mpm.conf
#LoadModule mpm_prefork_module modules/mod_mpm_prefork.so
#LoadModule mpm_worker_module modules/mod_mpm_worker.so
LoadModule mpm_event_module modules/mod_mpm_event.so
注意:三个模块只能用一个;选择其中一个模块后需要将其他两个模块进行注释;更改后重启服务
httpd-2.4新增模块
| 模块 | 功能 |
|---|---|
| mod_proxy_fcgi | 反向代理时支持apache服务器后端协议的模块 |
| mod_ratelimit | 提供速率限制功能的模块 |
| mod_remoteip | 基于ip的访问控制机制被改变,不再支持使用Order,Deny,Allow来做基于IP的访问控制 |
httpd基础
| 工具 | 功能 |
|---|---|
| htpasswd | basic认证基于文件实现时,用到的账号密码生成工具 |
| apachectl | httpd自带的服务控制脚本,支持start,stop,restart |
| apxs | 由httpd-devel软件包提供的,扩展httpd使用第三方模块的工具 |
| rotatelogs | 日志滚动工具(按天生成日志、按大小生成日志) |
| serxec | 访问某些有特殊权限的配置资源时,历史切换至指定用户运行的工具 |
| ab | apache benchmark,httpd的压力测试工具 |
rpm包安装的httpd程序环境
| 文件/目录 | 对应的功能 |
|---|---|
| /var/log/httpd/access.log | 访问日志 |
| /var/log/httpd/error_log | 错误日志 |
| /var/www/html | 站点文档目录 |
| /usr/lib64/httpd/modules | 模块文件路径 |
| /etc/httpd/conf/httpd.conf | 主配置文件 |
| /etc/httpd/conf.modules.d/*.conf | 模块配置文件 |
| /etc/httpd/conf.d/*.conf | 辅助配置文件、 |
httpd的安装步骤
- 源码安装httpd
源码安装httpd安装步骤 - yum安装httpd
- 搭建YUM本地仓库
本地YUM仓库搭建步骤 - 安装httpd
[root@localhost ~]# yum install -y httpd
[root@localhost ~]# systemctl start httpd
[root@localhost ~]# systemctl status httpd
● httpd.service - The Apache HTTP Server
   Loaded: loaded (/usr/lib/systemd/system/httpd.servic>
   Active: active (running) since Mon 2020-08-24 21:00:>
     Docs: man:httpd.service(8)
 Main PID: 991 (httpd)
   Status: "Total requests: 2; Idle/Busy workers 100/0;>
    Tasks: 278 (limit: 11340)
   Memory: 51.3M
   CGroup: /system.slice/httpd.service
           ├─ 991 /usr/sbin/httpd -DFOREGROUND
           ├─1167 /usr/sbin/httpd -DFOREGROUND
           ├─1168 /usr/sbin/httpd -DFOREGROUND
           ├─1169 /usr/sbin/httpd -DFOREGROUND
           ├─1170 /usr/sbin/httpd -DFOREGROUND
           └─1765 /usr/sbin/httpd -DFOREGROUND

Aug 24 20:59:57 localhost.localdomain systemd[1]: Start>
Aug 24 21:00:02 localhost.localdomain systemd[1]: Start>
Aug 24 21:00:02 localhost.localdomain httpd[991]: Serve>
lines 1-19/19 (END)
web相关命令
curl命令
curl支持以下功能:
- https认证
- http的POST/PUT等方法
- ftp上传
- kerberos认证
- http上传
- 代理服务器
- cookies
- 用户名/密码认证
- 下载文件断点续传
- socks5代理服务器
- 通过http代理服务器上传文件到ftp服务器
语法:curl [option] [URL]
option
-A/--user-agent     #设置用户代理发送给服务器
-basic              #使用http基本认证
--tcp-nodelay       #使用TCP_NODELAY选项
-e/--referer <URL>  #来源网络
--cacert <file>     #CA证书(SSL认证)
--compressed        #要求返回时压缩的格式
-H/--header <line>  #自定义请求首部信息传递给服务器
-I/--head           #只显示响应报文首部信息
--limit-rate <rate> #设置传输速度
-u/--user <user[:password]>     #设置服务器的用户和密码
-0/--http1      	#使用http 1.0版本,默认使用1.1版本。这个选项是数字0而不是字母o
-o/--output     	#把输出写到文件中
访问网站:curl http://localhost/wcl/index.html
[root@Yukino wcl]# curl http://localhost/wcl/index.html
七夕节快乐
(快乐都是别人的,你像个孤独患者自我拉扯)
下载:curl -o baidu.html https://www.baidu.com
[root@localhost ~]# curl -o baidu.html https://www.baidu.com
#baidu.html:本地名称;可写成绝对路径放到其他目录中
  % Total    % Received % Xferd  Average Speed   Time    Time     Time  Current
                                 Dload  Upload   Total   Spent    Left  Speed
  0     0    0     0    0     0      0      0 --:--:-- --100  2443  100  2443    0     0  18231      0 --:--:-- --:--:-- --:--:-- 18231
[root@localhost ~]# ll
total 8
-rw-------. 1 root root 1205 Aug 24  2020 anaconda-ks.cfg
-rw-r--r--  1 root root 2443 Aug 24 03:42 baidu.html
下载软件:curl -o /绝对路径/文件名 软件包URL
[root@Yukino ~]# curl -o /root/share/httpd-2.4.37-21.module_el8.2.0+382+15b0afa8.aarch64.rpm https://centos.pkgs.org/8/centos-appstream-aarch64/httpd-2.4.37-21.module_el8.2.0+382+15b0afa8.aarch64.rpm.html
  % Total    % Received % Xferd  Average Speed   Time    Time     Time  Current
                                 Dload  Upload   Total   Spent    Left  Speed
  0     0    0     0    0     0      0      0 --:--:-- -  0     0    0     0    0     0      0      0 --:--:-- -  0     0    0     0    0     0      0      0 --:--:--    0     0    0     0    0     0      0      0 --:--:--    0     0    0     0    0     0      0      0 --:--:--    0     0    0     0    0     0      0      0 --:--:--    0     0    0     0    0     0      0      0 --:--:--    0     0    0     0    0     0      0      0 --:--:--    0  4840    0     0    0     0      0      0 --:--:--  100  4840  100  4840    0     0    632      0  0:00:07  0:00:07 --:--:--  1155
[root@Yukino ~]# echo $?
0
[root@Yukino ~]# ll /root/share/
total 8
-rw-r--r-- 1 root root 4840 Aug 25 03:22 httpd-2.4.37-21.module_el8.2.0+382+15b0afa8.aarch64.rpm
httpd命用的options:
- option
  -l      #查看静态编译的模块,列出核心中编译了哪些模块。
          #它不会列出使用LoadModule指令动态加载的模块
  -M      #输出一个已经启用的模块列表,包括静态编译在服务器中的模块和作为DSO动态加载的模块
  -v      #显示httpd的版本,然后退出
  -V      #显示httpd和apr/apr-util的版本和编译参数,然后退出
  -X      #以调试模式运行httpd。仅启动一个工作进程,并且服务器不与控制台脱离
  -t      #检查配置文件是否有语法错误
httpd -l
[root@Yukino ~]# httpd -l
Compiled in modules:
  core.c
  mod_so.c
  http_core.c
httpd -M
[root@Yukino ~]# httpd -M
Loaded Modules:
 core_module (static)
 so_module (static)
 http_module (static)
 access_compat_module (shared)
 actions_module (shared)
 alias_module (shared)
 allowmethods_module (shared)
 auth_basic_module (shared)
 auth_digest_module (shared)
 authn_anon_module (shared)
 authn_core_module (shared)
 authn_dbd_module (shared)
 authn_dbm_module (shared)
 authn_file_module (shared)
 authn_socache_module (shared)
 authz_core_module (shared)
 authz_dbd_module (shared)
 authz_dbm_module (shared)
 authz_groupfile_module (shared)
 authz_host_module (shared)
 authz_owner_module (shared)
 authz_user_module (shared)
 autoindex_module (shared)
 brotli_module (shared)
 cache_module (shared)
 cache_disk_module (shared)
 cache_socache_module (shared)
 data_module (shared)
 dbd_module (shared)
 deflate_module (shared)
 dir_module (shared)
 dumpio_module (shared)
 echo_module (shared)
 env_module (shared)
 expires_module (shared)
 ext_filter_module (shared)
 filter_module (shared)
 headers_module (shared)
 include_module (shared)
 info_module (shared)
 log_config_module (shared)
 logio_module (shared)
 macro_module (shared)
 mime_magic_module (shared)
 mime_module (shared)
 negotiation_module (shared)
 remoteip_module (shared)
 reqtimeout_module (shared)
 request_module (shared)
 rewrite_module (shared)
 setenvif_module (shared)
 slotmem_plain_module (shared)
 slotmem_shm_module (shared)
 socache_dbm_module (shared)
 socache_memcache_module (shared)
 socache_shmcb_module (shared)
 status_module (shared)
 substitute_module (shared)
 suexec_module (shared)
 unique_id_module (shared)
 unixd_module (shared)
 userdir_module (shared)
 version_module (shared)
 vhost_alias_module (shared)
 watchdog_module (shared)
 dav_module (shared)
 dav_fs_module (shared)
 dav_lock_module (shared)
 lua_module (shared)
 mpm_event_module (shared)
 proxy_module (shared)
 lbmethod_bybusyness_module (shared)
 lbmethod_byrequests_module (shared)
 lbmethod_bytraffic_module (shared)
 lbmethod_heartbeat_module (shared)
 proxy_ajp_module (shared)
 proxy_balancer_module (shared)
 proxy_connect_module (shared)
 proxy_express_module (shared)
 proxy_fcgi_module (shared)
 proxy_fdpass_module (shared)
 proxy_ftp_module (shared)
 proxy_http_module (shared)
 proxy_hcheck_module (shared)
 proxy_scgi_module (shared)
 proxy_uwsgi_module (shared)
 proxy_wstunnel_module (shared)
 systemd_module (shared)
 cgid_module (shared)
 http2_module (shared)
 proxy_http2_module (shared)
httpd -v
[root@Yukino ~]# httpd -v
Server version: Apache/2.4.37 (Red Hat Enterprise Linux)
Server built:   Sep  2 2019 14:31:45
httpd -V
[root@Yukino ~]# httpd -V
Server version: Apache/2.4.37 (Red Hat Enterprise Linux)
Server built:   Sep  2 2019 14:31:45
Server's Module Magic Number: 20120211:83
Server loaded:  APR 1.6.3, APR-UTIL 1.6.1
Compiled using: APR 1.6.3, APR-UTIL 1.6.1
Architecture:   64-bit
Server MPM:     event
  threaded:     yes (fixed thread count)
    forked:     yes (variable process count)
Server compiled with....
 -D APR_HAS_SENDFILE
 -D APR_HAS_MMAP
 -D APR_HAVE_IPV6 (IPv4-mapped addresses enabled)
 -D APR_USE_SYSVSEM_SERIALIZE
 -D APR_USE_PTHREAD_SERIALIZE
 -D SINGLE_LISTEN_UNSERIALIZED_ACCEPT
 -D APR_HAS_OTHER_CHILD
 -D AP_HAVE_RELIABLE_PIPED_LOGS
 -D DYNAMIC_MODULE_LIMIT=256
 -D HTTPD_ROOT="/etc/httpd"
 -D SUEXEC_BIN="/usr/sbin/suexec"
 -D DEFAULT_PIDLOG="run/httpd.pid"
 -D DEFAULT_SCOREBOARD="logs/apache_runtime_status"
 -D DEFAULT_ERRORLOG="logs/error_log"
 -D AP_TYPES_CONFIG_FILE="conf/mime.types"
 -D SERVER_CONFIG_FILE="conf/httpd.conf"
httpd -X
[root@Yukino ~]# httpd -X
httpd (pid 1032) already running
httpd -t
[root@Yukino ~]# httpd -t
Syntax OK
httpd常用配置
切换使用MPM(编辑/etc/httpd/conf.modules.d/00-mpm.conf)
[root@Yukino ~]# vim /etc/httpd/conf.modules.d/00-mpm.conf
访问控制法则:
| 法则 | 功能 |
|---|---|
| Require all granted | 允许所有主机访问 |
| Require all deny | 拒绝所有主机访问 |
| Require ip IPADDR | 授权指定来源的地址主机访问 |
| Require not ip IPADDR | 拒绝指定来源的地址主机访问 |
| Require host HOSTNAME | 授权指定来源的主机名的主机访问 |
| Require not host HOSTNAME | 拒绝指定来源主机名的主机访问 |
先允许后拒绝:只有允许的可以访问,其他人都不能访问
先拒绝后允许:除了拒绝的人不能访问,其他人都可以访问
| IPADDR的类型 | HostName的类型 |
|---|---|
| IP:192.168.72.10 | FQDN:特定主机的全面 |
| Network/Length:192.168.72.0/24 | DOMAIN:指定域内所有主机 |
注意:httpd-2.4默认拒绝所有主机访问,所有安装后需要授权所有访问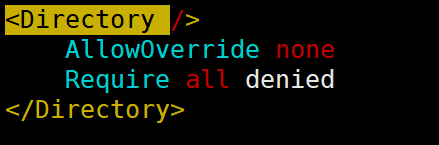
访问权限设置
- 设置拒绝IP地址为
192.168.72.5的主机对/var/www/html/wcl访问权限,其他主机全部允许(在/etc/httpd/conf/httpd.conf末尾加上)
- 重启服务后,用
curl命令通过192.168.72.5的主机访问/var/www/html/wcl
- 192.168.72.5的主机
[root@localhost ~]# ip addr show eth0
2: eth0: <BROADCAST,MULTICAST,UP,LOWER_UP> mtu 1500 qdisc fq_codel state UP group default qlen 1000
    link/ether 00:0c:29:91:0b:d4 brd ff:ff:ff:ff:ff:ff
    inet 192.168.72.5/24 brd 192.168.72.255 scope global noprefixroute eth0
       valid_lft forever preferred_lft forever
    inet6 fe80::20c:29ff:fe91:bd4/64 scope link
       valid_lft forever preferred_lft forever
- 用
curl命令做访问测试
[root@localhost ~]# curl http://192.168.72.10/wcl
<!DOCTYPE HTML PUBLIC "-//IETF//DTD HTML 2.0//EN">
<html><head>
<title>403 Forbidden</title>
</head><body>
<h1>Forbidden</h1>
<p>You don't have permission to access /wcl
on this server.<br />
</p>
</body></html>
访问被拒绝!!!
虚拟主机
虚拟主机分三类:
- 相同IP不同端口
- 不同IP相同端口
- 相同IP相同端口不同域名
将/etc/httpd/conf/httpd.conf中的ServerName改成需要的域名
配置虚拟主机
- 通过主配置文件(
/etc/httpd/conf/httpd.conf)配置虚拟主机
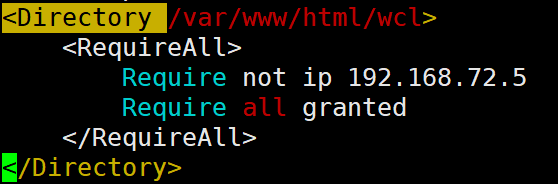
<VirtualHost 192.168.72.10:80>	#网站地址
    ServerName www.yukino.com
    DocumentRoot "/var/www/html/wcl"	#网站存放目录
    ErrorLog "/var/log/httpd/wcl/error_log"	#错误日志存放目录
    CustomLog "/var/log/httpd/wcl/accesss_log" 	combined	#访问日志存放目录;"combined"必须加上否则会报错
        <Directory /var/www/html/wcl>	#设置访问权限
            <RequireAll>
                Require all granted
                Require not ip 192.168.2
            </RequireAll>
        </Directory>
</VirtualHost>
- 通过
httpd-vhosts.conf文件配置虚拟主机
- 利用
find命令找到这个文件
[root@Yukino wcl]# find / -name *vhosts.conf
/usr/share/doc/httpd/httpd-vhosts.conf
- 编辑
httpd-vhosts.conf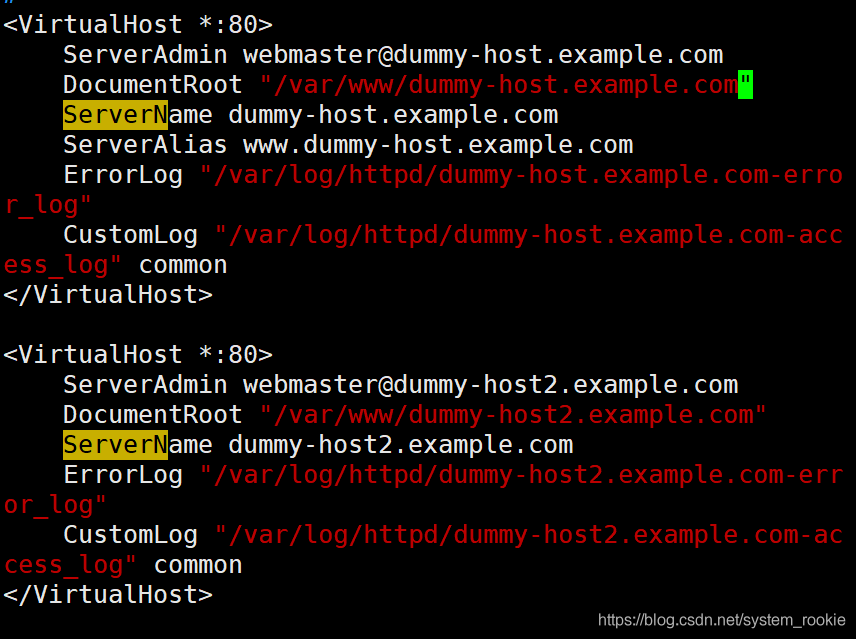
直接在模板中进行修改即可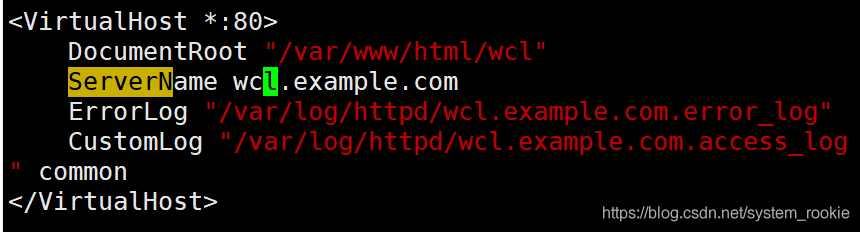
- 重启服务
[root@Yukino ~]# systemctl restart httpd
- 访问虚拟主机

虚拟主机三种模式实践
- 同IP不同端口(在
/etc/httpd/conf/httpd.conf添加Listen 81)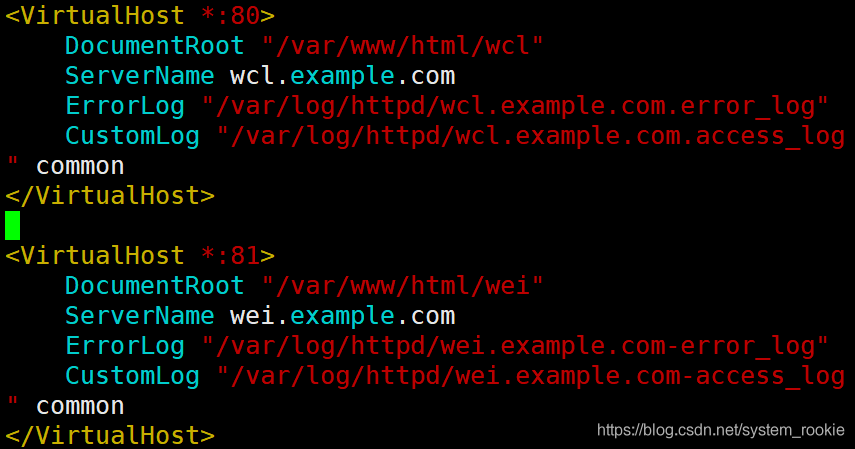
- 在本地电脑的
hosts文件中加入host记录(Windows的hosts文件在:C:\Windows\system32\drivers\etc\hosts)
80端口:
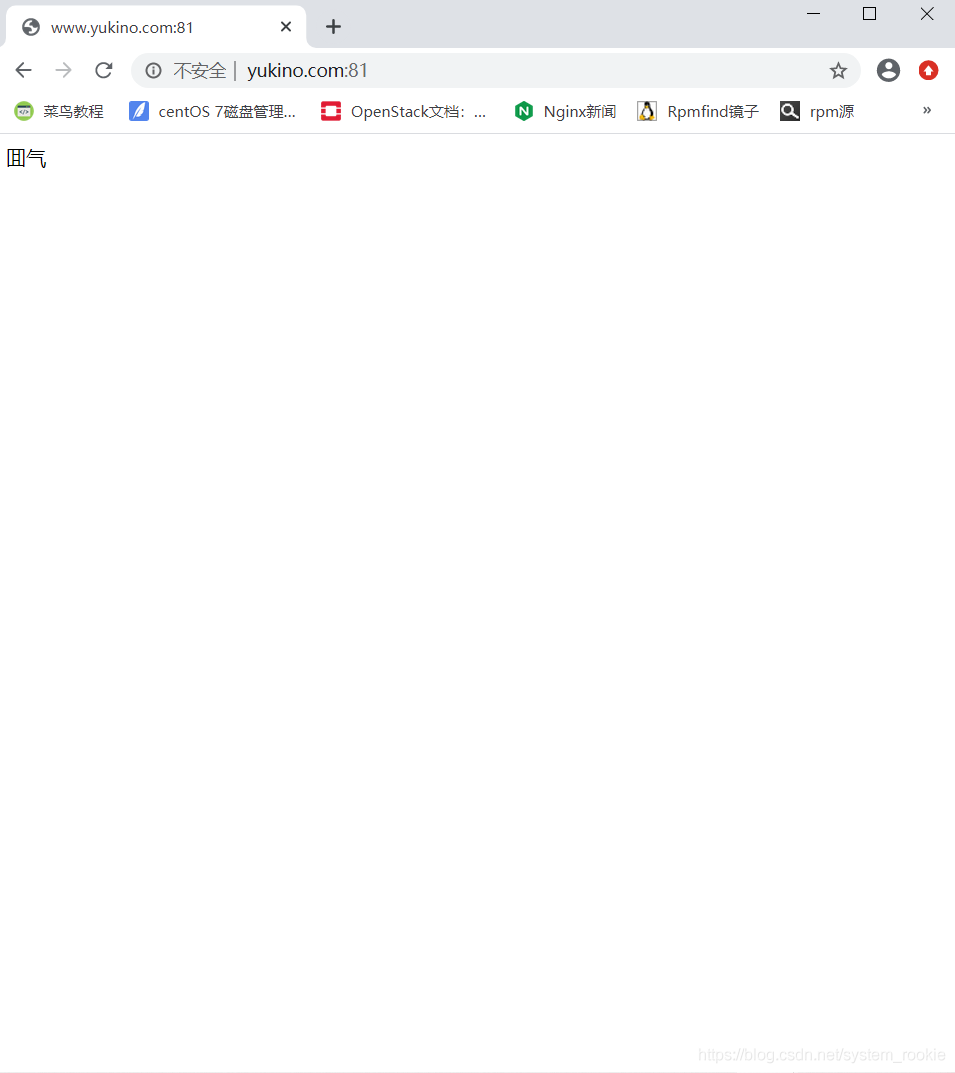
81端口: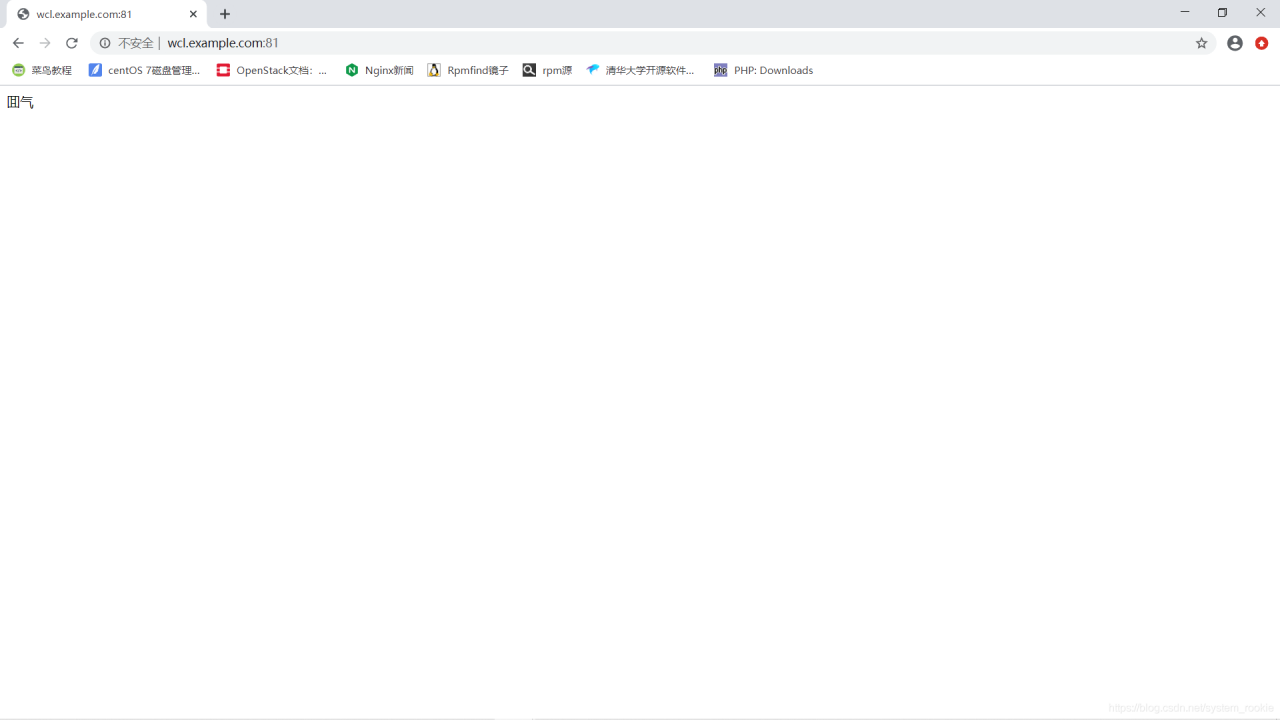
- 不同IP相同端口
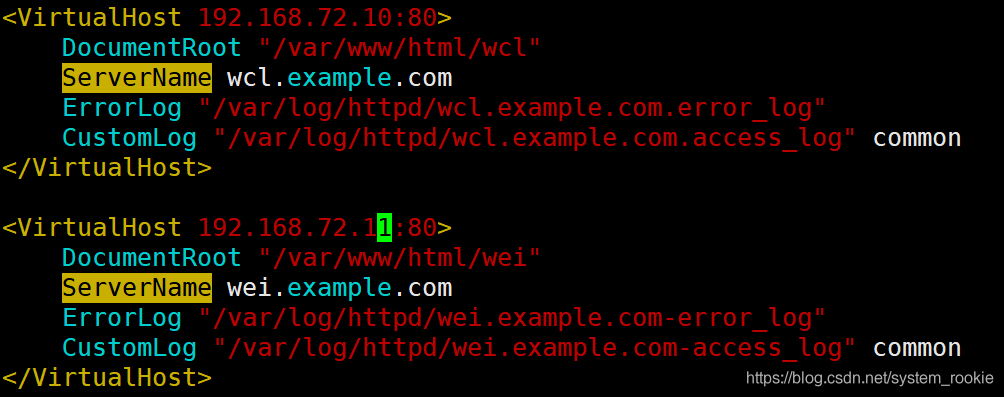
- 执行结果:
192.168.72.11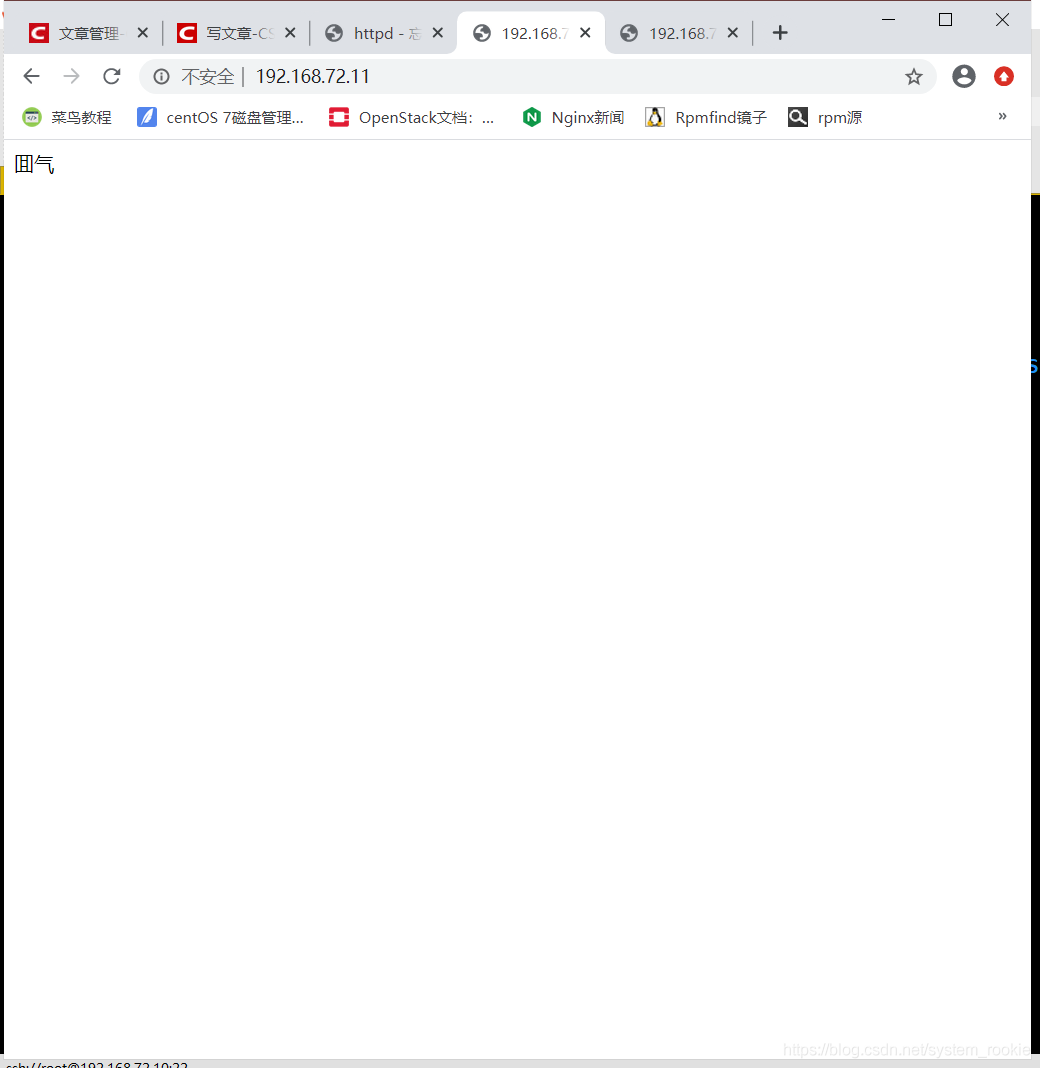
192.168.72.10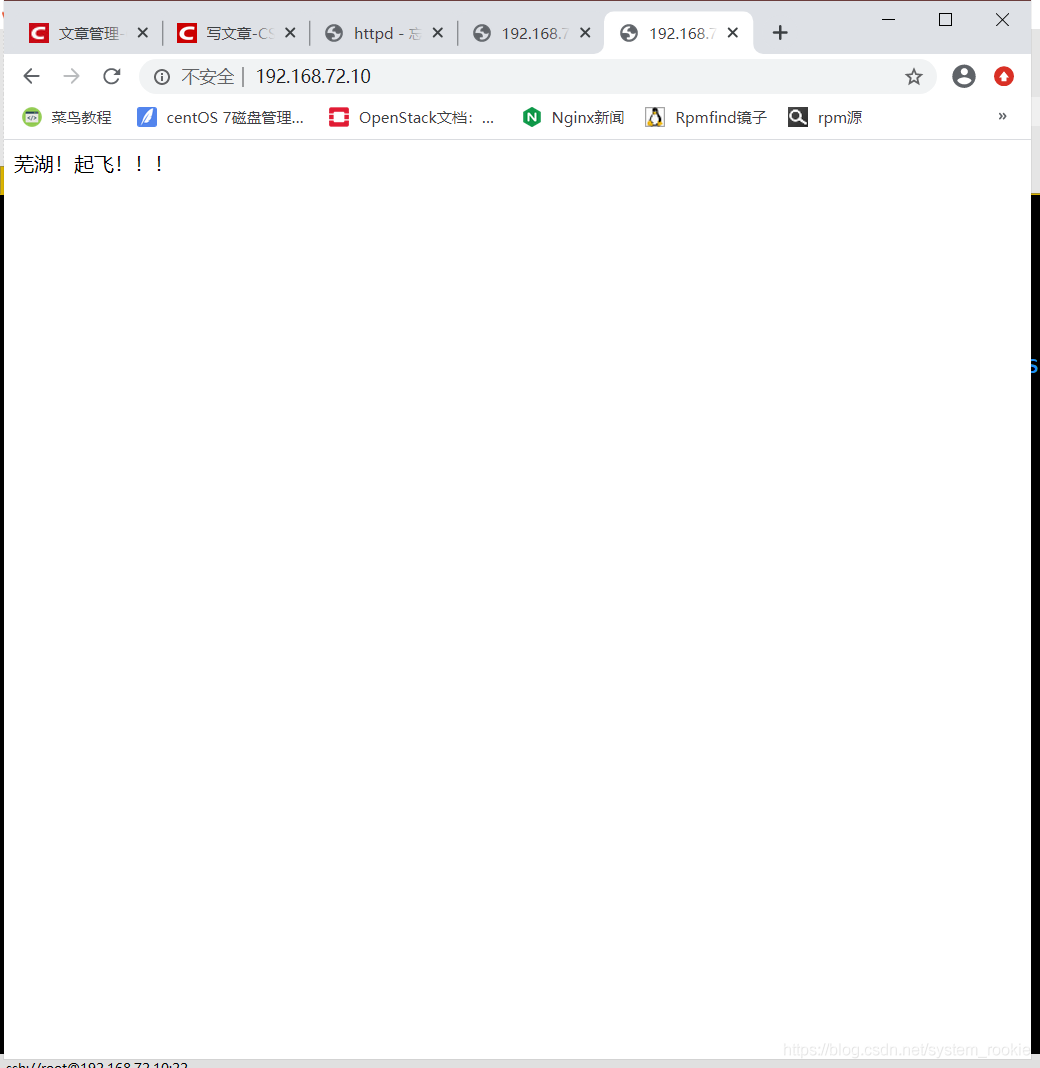
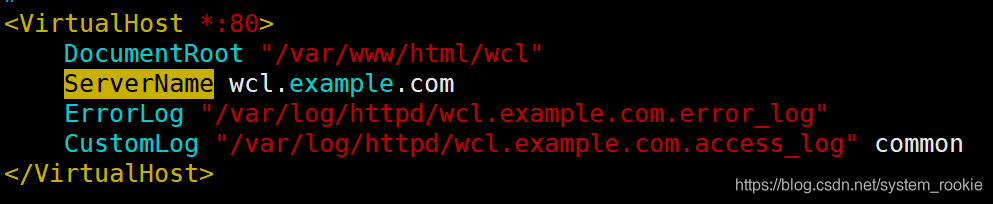
- 相同IP相同端口,不同域名
- 在主配置文件中设置两个域名(
需要在物理机的hosts文件中加上IP地址与域名的对应关系)
- httpd-hosts.conf文件中保持原虚拟主机配置
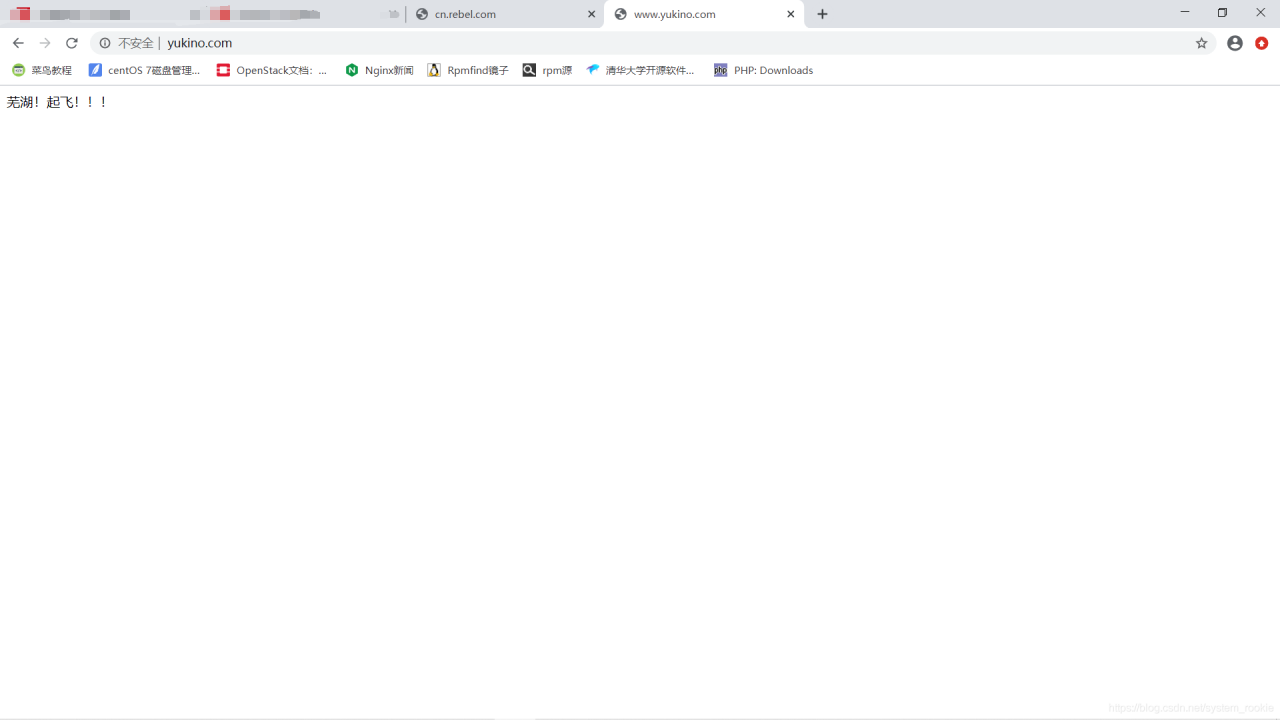
执行结果: - cn.rebel.com
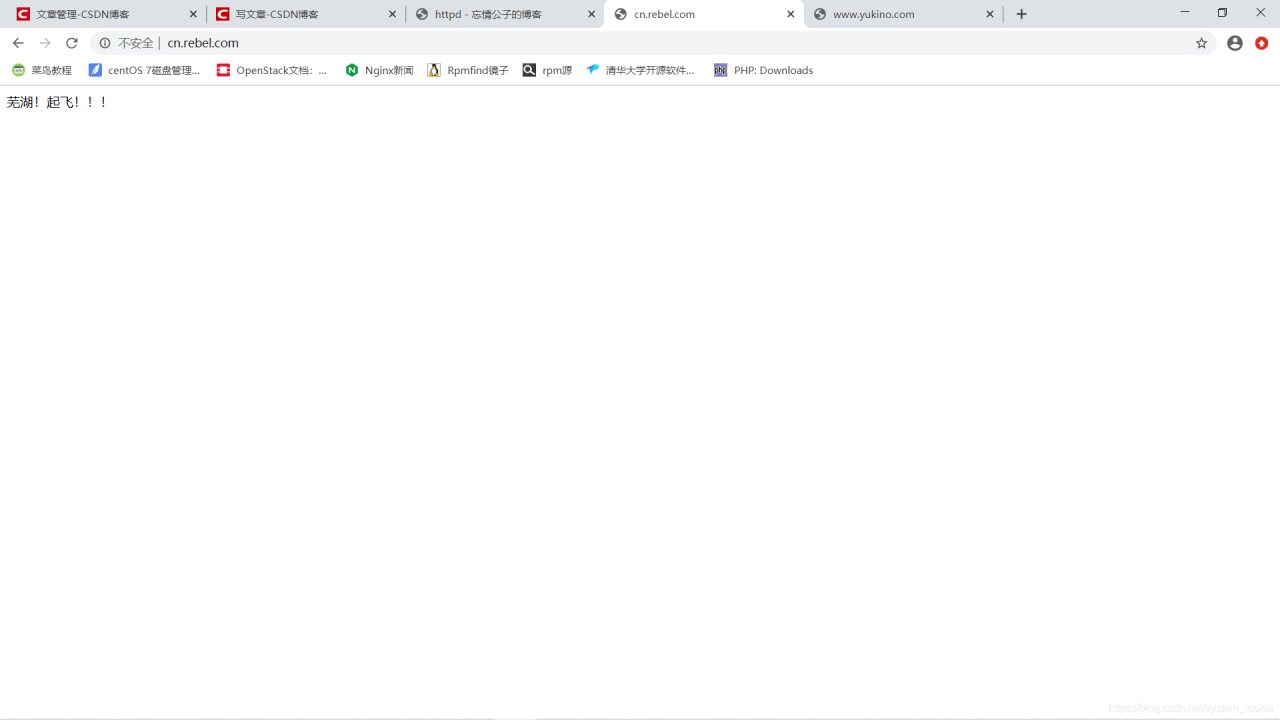
- www.yukino.com
https配置方法
openssl实现私有
CA的配置文件:/etc/pki/CA(redhat 8.0默认没有需要手动创建)
- 创建配置文件目录
[root@Yukino pki]# mkdir /etc/pki/CA
- CA生成一对密钥
[root@Yukino CA]# (umask 077;openssl genrsa -out private/cakey.pem 2048)
genrsa: Can't open "private/cakey.pem" for writing, No such file or directory
- 如果遇到这样的报错,说明需要在
CA目录下创建private目录
[root@Yukino CA]# mkdir private
[root@Yukino CA]# ll
total 0
drwxr-xr-x 2 root root 6 Aug 25 09:49 private
- 再重新执行生成密钥对的命令
[root@Yukino CA]# (umask 077;openssl genrsa -out private/cakey.pem 2048)
Generating RSA private key, 2048 bit long modulus (2 primes)
...........+++++
..........+++++
e is 65537 (0x010001)
- 执行成功后空目录
private中就有密钥文件了
[root@Yukino CA]# cd private/
[root@Yukino private]# ll
total 4
-rw------- 1 root root 1679 Aug 25 09:52 cakey.pem
- 提取公钥(
仅仅是查看公钥的步骤,可以不做)
[root@Yukino CA]# openssl rsa -in private/cakey.pem -pubout
writing RSA key
-----BEGIN PUBLIC KEY-----
MIIBIjANBgkqhkiG9w0BAQEFAAOCAQ8AMIIBCgKCAQEAnSPAmuaV4hbmuL8eFxOc
eCFthnX2cLft6vhp2ZT+t+6oeCzFc8fMkDwo7Ia+6oUt15Z2FAU4mhqxDy0H4alf
XCF6IraUHxguaRhV6XQdEec97w4eAhxbmvCw2msUXIys2MvegFsKyAh/P8QY8VUX
jCEMOK5aybd6SWKznzha5Bb7YUnHsrJBW34lDgoolUinCRpqbnLQUvu58kfInQ6w
0LoWCxlalAVCnKpIhPMSp/OqRgSnoQltBHEFmk5cuX5hinZILfulnwO9xdUX0vc8
k+iMBwbfyGlI0KggWF+rizlCFvk5nwFWPPCWEtC0QuwhPbqDkoYynhtWFWvCqYOi
8QIDAQAB
-----END PUBLIC KEY-----
- 生成签署证书
[root@Yukino CA]# openssl req -new -x509 -key private/cakey.pem -out cacert.pem -days 365
You are about to be asked to enter information that will be incorporated
into your certificate request.
What you are about to enter is what is called a Distinguished Name or a DN.
There are quite a few fields but you can leave some blank
For some fields there will be a default value,
If you enter '.', the field will be left blank.
-----
Country Name (2 letter code) [XX]:CN
State or Province Name (full name) []:HB
Locality Name (eg, city) [Default City]:WH
Organization Name (eg, company) [Default Company Ltd]:www.yukino.com
Organizational Unit Name (eg, section) []:www.yukino.com
Common Name (eg, your name or your server's hostname) []:www.yukino.com
Email Address []:123@321.com
- 读取证书(
可以不执行)
[root@Yukino CA]# openssl x509 -text -in cacert.pem
- 创建三个目录(
certs、newcerts、crl)
[root@Yukino CA]# mkdir certs newcerts crl
- 创建序列号
[root@Yukino CA]# touch index.txt && echo 01 > serial
- 客户端(需要生成密钥的服务器)生成密钥
[root@Yukino CA]# cd /etc/httpd && mkdir ssl && cd ssl
[root@Yukino ssl]# (umask 077;openssl genrsa -out httpd.key 2048)
Generating RSA private key, 2048 bit long modulus (2 primes)
...............................................................................................................................................................................+++++
........................................................................................+++++
e is 65537 (0x010001)
- 客户端生成密钥签署请求
[root@Yukino ssl]# openssl req -new -key httpd.key -days 365 -out httpd.csr
此处不设置密码
Please enter the following 'extra' attributes
to be sent with your certificate request
A challenge password []:
An optional company name []:
[root@Yukino ssl]# ll
- 客户端把证书签署请求文件发送给CA(
CA为本地时无需此操作)
scp httpd.csr root@CA端IP:/root
- CA签署客户端提交的请求证书
[root@Yukino ssl]# openssl ca -in ./httpd.csr -out httpd.crt -days 365
Using configuration from /etc/pki/tls/openssl.cnf
Check that the request matches the signature
Signature ok
Certificate Details:
        Serial Number: 1 (0x1)
        Validity
            Not Before: Aug 25 14:18:56 2020 GMT
            Not After : Aug 25 14:18:56 2021 GMT
        Subject:
            countryName               = CN
            stateOrProvinceName       = HB
            organizationName          = www.yukino.com
            organizationalUnitName    = www.yukino.com
            commonName                = www.yukino.com
            emailAddress              = 123@321.com
        X509v3 extensions:
            X509v3 Basic Constraints:
                CA:FALSE
            Netscape Comment:
                OpenSSL Generated Certificate
            X509v3 Subject Key Identifier:
                06:AD:BB:44:B7:4C:F5:72:44:F0:23:32:D3:3D:05:51:8F:B2:73:EC
            X509v3 Authority Key Identifier:
                keyid:83:05:40:EF:B8:50:10:14:37:60:AD:42:19:E6:06:5F:B4:E9:5C:6D

Certificate is to be certified until Aug 25 14:18:56 2021 GMT (365 days)
Sign the certificate? [y/n]:y


1 out of 1 certificate requests certified, commit? [y/n]y
Write out database with 1 new entries
Data Base Updated
- CA把签署好的证书httpd.crt发给客户端(
CA为本地时无需此操作)
scp httpd.crt root@客户端IP:/etc/httpd/ssl/
- 完成配置后删除
httpd.csr文件
[root@Yukino ssl]# rm -rf httpd.csr
[root@Yukino ssl]# ll
total 12
-rw-r--r-- 1 root root 4650 Aug 25 10:19 httpd.crt
-rw------- 1 root root 1679 Aug 25 10:08 httpd.key
配置https
- 安装mod_ssl模块
[root@Yukino ssl]# yum install -y mod_ssl
Updating Subscription Management repositories.
Unable to read consumer identity
This system is not registered to Red Hat Subscription Management. You can use subscription-manager to register.
Last metadata expiration check: 0:17:15 ago on Tue 25 Aug 2020 10:09:47 AM EDT.
Dependencies resolved.
========================================================
 Package Arch   Version                 Repo       Size
========================================================
Installing:
 mod_ssl x86_64 1:2.4.37-16.module+el8.1.0+4134+e6bad0ed
                                        AppStream 131 k

Transaction Summary
========================================================
Install  1 Package

Total size: 131 k
Installed size: 308 k
Downloading Packages:
Running transaction check
Transaction check succeeded.
Running transaction test
Transaction test succeeded.
Running transaction
  Preparing        :                                1/1
  Installing       : mod_ssl-1:2.4.37-16.module+e   1/1
  Running scriptlet: mod_ssl-1:2.4.37-16.module+e   1/1
  Verifying        : mod_ssl-1:2.4.37-16.module+e   1/1
Installed products updated.

Installed:
  mod_ssl-1:2.4.37-16.module+el8.1.0+4134+e6bad0ed.x86_64

Complete!
- 到
/etc/httpd/conf.modules.d下找到mod_ssl模块;查看00-ssl.conf
[root@Yukino ssl]# cd /etc/httpd/conf.modules.d/
[root@Yukino conf.modules.d]# ll
total 48
-rw-r--r-- 1 root root 3311 Aug 24 22:57 00-base.conf
-rw-r--r-- 1 root root 139 Sep 2 2019 00-dav.conf
-rw-r--r-- 1 root root 41 Sep 2 2019 00-lua.conf
-rw-r--r-- 1 root root 948 Aug 25 03:52 00-mpm.conf
-rw-r--r-- 1 root root 787 Sep 2 2019 00-optional.conf
-rw-r--r-- 1 root root 1073 Sep 2 2019 00-proxy.conf
-rw-r--r-- 1 root root 41 Sep 2 2019 00-ssl.conf
-rw-r--r-- 1 root root 88 Sep 2 2019 00-systemd.conf
-rw-r--r-- 1 root root 451 Sep 2 2019 01-cgi.conf
-rw-r--r-- 1 root root 45 Sep 2 2019 10-h2.conf
-rw-r--r-- 1 root root 57 Sep 2 2019 10-proxy_h2.conf
-rw-r--r-- 1 root root 496 Sep 2 2019 README
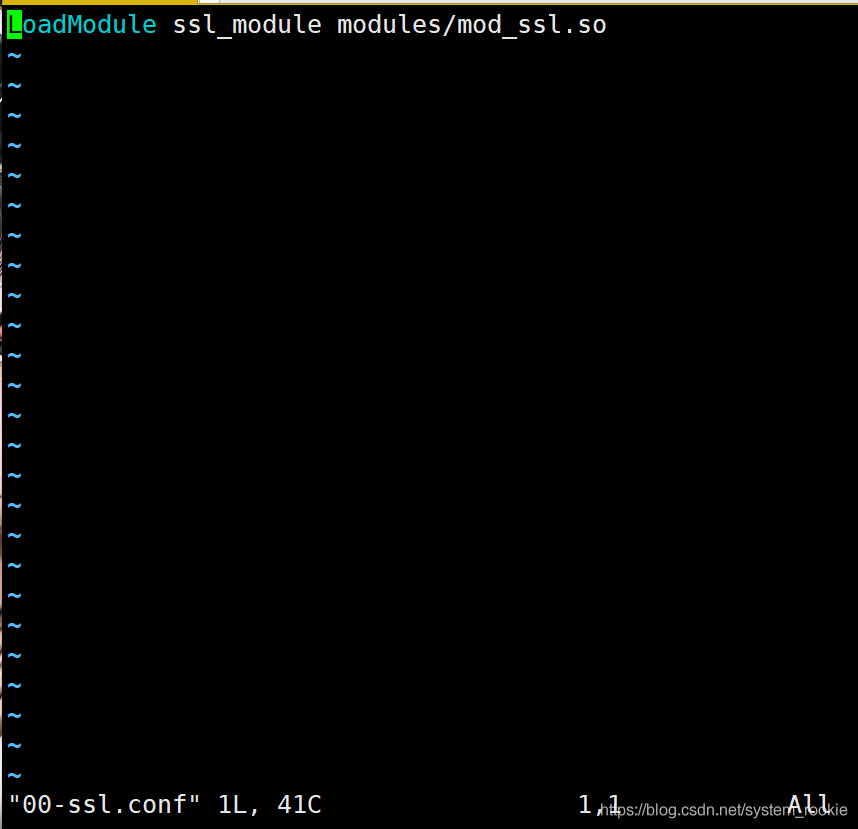
[root@Yukino conf.modules.d]# vim 00-ssl.conf
- 可以看出此模块已经启用
- 配置
httpd.conf文件,取消以下注释(此前版本需要将以下参数加入配置文件,redhat 8不需要)
#第一步中安装的mod_ssl实际上已经启用了该模块
LoadModule ssl_module modules/mod_ssl.so
#httpd.conf最后一行:IncludeOptional conf.d/*.conf实际上包含了以下两个参数
Include /etc/httpd24/extra/httpd-vhosts.conf
Include /etc/httpd24/extra/httpd-ssl.conf
- 在httpd-vhosts.conf中配置虚拟主机
上文已完成虚拟主机配置,此步骤跳过 - 在httpd-ssl.conf中配置证书的位置
[root@Yukino ~]# vim /etc/httpd/conf.d/ssl.conf
- 目录域名配置
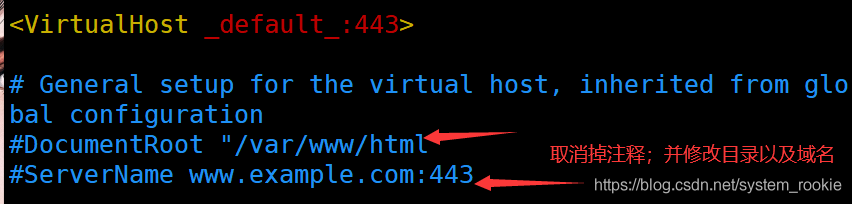
改完之后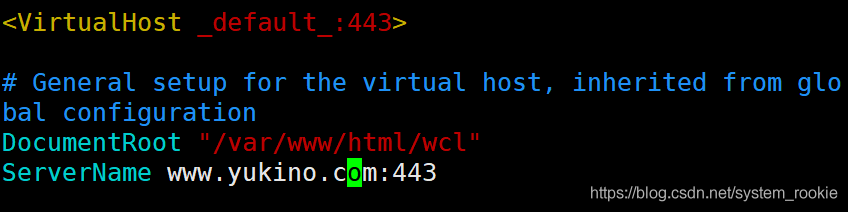
- 证书配置
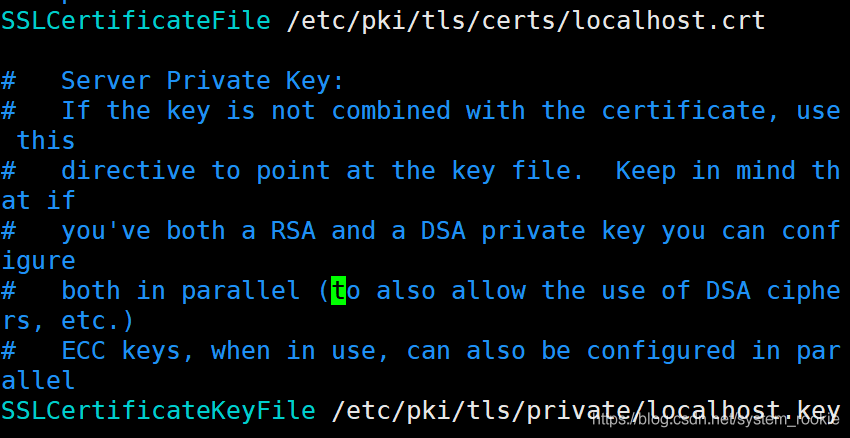
将刚刚生成的httpd.crt和httpd.key的绝对路径写进来
[root@Yukino ~]# cd /etc/httpd/ssl/
[root@Yukino ssl]# ll
total 12
-rw-r--r-- 1 root root 4650 Aug 25 10:19 httpd.crt
-rw------- 1 root root 1679 Aug 25 10:08 httpd.key
修改后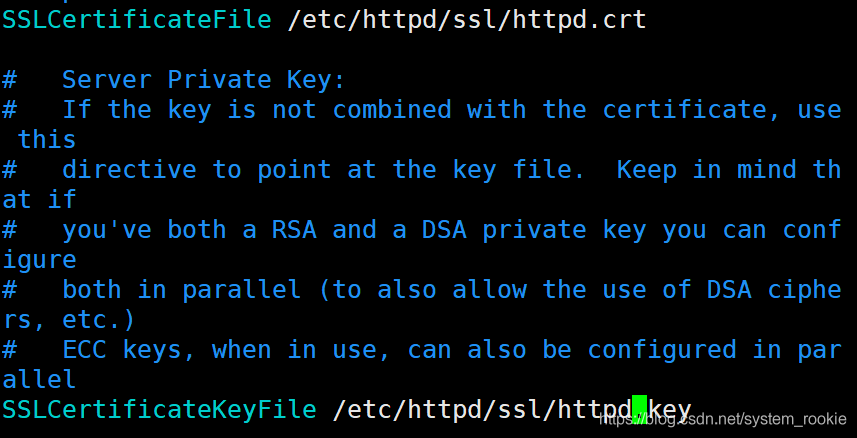
- 检查配置文件是否有语法错误
[root@Yukino ~]# httpd -t
Syntax OK
[root@Yukino ~]#
- 启动或重启服务
[root@Yukino ~]# systemctl restart httpd
- 设置hosts以便用域名访问(仅学习阶段,企业实际工作中无需做此步。)

- 查看443端口是否启用
[root@Yukino ~]# ss -antl
LISTEN0      128                  *:443               *:
- 搜索
https://域名测试是否成功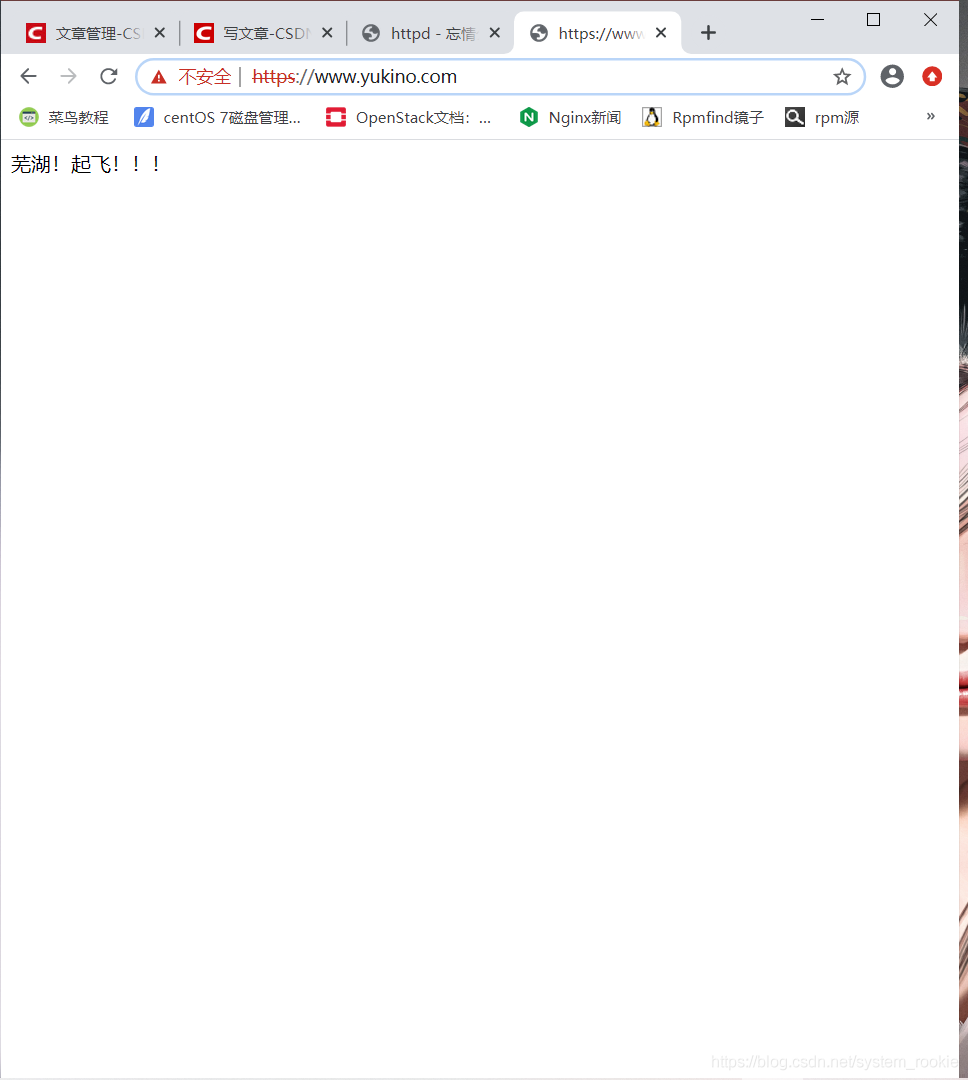
防火墙策略
- 查看所有防火墙策略
[root@Yukino ~]# firewall-cmd --list-all
public (active)
  target: default
  icmp-block-inversion: no
  interfaces: ens160
  sources:
  services: cockpit dhcpv6-client ssh
  ports:
  protocols:
  masquerade: no
  forward-ports:
  source-ports:
  icmp-blocks:
  rich rules:
	rule family="ipv4" source address="192.169.72.0/24" service name="http" accept
- 设置ipv4网段策略
[root@localhost ~]# firewall-cmd --add-rich-rule 'rule family=ipv4 source address=192.169.72.0/24 service name=http accept' --permanent
#--add-rich-rule:添加富规则
#rule family:家庭规则
#source addresss:源IP地址
#service name:服务名称(如果是httpd服务就写成http accept;如果是nginx服务就写成nginx accept)
#--permanent:永久生效(不添加此参数表示开机重启后策略不生效)
- 设置端口策略
root@Yukino ~]# firewall-cmd --add-rich-rule 'rule family=ipv4 source address=192.168.72.0/24 port port=81 protocol=tcp accept' --permanent
success
#port port=81:设置放行81端口的策略
#protocol=tcl accept:为tcp协议(如果使用的是UDP协议则改成udp accept)
- 刷新防火墙策略
[root@Yukino ~]# firewall-cmd --reload
success
使用semanage命令给本地添加新的TCP端口
- semanage命令所在的安装包
[root@Yukino ~]# yum provides *bin/semanage
Updating Subscription Management repositories.
Unable to read consumer identity
This system is not registered to Red Hat Subscription Management. You can use subscription-manager to register.
Last metadata expiration check: 0:01:59 ago on Tue 25 Aug 2020 11:39:24 AM EDT.
policycoreutils-python-utils-2.9-3.el8.noarch : SELinux
     ...: policy core python utilities
Repo        : @System
Matched from:
Other       : *bin/semanage

policycoreutils-python-utils-2.9-3.el8.noarch : SELinux
     ...: policy core python utilities
Repo        : BaseOS
Matched from:
Other       : *bin/semanage
- 查看提供本地http服务的TCP端口
[root@Yukino ~]# semanage port -l | grep http
http_cache_port_t              tcp      8080, 8118, 8123, 10001-10010
http_cache_port_t              udp      3130
http_port_t                    tcp      80, 81, 443, 488, 8008, 8009, 8443, 9000
pegasus_http_port_t            tcp      5988
pegasus_https_port_t           tcp      5989
- 给http服务添加新的TCP端口
[root@Yukino ~]# semanage port -a -t http_port_t -p tcp 8888
#-a:添加
#-t:选择类型	#1.http_cache_port_t(tcp)
			#2.http_cache(udp)
			#3.http_port_t
			#4.pegasus_http_port_t
			#5.pegasus_https_port_t
#-p:添加tcp端口
- 8888端口已经添加
[root@Yukino ~]# semanage port -l | grep http
http_port_t                    tcp      8888, 80, 81, 443, 488, 8008, 8009, 8443, 9000
- 设置8888端口防火墙策略
[root@Yukino ~]# firewall-cmd --add-rich-rule 'rule family=ipv4 source address=192.168.72.0/24 port port=8888 protocol=tcp accept' --permanent
[root@Yukino ~]# firewall-cmd --reload
success
[root@Yukino ~]# firewall-cmd --list-all
public (active)
  target: default
  icmp-block-inversion: no
  interfaces: ens160
  sources:
  services: cockpit dhcpv6-client ssh
  ports:
  protocols:
  masquerade: no
  forward-ports:
  source-ports:
  icmp-blocks:
  rich rules:
	rule family="ipv4" source address="192.169.72.0/24" service name="http" accept
	rule family="ipv4" source address="192.168.72.0/24" port port="81" protocol="tcp" accept
	rule family="ipv4" source address="192.168.72.0/24" port port="80" protocol="tcp" accept
	rule family="ipv4" source address="192.168.72.0/24" port port="8888" protocol="tcp" accept
访问测试: